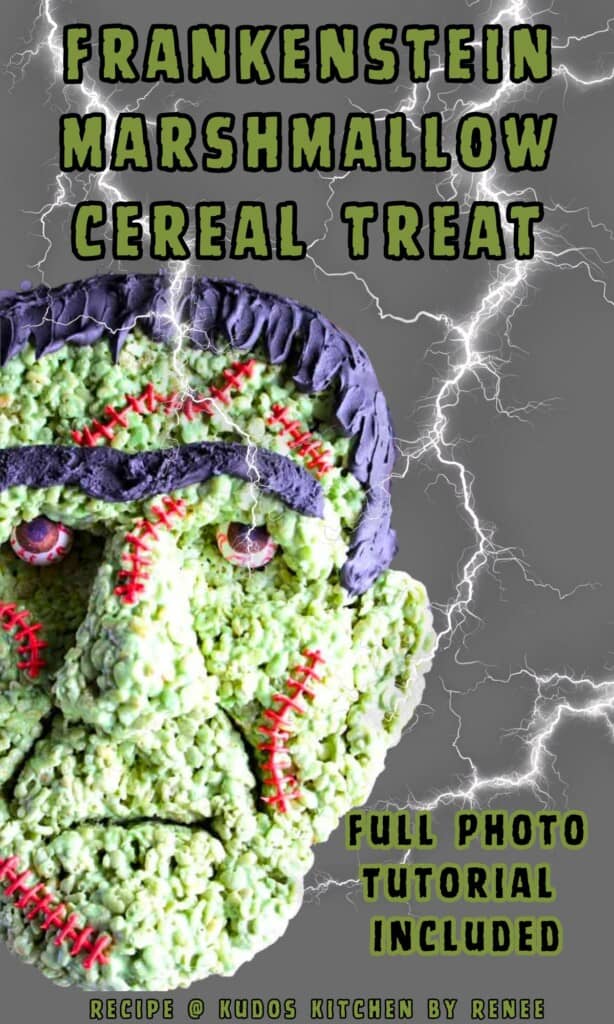
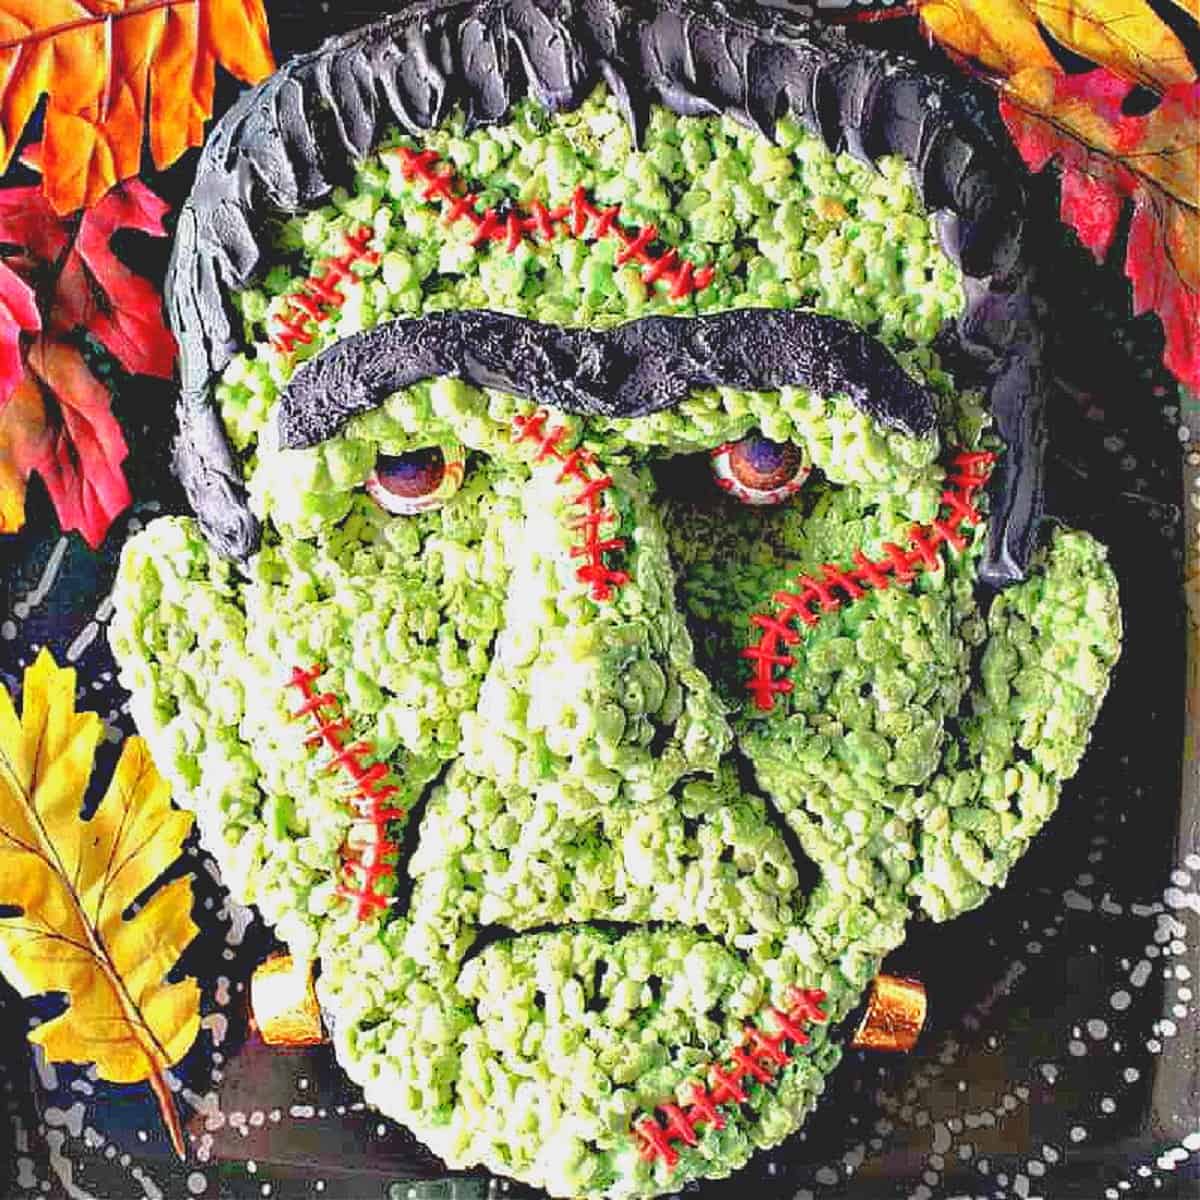
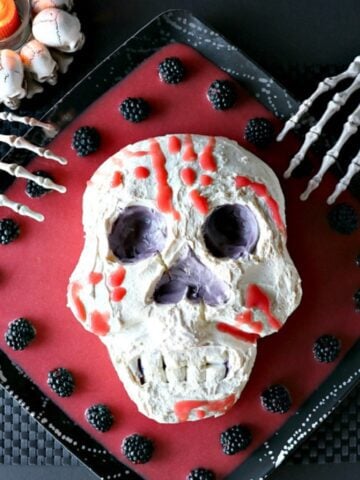
Surprise and delight all the goblins you know by serving up this easy to make freaky Frankenstein Rice Krispie Treat. Think he's too difficult to make? Think again! I'm sharing all my tips and TRICKS with an easy-to-follow step-by-step photo tutorial.
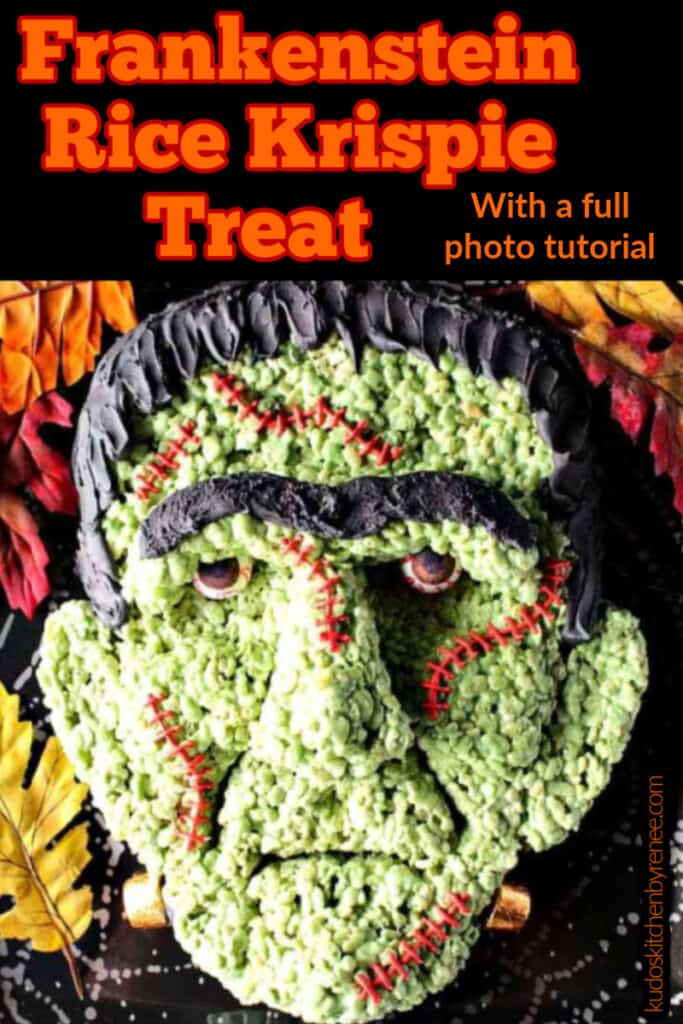
If you're intimidated or scared by the looks of this Frankenstein Rice Krispie Treat because you think you wouldn't have success making him yourself, I'm here to give you the evil eye (make that "eyes") and prove you wrong!
Stick with me (marshmallow humor) as I show you just how painless making this Frankenstein Rice Krispie Halloween Treat will be...
This recipe post and its contents may include affiliate links for your consideration. I may earn a commission from qualifying purchases, but your prices are never increased as a result. Thank you.
This recipe was originally shared in 2017. This post has been updated with additional information, including a recipe card and nutritional information, but the recipe itself has remained unchanged.
Table of Contents Found Here
- The ingredient list:
- Kitchen tools and equipment needed:
- Can freaky Frank marshmallow treat be made in advance?
- Can the colors be altered from what's written in the recipe?
- Helpful tips for making this realistic Frankenstein Rice Krispie Treat:
- How to color royal icing with gel food color:
- The photo instructions for making Frankenstein Rice Krispie Treat:
- Additional Halloween treats:
- Printable Recipe Card
- Frankenstein Rice Krispie Treat
- Please comment if you've made this recipe.

The ingredient list:
*Please note that the exact measurements along with a "shop the recipe" feature from Instacart and Walmart is available inside the printable recipe card.
- rice cereal
- butter
- marshmallows
- 2 - 1" white gumballs
- edible food markers
- gel food colors
- confectioners sugar
- meringue powder
- light corn syrup
- almond extract
Kitchen tools and equipment needed:
- 7 - 8-quart slow cooker
- medium mixing bowls
- spoons
- zip-top bags
- scissors
- air-tight containers
- serving platter
- non-stick baking spray or coconut spray
- paring knives
- spatula
- hand mixer
- measuring cups and spoons
- wooden spoon
- offset spatula
Can freaky Frank marshmallow treat be made in advance?
Yes!
Feel free to make him up to 3 days before you plan to serve him.
Cover him loosely with plastic wrap and keep him on the counter at room temperature.
Can the colors be altered from what's written in the recipe?
Of course.
These are only suggestions, and how I made him. Feel free to get as creative as you wish!
Helpful tips for making this realistic Frankenstein Rice Krispie Treat:
Tip #1:
The first tip I'm sharing (and probably the most important one) is to make the rice cereal marshmallow treat in a slow cooker!
Yes. That's right!
By making the rice cereal treat in a slow cooker it will keep the marshmallow cereal treat warm (not hot), and malleable enough to work with so you'll have time to push and pull Frank's facial features around until you're happy with the results.
Much like a mad scientist!

Save this for later.
Email forwarding service for saving information.
Tip #2:
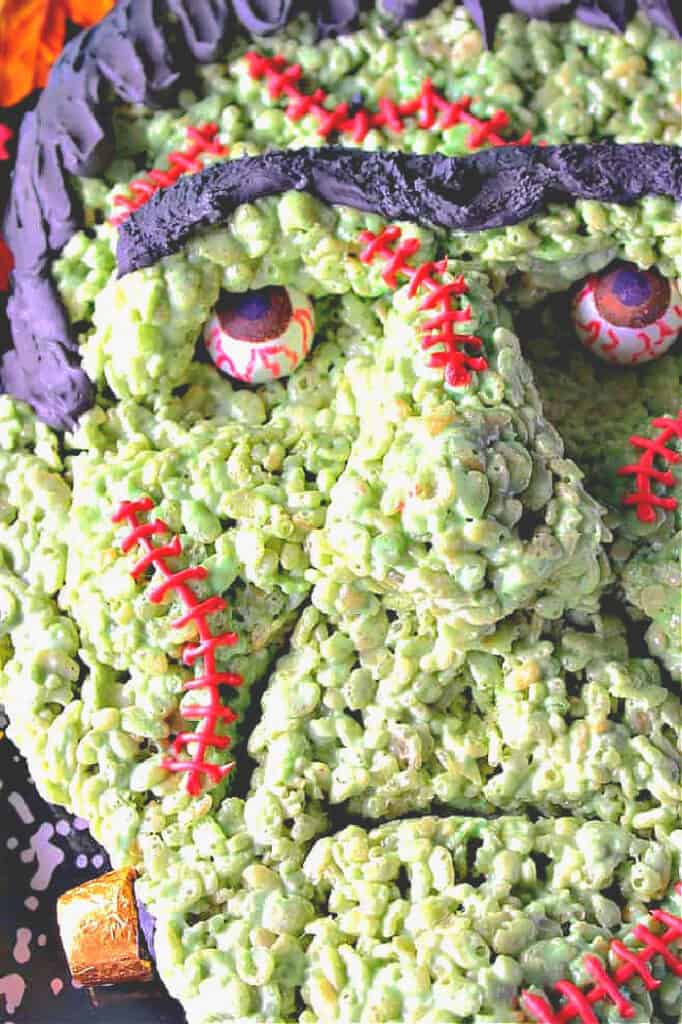
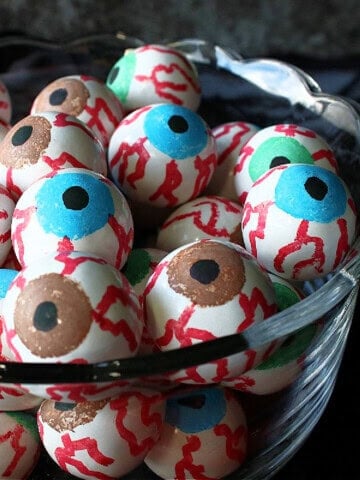
My second tip for making a realistic-looking Frankenstein is to use white gumballs for his eyeballs and color them with edible food markers.
The edible writer colors I've used to make his eyes are Red, Black, and Brown, but feel free to use any colors you choose.
These edible food writers dry almost immediately and won't smear or streak, even when working on a slick surface of a gumball.
I chose to make my Frankenstein's eyes brown, but I urge you to use your own creativity and make his eyes any color you like.
But, whichever color eyeballs you choose to go with, don't forget to add lots and lots of red squiggly veins!
Tip #3:
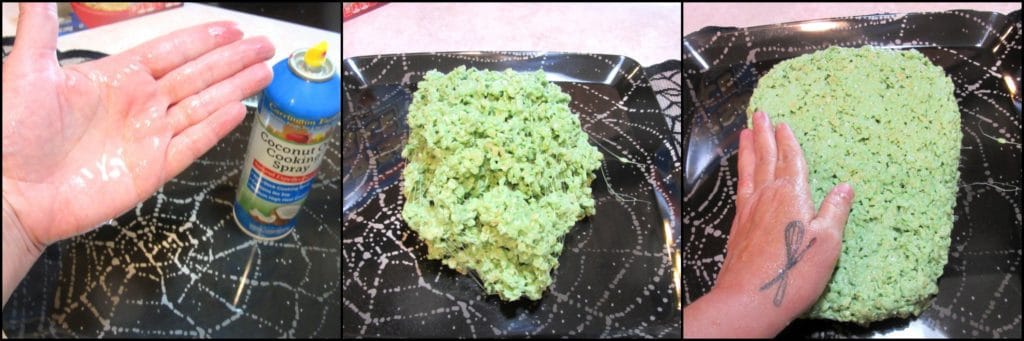
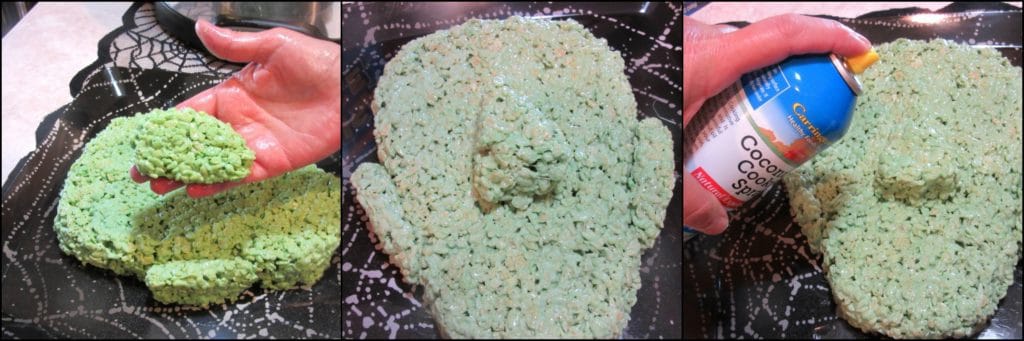
The third tip I have for you when making this Frankenstein rice cereal Halloween treat is to have plenty of baking spray handy and use it liberally on your hands and spoons to keep the marshmallow Krispies from sticking to all the wrong places.
It will keep Frank from becoming a major mess, and you can even spray it directly onto your project if needed.
Let me tell you, that bit helped me tremendously!
Tip #4:
The fourth tip I have for you is in making the royal icing.
I used that for Frankenstein's hair, eyebrows, and stitches.
I also used it for the glue needed to hold the Rolo candy in place for Frank's neck bolts.
Royal icing can be made in advance (no refrigeration required) and thinned with water if needed.
Once royal icing comes in contact with air for a prolonged period of time, it hardens and becomes firm.
Royal icing is still perfectly edible after it firms, but it won't smear or wipe off as a buttercream icing would.
After you've made your royal icing, keep it covered well until you're ready to use it.

Tip #5
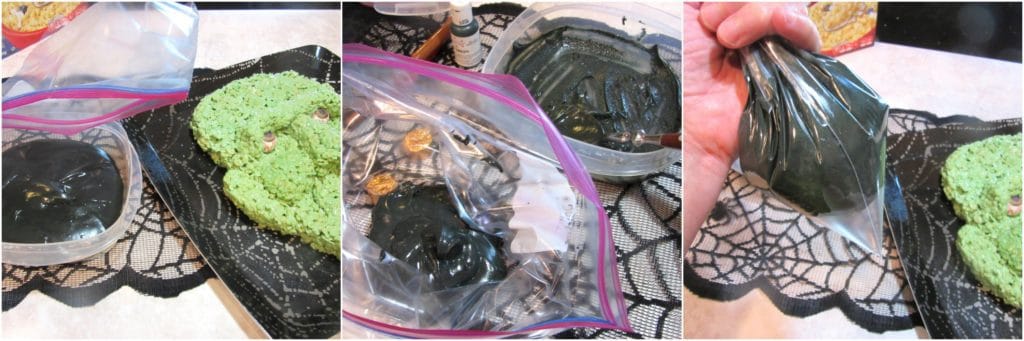
The fifth (and I believe final) tip I have for you in making this Frankenstein Rice Krispie Treat is to use plastic zip-top bags in place of parchment paper or piping bags.
Zip-top bags work just as well as piping bags as long as you make sure to get all of the icing into the bottom corner of the bag.
Once you do get the icing in the corner of the bag grip it as close to the icing as you can and twist the bag.
Use scissors to snip a piece of the corner tip (small snip for thin lines, larger snip for thick lines), and VIOLA! You now have a piping bag that works every bit as good as what the professionals use. See the photos below.
Tip #6:
WAIT! There's a sixth (and I promise), final tip for making this Frankenstein Rice Krispie Treat, and it's really THE BEST ONE OF ALL!
You can make the eyeballs and the royal icing IN ADVANCE so on the day you're ready to assemble freaky Frank, he'll go together in a snap!
How's that for making your party planning easier?!!
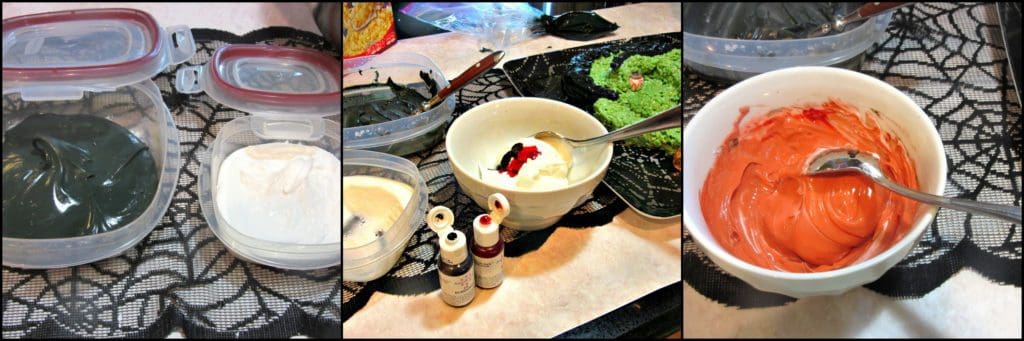
How to color royal icing with gel food color:
When coloring royal icing with Soft Gel Paste, I like to spoon an amount of white icing into smaller bowls and then drop bits of color into the icing and mix well.
Start with a small amount of color first, and add more if you desire a deeper color.
The complete directions are shown below.

The photo instructions for making Frankenstein Rice Krispie Treat:
- To make the eyeballs, use the edible writers to draw a circle in the center of a white gumball. Color the circle in.
- You may want to do two to three coats of color for a deeper color.
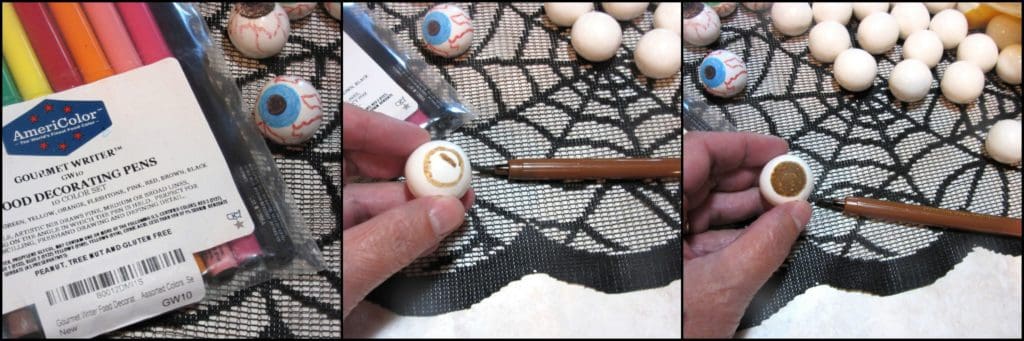
- Use the red writer to add the squiggly veins to each eyeball.
- Use the black writer to add the black pupils to each eyeball.
- Set the eyeballs aside until you're ready to insert them into Frank's head.

- To make the royal icing, place 3 cups of confectioners sugar in a large bowl.
- Add one teaspoon of pure almond extract and ¼ cup warm water to the bowl.
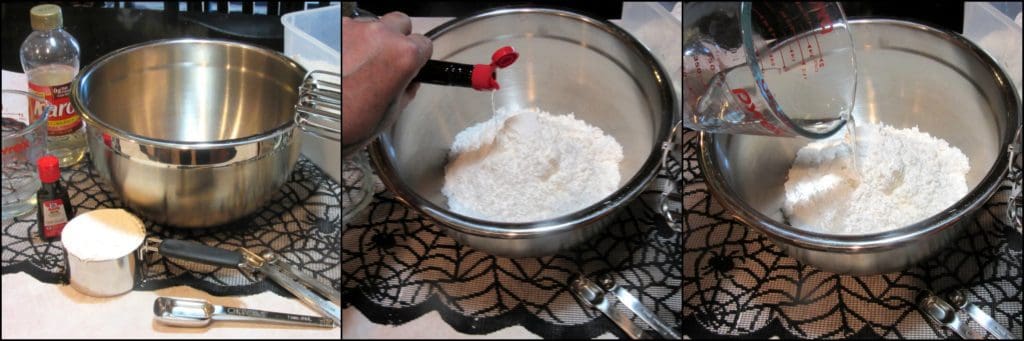
- Add 1½ tablespoons of light corn syrup.
- Blend with a hand mixer on low to medium to form a relatively firm icing but one that still flows evenly when dropped back into the bowl.
- Add in three tablespoons of meringue powder to the icing.
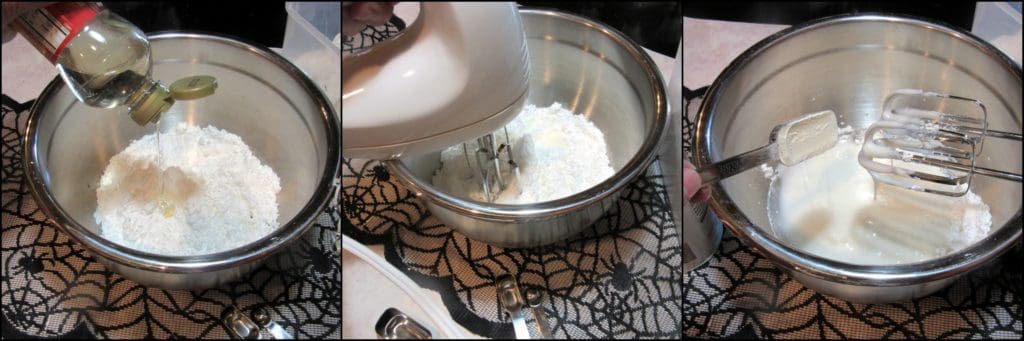
- Continue to beat on low speed for 1 - 2 minutes and the icing will thicken slightly. *Note - You're looking for a consistency a little looser than peanut butter.
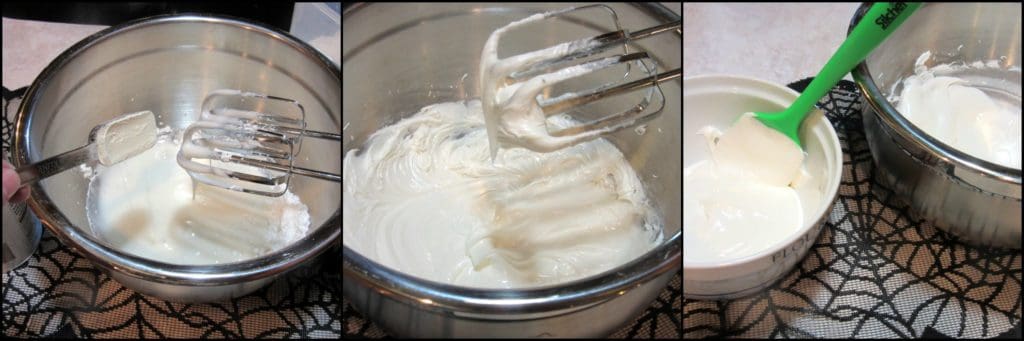
- Divide the icing into two bowls.
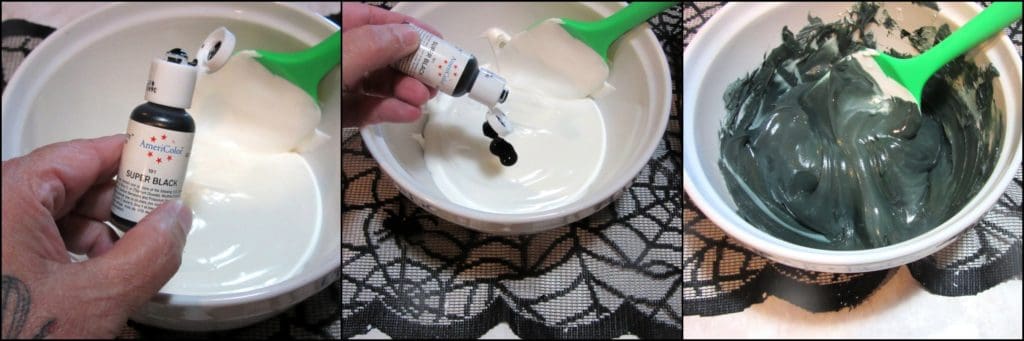
- In a medium bowl, add approximately 1½ cups of icing along with several drops of black gel paste. Stir well.
- If you prefer a darker hue, add additional drops of black gel color and mix until you achieve your desired color.
- In a smaller bowl add the remaining white icing.
- Stir in a few drops of red gel paste to the white icing, and a few drops of burgundy gel paste, and stir well to combine and make the color for Frank's stitches.
- Again, you can add additional gel food color for a deeper, darker hue, if desired. *Note - Royal icing can be made in advance. Place the colored or white icing in covered containers and store at room temperature until ready to use.
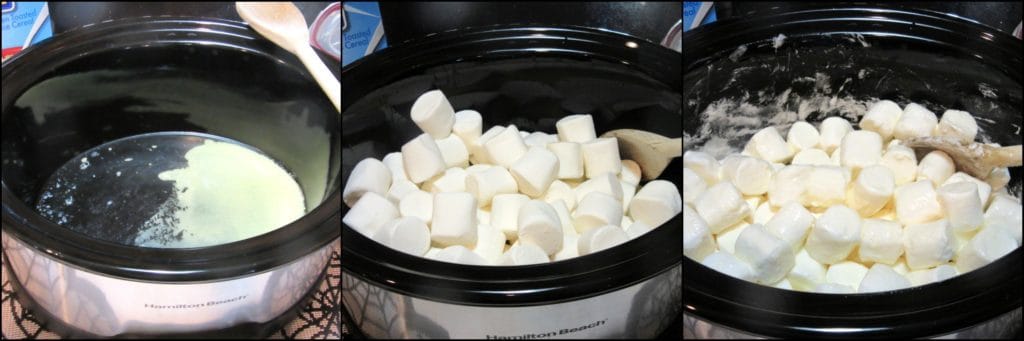
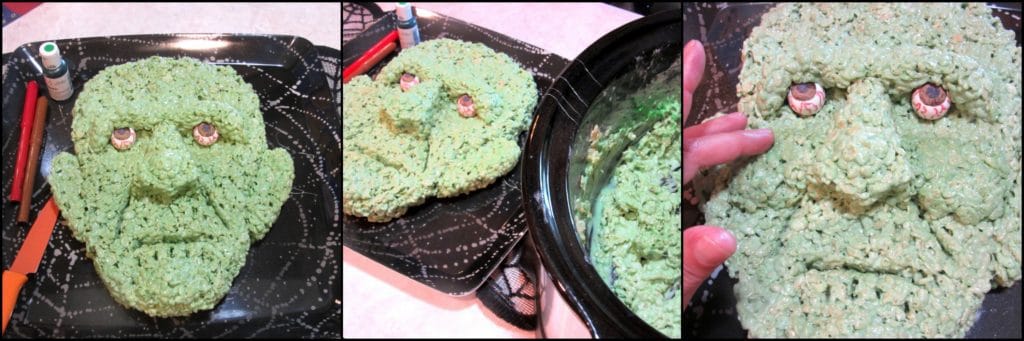
- Melt one stick of butter in a slow cooker over low heat. Add one bag of marshmallows and stir to coat all the marshmallows with the butter.
- Once the marshmallows have started to melt, add a few drops of leaf green gel paste, and a drop or two of chocolate brown gel paste.
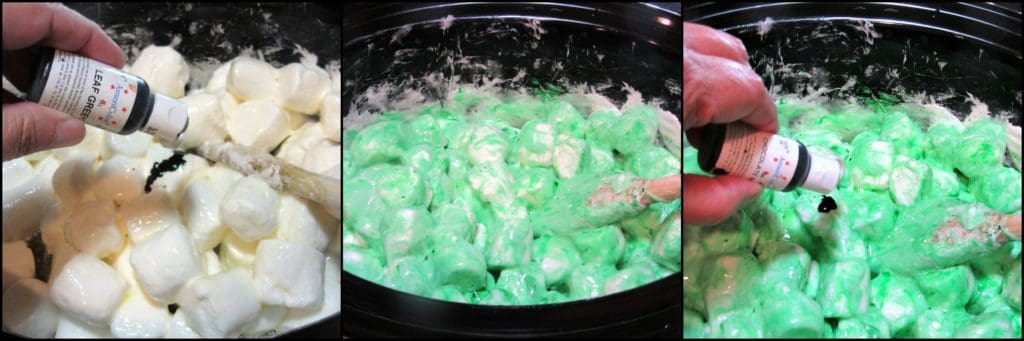
- Stir well to combine, and thoroughly mix the color so no streaks remain.
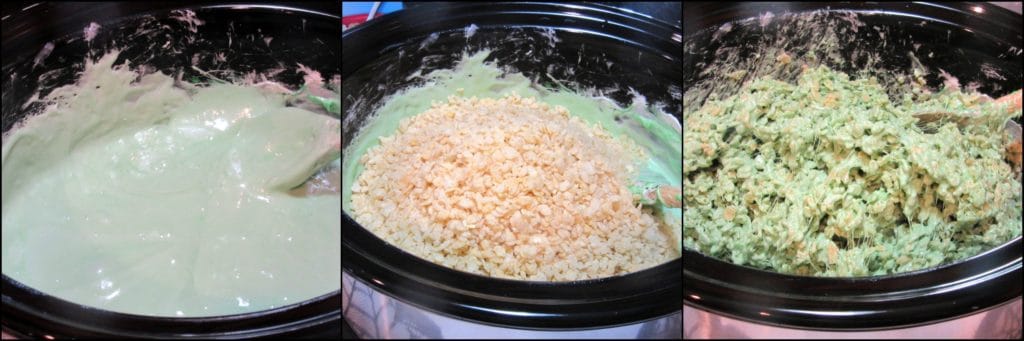
- Add the rice cereal and mix well with the green-tinted melted marshmallows.
To prevent massive sticking of the marshmallow treat cereal, spray your hands and work tools liberally with coconut oil or baking spray.
Place ⅔'s of the colored rice cereal treat onto a serving plate.
Use your sprayed hands to press the warm rice cereal treat into a modified rectangle, making Frank's forehead area slightly wider than his chin reign.
Frank's face dimensions are approximately 10" tall by 8" wide (without his ears).
- Using the remaining warm rice cereal treat in the slow cooker fashion two ears and affix them on either side of Frank's head.
- Also, make a triangle shaped nose and stick it in the center of his face, a little above the bottom of his ears. *Note - Remember to use the non-stick spray liberally. It will help you mold and sculpt the sticky rice cereal easily without excessive sticking to your hands and tools. The spray can be sprayed directly onto your project if needed.
- Take your time working and molding Frank's features until you're happy with the results.
- Add the gumball eyeballs to either side of Frank's face, next to the bridge of his nose, and press each eyeball gently to recess them slightly.
- Use more warm rice cereal to fashion a thick snake-like piece for Frank's evil forehead brow line.
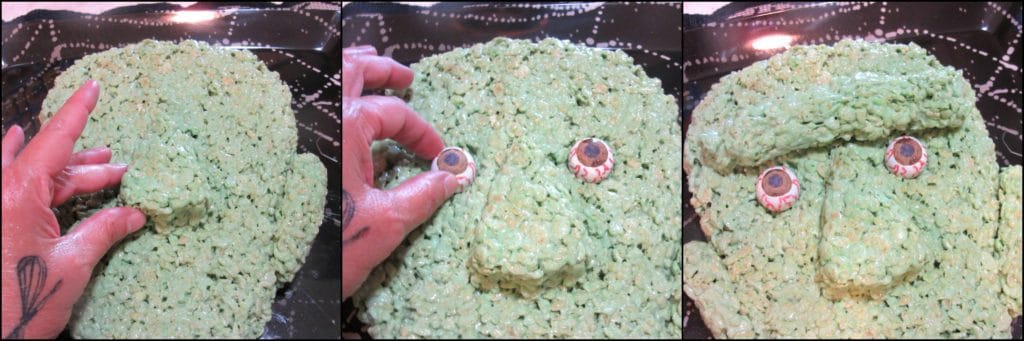
- Gently work with Frank's brow line, pulling and pushing the warm marshmallow cereal over the tops of his eyes (to hood them and make them creepy), and also form his brow line around the sides of each eye slightly. (see photo below)
- Then press the warm cereal area around and under each eyeball a bit to give his eyes a more sunken appearance. *Note -This step may be hard to tell from the photos, but doing this step gives him a lot of impact!
- Take a bit more marshmallow treat and build up his chin to give Frank more of a "manly" appearance.
- Use a paring knife sprayed liberally with non-stick spray and gently cut a slit for Frank's mouth that is turned ever so slightly down at both ends for his menacing frown.
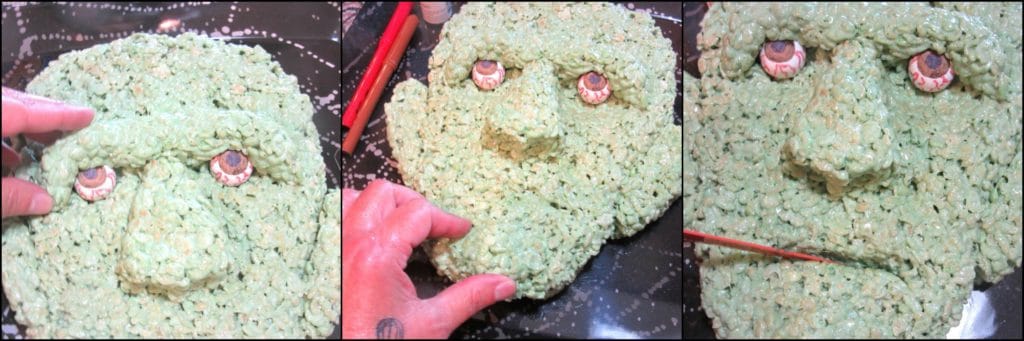
- Next, use the paring knife to add frown lines and wrinkle likes around his mouth to add character (see below).
- Finally, build up Frank's cheekbones with some additional warm cereal (remaining in the slow cooker). *Note - This cheekbone step helps to finish off the contours of his face and give him a realistic appearance.
- It's now time to put the finishing touches on Frank.
- Use a large zip-top plastic bag and scoop the prepared black royal icing into the corner of the bag.
- Push the icing into a bottom corner tip of the bag, twist, and snip off the corner to form a relatively large hole.
- This will be used to pipe Frank's hair on top of his head, above his ears (as sideburns), and slightly over his forehead in a fringe-like fashion. (See photos below)
- Apply firm and even pressure to pipe a jagged royal icing line of hair over Frank's forehead.
- Use a spatula or knife to gently smooth his hair in place, if desired.
- Use the same black icing to pipe Frank's unibrow.
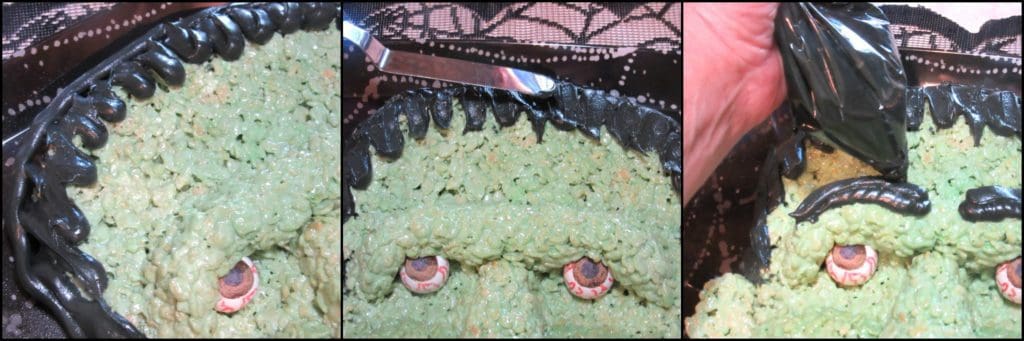
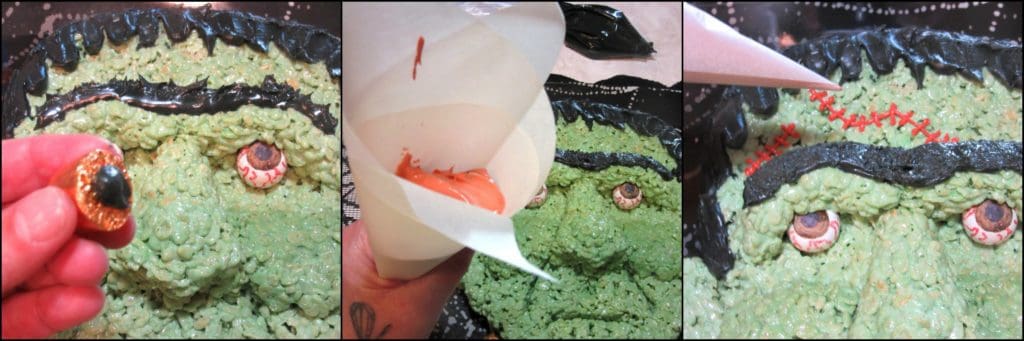
- Next, pipe a bit of royal icing onto two candy pieces (I used Rolo candy) and stick one on either side of Frank's chiseled jawline.
- Finally, use a small zip-lock bag (or a piping bag, seen in the photo) and spoon in the red royal icing.
- Snip off a small corner off the bottom corner of the bag (for piping thin lines), and carefully add as many stitches to Frank's face as you desire!
- There you have him. Done!
This Frankenstein Rice Cereal Halloween Treat is sure to be a giant hit with your family and friends and will make you the talk of the town, in the very best way of course!

Additional Halloween treats:
Twice Baked Idaho Potato Graves
Halloween Treats Recipe Roundup
Don't look now, but somebody's watching you!! HAPPY HAUNTINGS!

When you make today's recipe (and I hope that you will), I'd appreciate it if you'd take the time to come back and give it a star rating along with a comment on why you rated as you did.
Search engines such as Google appreciate comments and ratings and, in turn, will show my recipes to more people. Please look for the pink star rating box within the printable recipe card. Thank you!!
Printable Recipe Card

Frankenstein Rice Krispie Treat
Ingredients
To make the eyeballs:
- 2 - white 1" gumballs
- 3 food writer pens. Red Brown, Black
To make the royal icing:
- 3 cups confectioner's sugar
- 1 teaspoon pure almond extract
- ¼ cup warm water
- 1½ tablespoons light corn syrup
- 3 tablespoons dry meringue powder
- Gel food color. Red Burgundy, and Ultra Black
To make the marshmallow rice cereal:
- 1 stick (8 tablespoons) stick butter
- 6 cups of crisp rice cereal
- 1 bag marshmallows regular size marshmallows
- Gel food color. Leaf Green and Chocolate Brown
Instructions
To make the gumball eyeballs:
- Draw and color in a circle on two gumballs to resemble an iris in size comparison to the gumball.
- Use the red writer to draw squiggly lines to represent the veins.
- Draw a black circle in the center of each iris to represent the pupil.
- Set aside until ready to assemble Frankenstein.
To make the royal icing:
- In a large bowl, use a hand blender to beat the sugar, almond extract, water, corn syrup, and meringue powder. The consistency will be that of loose peanut butter. Add additional water if needed.
- Divide the royal icing into two bowls.
- One bowl should have approximately 2 cups of the icing. Add several drops of Gel Paste Food Color to the bowl and stir well to thoroughly combine. Add more color if you prefer a darker color.
- In a smaller bowl, add a few drops of red, and a few drops of burgundy Gel Paste Food Color to the remaining white royal icing and stir well to combine. Add more color if you prefer a darker color.
- Cover both bowls well and store at room temperature if making the icing in advance. No need to refrigerate.
To make and shape the Frankenstein rice cereal treat:
- Melt the butter in a slow cooker over medium heat.
- Add the marshmallows to the cooker and stir until they're coated with the butter and starting to melt.
- Add a few drops of Leaf Grean Gel Paste Food Color to the marshmallows along with a few drops of Chocolate Brown. Stir well to combine and until the marshmallows are completely melted and there are no streaks of color in the mix.
- Stir in the crisp rice cereal and mix well to completely combine the marshmallows with the cereal.
- Turn the cooker heat to low.
- Use non-stick cooking spray on hands and utensils as you mold Frankenstein's face into place on a serving platter.
- Press Frank's gumball eyes in place and recess them slightly.
- Continue working the warm cereal to finish Frank's features. See blog post.
- https://www.kudoskitchenbyrenee.com/frankenstein-rice-cereal-halloween-treat/
- Pipe the black royal icing in place to form Frank's hair and unibrow.
- Pipe red stitches in desired areas on Frank's face.
- Add two candies (using the royal icing as glue) to the sides of Frank's jawline as his bolts.
- Allow the royal icing to lightly dry before covering.
- No need for refrigeration. Will keep for up to one week.
- Serve and enjoy.
Notes
Nutrition
I sincerely hope you've enjoyed my freaky Frankenstein Rice Krispie Treat as much as I've enjoyed bringing him to you!
Should you have any questions or comments regarding anything you've seen on my site, please don't hesitate to reach out to contact me. It is always my distinct pleasure to get back with you just as soon as I possibly can!
Thank you so much for visiting me today in my Kudos Kitchen. I hope you found something you'll love and that you will come back and visit me often. Please know that there is always room for you around my kitchen table!
Until we eat again, I hope you have a delicious day!


All of the recipes you'll find here on my website are in loving memory of my son, Greg, who left this earth far too soon and will be forever in our hearts.

Britni says
So creative & awesome! Thank you!
Renée says
You're welcome. It has been my pleasure!
Tara Kuczykowski says
Oh my gosh, this is SO fun for Halloween! My kids will love it.
Renée says
It takes a little preparation time, but it's well worth it. I do hope you'll give him a try. Thanks, Tara.
Renée says
Yep. Big and little kids alike love this fun treat! Thanks, Tara!
Carolyn Ingram says
This is amazing!
Renée says
Thank you, Carolyn! I do hope you'll make Frankenstein in your own kitchen. You'll have so much fun!
Liren | Kitchen Confidante says
This is work of art!!! You're amazing!
Renée says
Thank you so much, Liren. I'm having fun with my food and anyone can (should) do it!
Phoebe Hendricks says
I don't know that mine would ever come out looking this amazing, but man do I want to try it!
Renée says
You can do this!! Your Frankenstein might not look exactly like mine, but he'll still look great! I know it!!
Anna @ Crunchy Creamy Sweet says
This is the best Frankenstein treat ever! So creative!
Renée says
Thanks, Anna! 🙂
Jocelyn (Grandbaby Cakes) says
This looks delicious and a novel idea for the kiddies!
Renée says
Thank you, Jocelyn!
Abeer says
OMG! It seeams to be so real! Fantastic!
Renée says
hehehe! Thanks 😉
carrieffm says
This is amazing!! And the slow cooker tip is genius. 🙂
Renée says
Right? It's a game changer for this type of thing.
Erin @ Texanerin Baking says
This looks so amazing! What a fun treat for Halloween!
Patricia @ Grab a Plate says
Love the marshmallow humor 😉 And I LOVE this adorable (scary?) treat! This will bring a lot of smiles and cheer to anyone who sees it! You're so creative!
TheChunkyChef says
Such a fun and festive Halloween treat!! Those step by step photos are SO helpful!
Renée says
Thank you. I'm glad you find them helpful!
Jen says
This is seriously a work of art! You really outdid yourself this time and I'm excited to try my hand at this. I'm definitely not as artistic as you but I love the way you broke down each step to help out a novice like me!
Renée says
Jen, I really hope you make him. I'm so happy that you appreciate the photos. I tried to break it down so it wasn't intimidating. If you make him I'd love to see your finished Frank.
betsycohen says
I can't even begin to describe how much I LOVE this project! You are beyond clever and creative and the way you show the step-by-step pics, really allows me to visualize what I need to do to make my own Frankenstein. Sharing on Desserts Required's FB page mañana. <3
Renée says
So glad you find the step-by-step photos helpful, Betsy! Thanks for all the kind words, and thanks for sharing!!!
Katrina says
Thanks for the great tutorial! Would the colors be available at craft stores or better to just get online? Might take me a couple weeks but I'm gonna try it.
Renée says
It's best to use the links I've supplied and purchase the colors online, Katrina. Thanks for asking!
Katrina Scott Smith says
Grr, I looked and looked at your post for links before asking but probably missed it because I was on my phone. K, I'll find them on my computer. Thanks!
Claudia Lamascolo says
sensational post ... you did them proud congratulations! I love this!
Renée says
That means the world to me. Thank you so much, Claudia!!