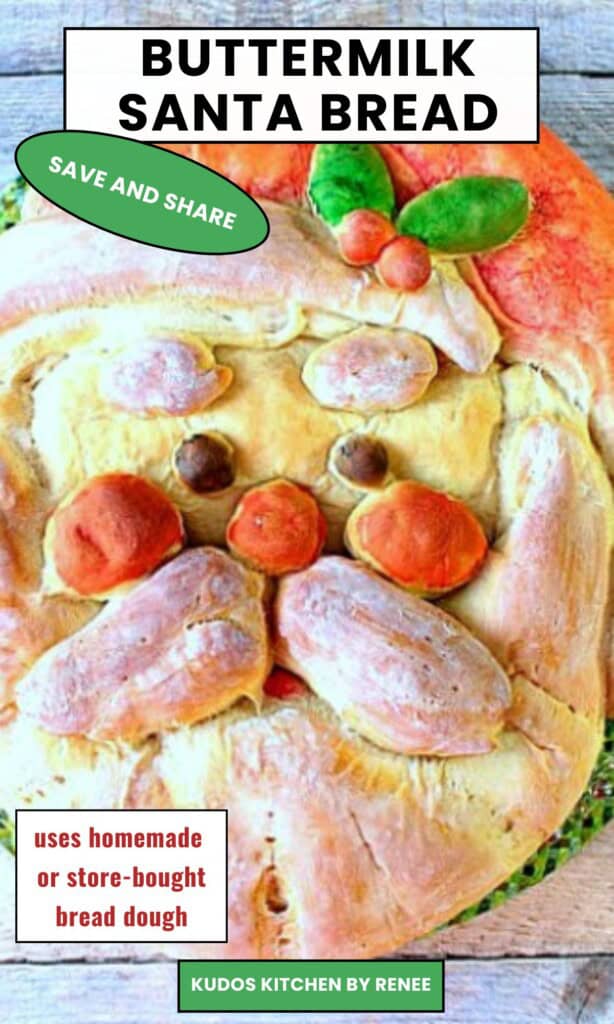
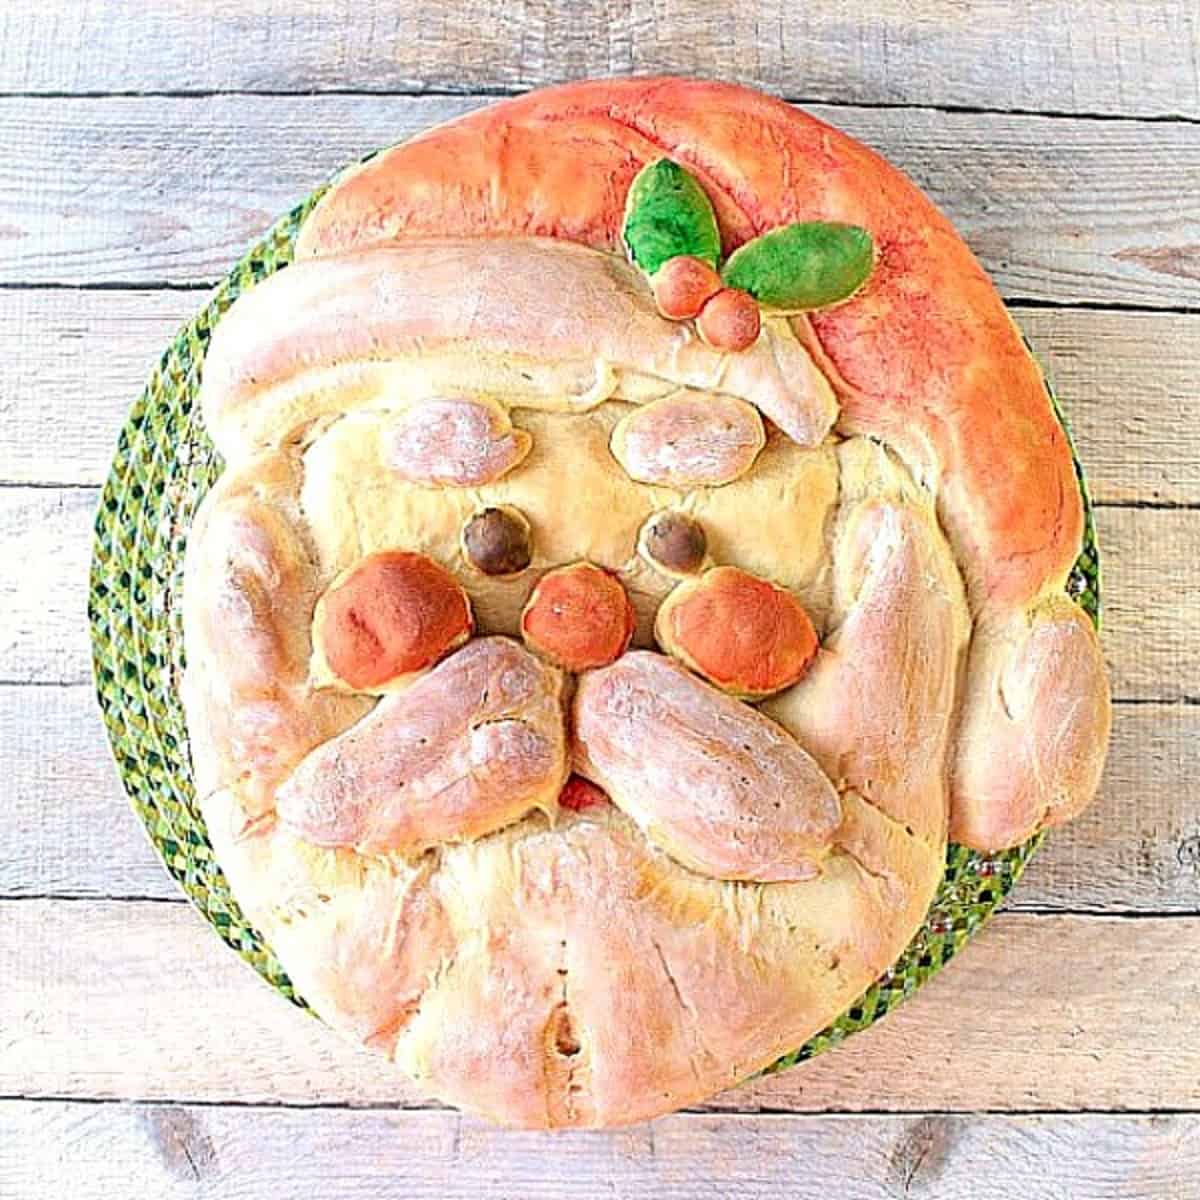
Buttermilk Santa Shaped Bread is as whimsical as he is delicious. With my easy-to-follow step-by-step instructions, he'll be on your holiday table in no time.

People are starting to send me photos of their completed Santa bread creations and it warms my heart, as well as my kitchen! Follow me on my socials (FB and IG and you'll see the amazing reader recreations I'm talking about.
For other fun, whimsical and charming Christmas treats that are as much fun to make as they are to eat, check out the following recipes: Grinch Guacamole, Rudolph the BREAD-Nosed Reindeer, 3D Rice Krispies Christmas Tree, and Pecan Pie with Poinsettia Crust.
This recipe post and its contents may include affiliate links for your consideration. I may earn a commission from qualifying purchases, but your prices are never increased as a result. Thank you.
Table of Contents Found Here

Can this Santa bread be made with store-bought dough?
The recipe I'm sharing here is a good one.
However, if you're interested in making a Shaped Santa bread, but don't want to go to the trouble of making your own dough, by all means, you can buy some store-bought frozen dough and follow the thawing and rising directions on the package.
From that point proceed with the recipe using the steps I'm sharing for assembling this adorable Shaped Santa Bread.

The ingredient list:
*Please note that the exact measurements along with a "shop the recipe" feature from Instacart and Walmart is available inside the printable recipe card.
- active dry yeast
- sugar
- warm water
- buttermilk
- honey butter
- salt
- all-purpose flour

Tips and tricks for making shaped Santa Bread:
- Don't be afraid to apply pressure to the dough pieces you use for making all his facial elements. Since bread dough is elastic, it may take you a bit of working with to get the dough to conform to what shape you're trying to achieve.
- Don't forget to lightly flour your work surface, but make sure not to over-flour.
- When attaching pieces of dough to one another, use a bit of tap water and a little light pressure to press the pieces gently to each other but without distorting their shape.
- When making slits in Santa's beard and mustache, deeper is better, and a sharp paring knife is essential. Going over the same cuts more than once is better than trying to cut too deeply on the first slice. I wish I would have followed my own advice on this step because many of my cuts kind of disappeared once Santa spent time in the oven. *Note - The cutting is optional but adds a fun bit of detail.
- Finally, if you've decided to add color to Buttermilk Honey Shaped Santa Bread after baking, please, please, please dilute your food coloring with plenty of water and test a small area first. The object is to give Santa a light kiss of color and not to make him into a beacon in the night. That's Rudolph's job!

Save this for later.
Email forwarding service for saving information.
The step-by-step photo instructions:
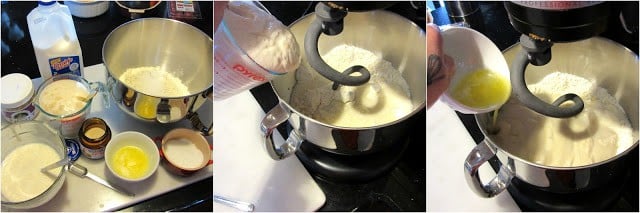
- In a small bowl, dissolve the yeast in the warm water. Add the sugar and allow the mixture to sit and get foamy (about 5 minutes).
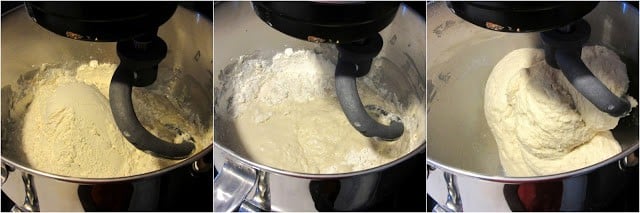
- In the bowl of a stand mixer with the dough hook, combine 3 cups of flour, the foamy yeast mixture, buttermilk, butter, honey, and salt. Mix in an additional 3 cups of flour and mix until the dough forms a softball. Turn the dough out onto a lightly floured surface and knead by hand until the dough is smooth and elastic. *Note - You may need to work in the remaining ½ cup of flour if the dough is extremely sticky.
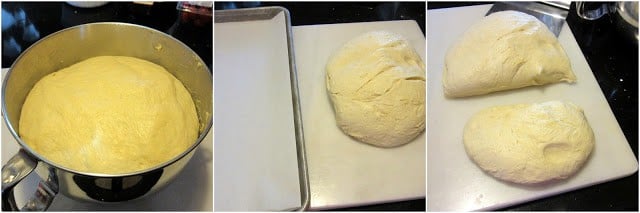
- Spray the inside of the bowl lightly with olive oil spray. Return the dough to the bowl and spray the top lightly with olive oil. Cover the bowl with plastic wrap and place the bowl in a warm, draft-free place until the dough has doubled in bulk (approximately 1 hour).
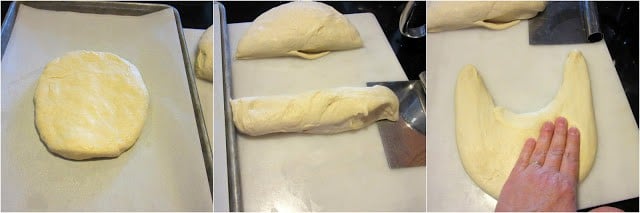
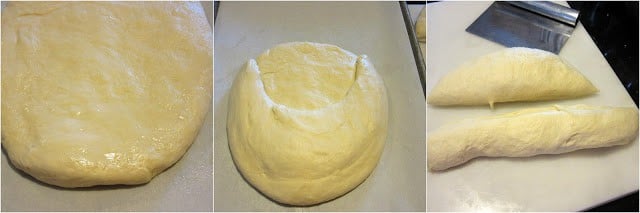
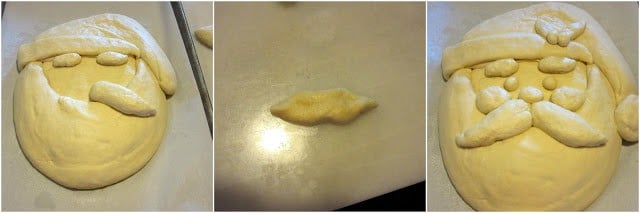
- Turn the risen dough out onto a lightly floured surface and divide the dough in half. Working on a baking sheet that has been lined with parchment paper, press half of the dough out to form a slightly oblong oval (approximately 1" thick) in the center of the baking sheet. This is the base for Santa's face.
- Cut off approximately ⅓ of the remaining dough ball and form a modified "U" shape which will form Santa's beard. Make sure to leave more dough at the bottom of the shape and taper it on each side. Use water to adhere the beard to Santa's face, pulling and patting until you get your desired shape.
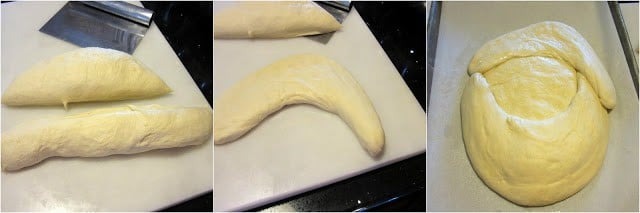
- Cut off another piece of dough from the remaining ball and form it into a slight boomerang shape. This will be Santa's hat. Adhere the hat onto the top of Santa's face using water and press and pull it into your desired shape. *Note - I pulled and pushed the dough for Santa's hat down on the right side at a jaunty angle.
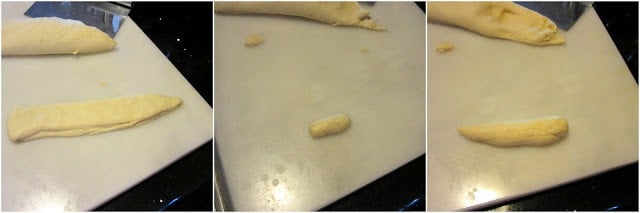
- Cut another piece of dough from the remaining piece and form a long, modified triangle shape. This will be the trim on Santa's hat.
- Adhere the trim to the hat using water and press it into place.
- With the remaining dough, pinch or cut off pieces that will form 2 sides of Santa's mustache, 1 nose, 2 cheeks, two eyes, holly leaves and berries (if desired), and the ball at the end of Santa's hat. Attach all the elements with water.
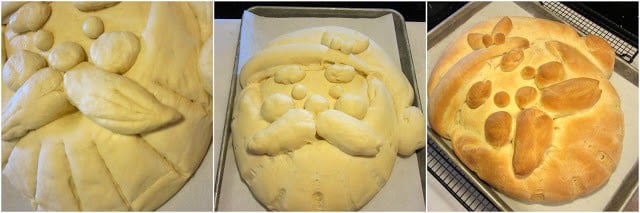
- Use a very sharp paring knife to cut slits in Santa's beard, and also to add details to the holly berries. *Note - It's easier to make several shallow cuts than one deep one. The deeper the cut the more the details will show after the second rise and bake.
- Place the completed Santa in a warm, draft-free place to rise a second time (approximately 45 minutes). Once risen, preheat the oven to 375 degrees and bake Santa in a preheated oven for 35-40 minutes, or until he's golden brown and sounds hollow when tapped.
- Cool Santa completely.
- If adding color, mix a small drop of each of the colors with about 1 tablespoon of water.
- Use a clean paintbrush to lightly brush color onto Santa's hat, beard, eyes, cheeks and nose, and holly berries. If you'd like a deeper color, add two or more coats, drying in between each coat.
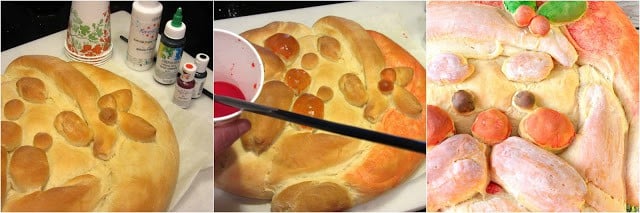
To color or not to color? That is the question
Once you've assembled Santa's shape, and have allowed him to rise and bake, you can decide if you'd like to add a little festive color to him by using food coloring that's been thinned with water. Or, you can leave him plain and golden brown. The call is yours!
But either way, you make him... just make sure you do! Making this Shaped Santa bread will hopefully become a fun family tradition that you can pass down for generations.


Additional shaped bread recipes:
When you make today's recipe (and I hope that you will), I'd appreciate it if you'd take the time to come back and give it a star rating along with a comment on why you rated as you did.
Search engines such as Google appreciate comments and ratings and, in turn, will show my recipes to more people. Please look for the pink star rating box within the printable recipe card. Thank you!!
Printable Recipe Card

Buttermilk Santa-Shaped Bread
Equipment
- stand mixer with dough hook (optional)
Ingredients
- 1 package active dry yeast 3½ teaspoons
- 1 teaspoon granulated sugar
- ¾ cup warm water 110-115 degrees
- 1½ cup buttermilk
- 3 tablespoons butter melted
- 3 tablespoons honey
- 1 tablespoon salt
- 6½ cups all-purpose flour plus additional if needed
Instructions
- In a small bowl, dissolve the yeast in the warm water. Add the sugar and allow the mixture to sit and get foamy (about 5 minutes).
- In the bowl of a stand mixer with the dough hook, combine 3 cups of flour, the foamy yeast mixture, buttermilk, butter, honey, and salt. Mix in an additional 3 cups of flour and mix until the dough forms a softball. Turn the dough out onto a lightly floured surface and knead by hand until the dough is smooth and elastic. *Note - You may need to work in the remaining ½ cup flour if the dough is extremely sticky.
- Spray the inside of the bowl lightly with olive oil spray. Return the dough to the bowl and spray the top lightly with olive oil. Cover the bowl with plastic wrap and place the bowl in a warm, draft-free place until the dough has doubled in bulk (approximately 1 hour).
- Turn the risen dough out onto a lightly floured surface and divide the dough in half. Working on a baking sheet that has been lined with parchment paper, press half of the dough out to form a slightly oblong oval (approximately 1" thick) in the center of the baking sheet. This is the base for Santa's face.
- Cut off approximately ⅓ of the remaining dough ball and form a modified "U" shape which will form Santa's beard. Make sure to leave more dough at the bottom of the shape and taper it on each side. Use water to adhere the beard to Santa's face, pulling and patting until you get your desired shape.
- Cut off another piece of dough from the remaining ball and form it into a slight boomerang shape. This will be Santa's hat. Adhere the hat onto the top of Santa's face using water and pressing and pulling it into your desired shape. *Note - I pulled and pushed the dough for Santa's hat down on the right side at a jaunty angle.
- Cut another piece of dough from the remaining piece and form a long, modified triangle shape. This will be the trim on Santa's hat. Adhere the trim to the hat using water and pressing it into place. With the remaining dough, pinch or cut off pieces that will form 2 sides of Santa's mustache, 1 nose, 2 cheeks, two eyes, holly leaves and berries (if desired), and the ball at the end of Santa's hat. Attach all the elements with water.
- Use a very sharp paring knife to cut slits in Santa's beard, and also to add details to the holly berries. *Note - It's easier to make several shallow cuts than one deep one. The deeper cut shallow cuts, the more the details will show after the second rise and bake.
- Place the completed Santa in a warm, draft-free place to rise a second time (approximately 45 minutes). Once risen, preheat oven to 375 degrees F (190 ℃) and bake Santa in a preheated oven for 35-40 minutes, or until he's golden brown and sounds hollow when tapped.
- Cool Santa completely. If adding color, mix a small drop of each of the colors with about 1 tablespoon of water. Use a clean paintbrush to lightly brush color onto Santa's hat, beard, eyes, cheeks and nose, and holly berries. If you'd like a deeper color, add two or more coats, drying in-between each coat.
- Serve and enjoy!!!
Notes
Nutrition
I sincerely hope you've enjoyed today's Buttermilk Honey Shaped Santa Bread as much as I've enjoyed bringing it to you!

Should you have any questions or comments regarding anything you've seen on my site, please don't hesitate to reach out to contact me. It is always my distinct pleasure to get back with you just as soon as I possibly can!
Thank you so much for visiting me today in my Kudos Kitchen. I hope you found something you'll love and that you will come back and visit me often. Please know that there is always room for you around my kitchen table!
Until we eat again, I hope you have a delicious day!


All of the recipes you'll find here on my website are in loving memory of my son, Greg, who left this earth far too soon and will be forever in our hearts.

Shadi Hasanzadenemati says
This looks absolutely unique and beautiful. I am going to make this and take it to a party we're going this holiday season. Everyone will love it!
Renée says
You'll be the hit of the holiday party! Have fun!!
Jillian Wade says
Such an incredible recipe, this Santa Bread looks like a piece of art! My kids will LOVE making the recipe with me!
Renée says
Kid tested, and approved!! 🙂 Have fun!!
Renée says
I'm so glad. They'll have a blast making him! Merry Christmas!
Sonya says
I am so happy I happened to spot this on Pinterest yesterday. I got up this morning and baked it up!!
This recipe is fantastic..if anyone is nervous about it..don't be. The dough is a dream to work with and it holds its shape fantastically. The end result is a super soft bread (thanks to the buttermilk) in the shape of Santa..I mean,how neat is that 🙂 My Santa face sort of had a mind of his own and his left side..mustache and cheek decided to kind of go off on their own..haha It still looked perfect and once you lightly paint him,he will come alive right before your eyes.
The bread itself would also make excellent 9x5 inch loaves which I plan to make after Christmas. I already have plans for next year..I think Santa needs a friend..perhaps Rudolph?
Thank you thank you for a fantastic recipe,easy to follow instructions and pictures..thank you for those. I am a visual person and loved having them handy.
Merry Christmas from an American all the way in The Netherlands!!
Renee Goerger says
Sonya, You just gave me the best Christmas present! I'm so thrilled that you had success with this bread and that you're Santa came to life before your eyes! I got goosebumps when I read that! I too had thought of doing a Rudolph to accompany Santa, but time got the better of me this year. Thank you a million times over for sharing your lovely comment with me. I wish you the best Christmas, and the brightest New Year! Thanks again,
Renee
Nutmeg Nanny says
Seriously you are the most talented bread maker ever! This bread is perfect for Christmas.
Kim Bee says
This might be the COOLEST bread I've ever seen in my entire life. You deserve a bread baking award for this. This is AMAZING!!!
Laura N says
How festive indeed Renee, I can't think of anything that screams holiday bread than Santa himself! Laura@ Baking in Pyjamas
Dani Meyer says
You are off the hook! This is so cool. I'm not patient enough anymore to do recipes like this but I'm so totally impressed. Props to you!
Paula Jones says
Oh my gosh, this is almost too adorable to eat. ALMOST ; )
Heather Schmitt-Gonzalez says
You know what? I was so ridiculously busy that I couldn't bake for Twelve Loaves this month...but guess what? THIS is what I'd originally planned on making! Yours turned out so perfect - that face is adorable. I hope I find the time to make a loaf for Christmas.
Angie Barrett says
I saw this santa bread on your facebook and totally fell in love with him! I wish I was that talented with bread! The's just perfect! This would be adorable on a table for Christmas brunch!
Martha @ A Family Feast says
Renne - I've been anxiously waiting to see this recipe after you shared sneak peeks on Facebook! This is fantastic!
Back for Seconds says
You are so talented! This santa bread is just perfect!
Blackberry Babe says
This is SO cute and just clever! I love it!
Ashley @ Wishes and Dishes says
OK this is just brilliant and not to mention ADORABLE!! I love the subtle colors from the food coloring. So cute!
Lauren Kelly says
I absolutely love this bread, you are so incredibly talented!
Erin Dee says
Aww, yay! It's this recipe! I saw the picture somewhere (maybe IG) and was totally in awe. You do such amazing things with bread - this is such a gorgeous loaf! I wish I could do the same. You make it look so easy!
Cookin' Canuck says
You did such a fantastic job with this, Renee! What a fun thing to make and serve at Christmastime.
Nancy Piran says
You did such a fabulous job with this! Love it!
Tanya-Lemonsforlulu.com says
I cannot get over this bread! Santa looks amazing!
Lauren says
This is seriously impressive. WOW!
Felice Geoghegan says
Wow, this bread is amazing. Your bread is almost too pretty to eat, but I imagine that Santa would taste pretty good 🙂
Karen Kerr says
That's incredible! I'm pretty sure if I tried that, I'd have all of the appliques falling everywhere. Such amazing talent!
Cheap Ethnic Eatz says
When I saw the title of your recipe I could not wait to see if it was similar in idea to me and how they would compare. Same concept very different routes taken and totally different results. I just love your Santa!
Sweet and That's it says
Renee, your Santa is absolutely g o r g e o u s and I'd be honored if you agreed to share your link on my blog, where I have opened the "Santa Showroom".
I wish you a wonderful time and lots of fun and success with your baking and paintings, which are the most amazing, I've seen.
xx Carola
Faith (An Edible Mosaic) says
This is absolutely adorable! I love the flavors going on too...a touch of honey is such a lovely addition to bread!
Joanie @ ZagLeft says
What a wonderful recipe, Renee! I love how you broke down each of the steps and made it look so easy. This is a recipe I would love to make with my daughter this Christmas.
Kacey Joanette says
And to think I thought your pumpkin-shaped bread was my favourite! I love this!!! So creative and festive (and who does not like homemade bread?!) I wonder if I would have the patience for this...