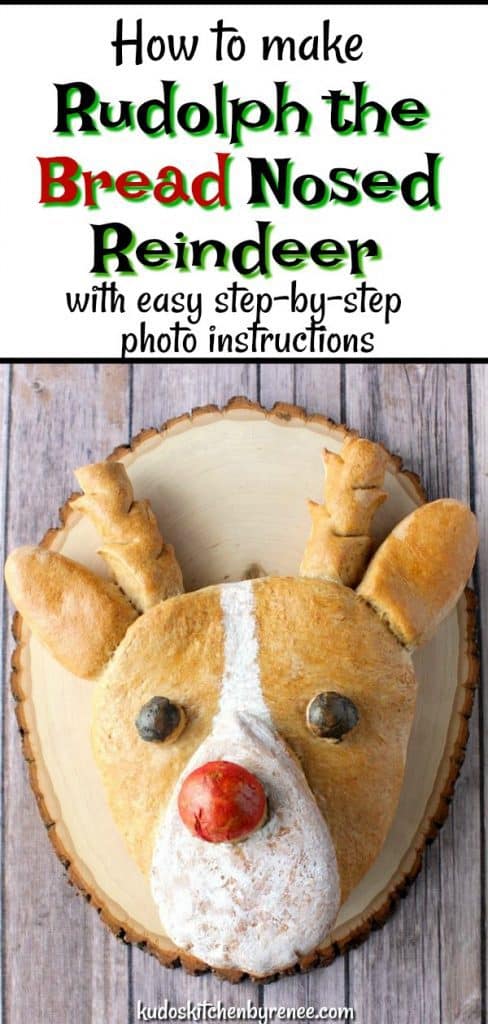
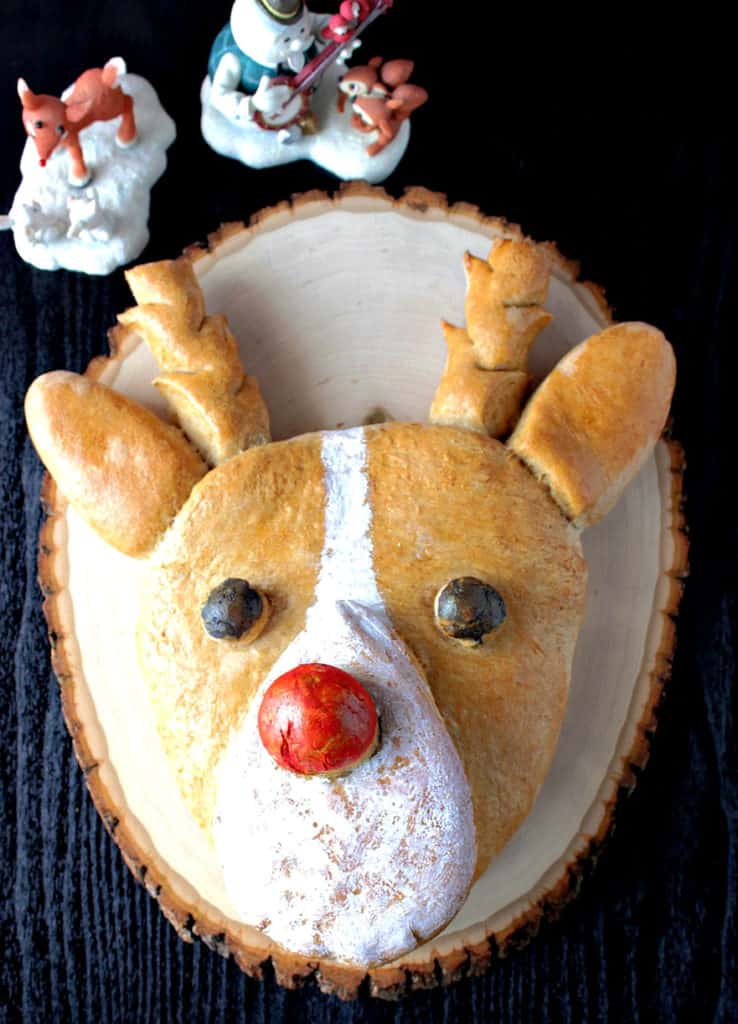
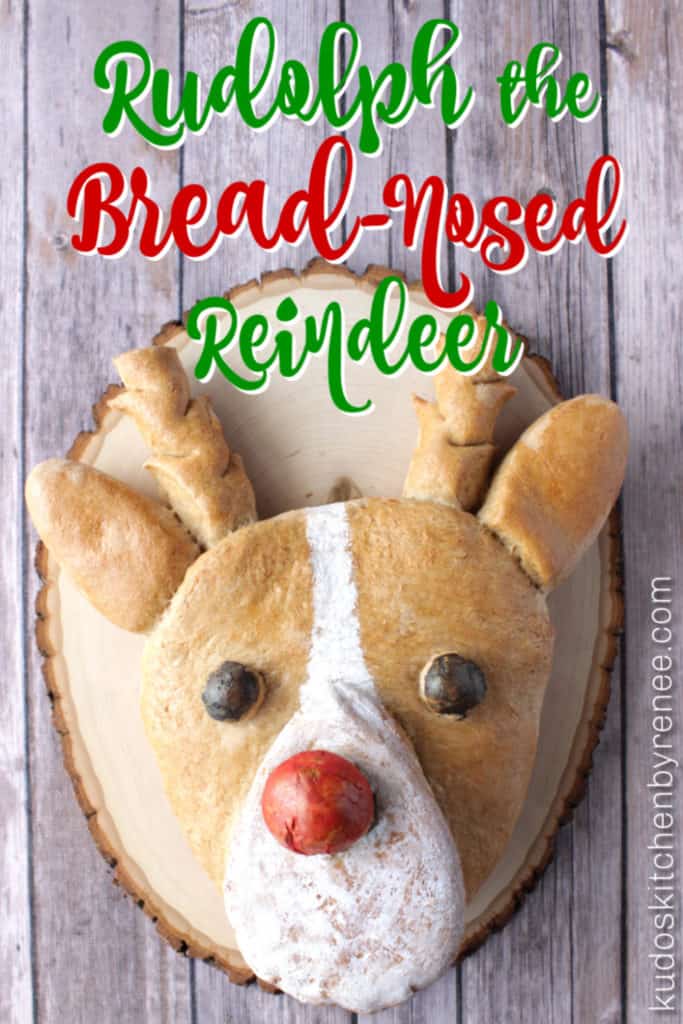
Give your homemade bread baking skills a whimsical twist by making this Whole Wheat Rudolph the Bread-Nosed Reindeer. Or you can use store-bought frozen bread dough and follow the instructions for forming and shaping.
Either way you make him, your family and friends will be delighted to see Rudolph making an appearance at the holiday table!
Table of Contents Found Here
- The ingredient list:
- Kitchen tools and equipment needed:
- Playing with your food is mandatory!!
- Having fun with food!
- Can the food color be omitted from this recipe?
- The fine art of playing with your food:
- How to be the hit of the holiday party circuit!
- Do these holiday yeast bread recipes need to be colored or can they remain plain?
- Can this savory holiday yeast bread be frozen after baking?
- How long will this savory holiday yeast bread take to make from start to finish?
- The step-by-step photo instructions for making Rudolph Bread:
- Printable Recipe Card
- Please comment if you've made this recipe.
The ingredient list:
**Note - The following lists of ingredients plus kitchen tools and equipment contain affiliate links (highlighted in blue) for your consideration and shopping convenience.#CommissionsEarned
- whole wheat flour
- bread flour
- salt
- warm water
- active dry yeast
- sugar
- olive oil
- red, white and black gel food color (optional)
- egg
Kitchen tools and equipment needed:
- Large Bowl
- Small Bowls
- Stand Mixer (optional but very helpful)
- Measuring Cups and Spoons
- Baking Sheets
- Parchment Paper
- Paint Brush (optional)
- Pastry Brush
- Whisk
- Bench Scraper
- Paring Knife
- Olive Oil Spray
- Plastic Wrap
Playing with your food is mandatory!!
While this Whole Wheat Rudolph Bread-Nosed Reindeer may look tricky to recreate, let me assure you, he is easier to make than you may think.
Since bread dough is completely pliable, you can shape, squeeze, and mold it, much like your childhood favorite playdough!
Having fun with food!
If you're a frequent reader of my blog, then you know that I like to play with my food, I love to paint, and I love color!
Today's Rudolph Bread recipe is a prime example of that.
I seriously can't help myself. I just adore playing with my food, especially around the holidays!
Do you see any parallels between what I've been doing here?
Of course, you do. I'm pretty much living out my childhood, through my food (and art).
In many ways, you can say that I've never grown up, and I refuse to.
Why start now?
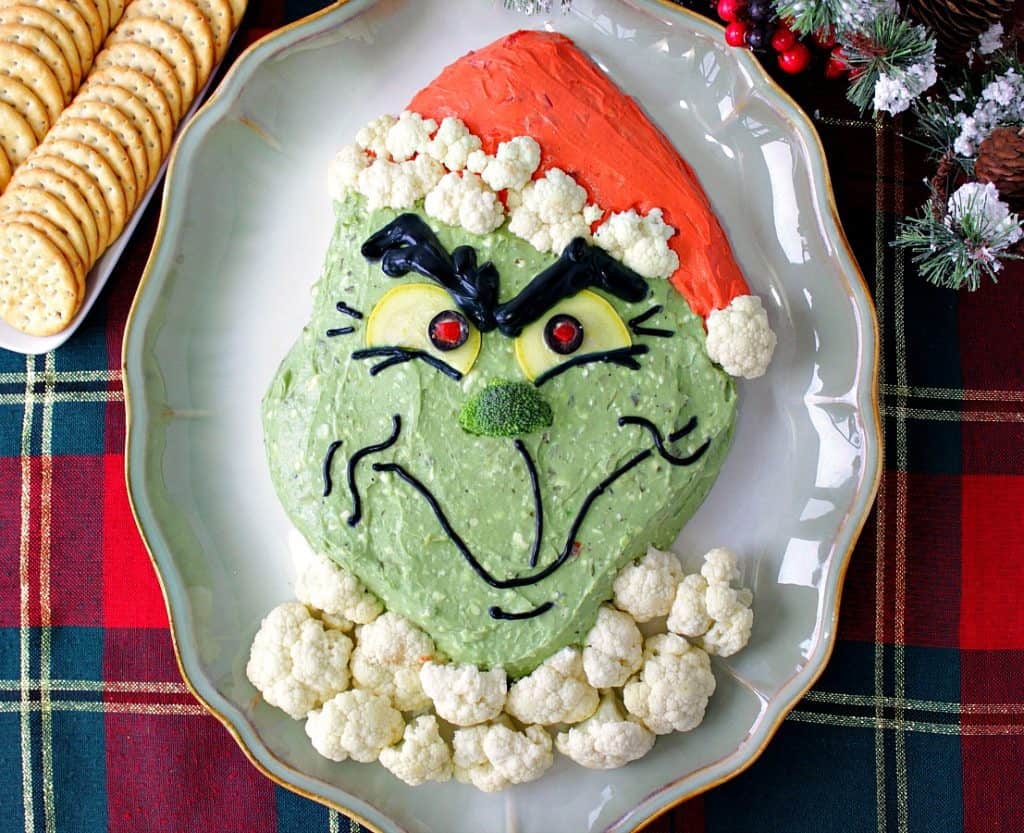
Case in point, my Grinch Guacamole Appetizer (pictured below).
"With a few simple ingredients and some easy instructions, you can warm the hearts of your family and friends with this gloriously easy-to-make realistic-looking Grinch Guacamole."
Can the food color be omitted from this recipe?
Yes, of course.
If you prefer your Rudolph to be plain and uncomplicated, feel free to leave the red-nose and white muzzle out of the recipe.
The fine art of playing with your food:
This holiday season, I've been all about painting pie crust, and bread dough.
However, last year is the year I really broke out of my bread box with this Charming Buttermilk Honey Santa Bread (pictured below).
To this day, he's still one of my favorites. This Santa bread is the one that made the biggest impression on my family last Christmas Eve when he joined us at the table for dinner. Ho Ho Ho!
"Ho! Ho! Ho! This tasty and Charming Buttermilk Honey Shaped Santa Bread is as whimsical as he is delicious. With my easy-to-follow step-by-step instructions, he’ll be on your holiday table in no (make that) HO time." 😉

How to be the hit of the holiday party circuit!
Just imagine serving all three of these whimsical dishes (listed above) for your next holiday party, or dinner.
You'll be the talk of the town, and you'll no doubt have made memories for your family and friends that will live on for years to come!
Save this for later.
Email forwarding service for saving information.
Do these holiday yeast bread recipes need to be colored or can they remain plain?
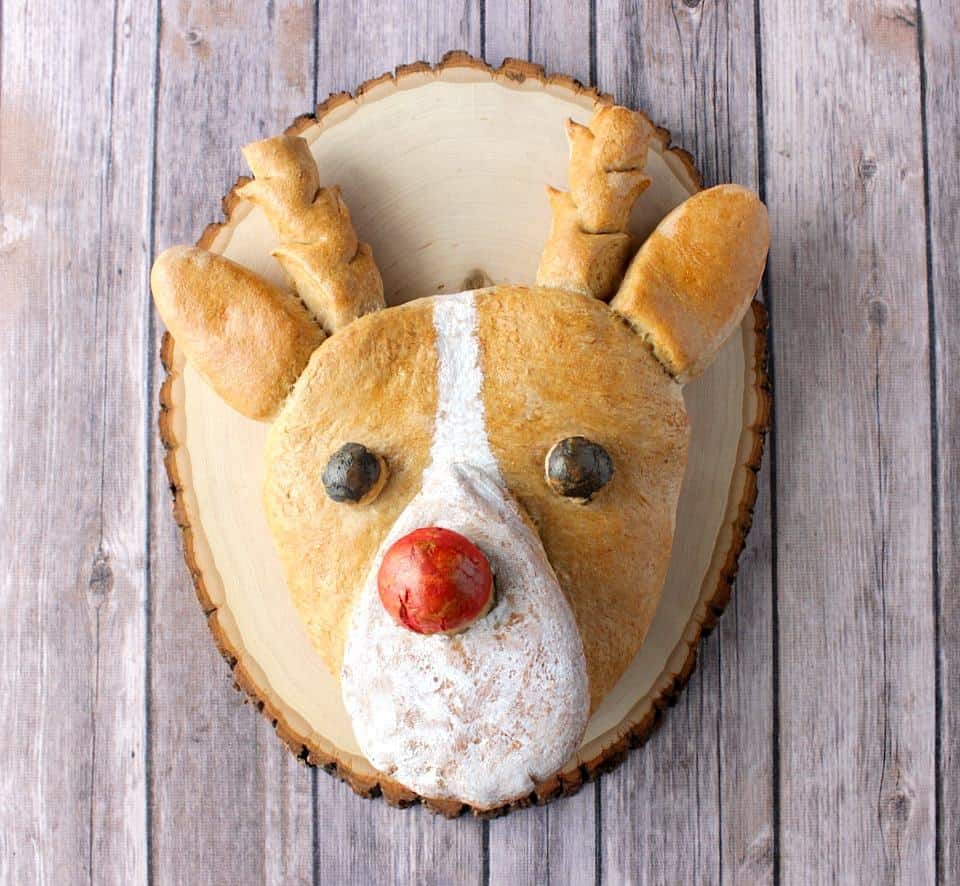
Even though I've shown this Whole Wheat Rudolph the Bread-Nosed Reindeer in fabulous technicolor, you certainly can make (and serve) him in his own brown rustic form, sans color. He'll still be just as cute, and just as delicious!!
It's completely your call if you want to add color or not.
I only urge you to make them as I know you'll be delighted that you too can reproduce these whimsical treats with just a little bit of time and effort.
I've taken a ton of step-by-step photos (shown below) of the making of Rudolph bread to help you learn through visual tips and techniques.
I know you'll find the photos helpful. But feel free to use your own creativity if you'd like to break out and do your own thing. I totally applaud your style!
Can this savory holiday yeast bread be frozen after baking?
Yes!
Make sure to wrap it very well in plastic wrap after the bread is completely cooled, and it can remain in the freezer for up to 2 months.
How long will this savory holiday yeast bread take to make from start to finish?
With two rise times of at least 60 minutes each, along with the shaping time, and bake time, this recipe will take approximately 5½ hours from start to finish.
Please plan accordingly.
The step-by-step photo instructions for making Rudolph Bread:
*Please note - The rise time for this bread is quite long due to the use of whole wheat flour and the density of this dough. Please plan accordingly.
This technique for forming Rudolph can be used with any of your favorite bread doughs, and even store-bought frozen bread dough, which has been thawed according to the package directions.
- In a large bowl of a stand mixer, whisk together 2 cups of bread flour, 1 cup of whole wheat flour, 1½ teaspoons active dry yeast, 1 teaspoon sugar, 1½ teaspoons kosher salt.
- Switch to the dough hook and add 1 cup warm water (110 degrees, i.e. warm to the touch), plus 2 to 4 additional tablespoons water (depending on the humidity). You may or may not need additional water. The dough should be soft and pliable, but not sticky.
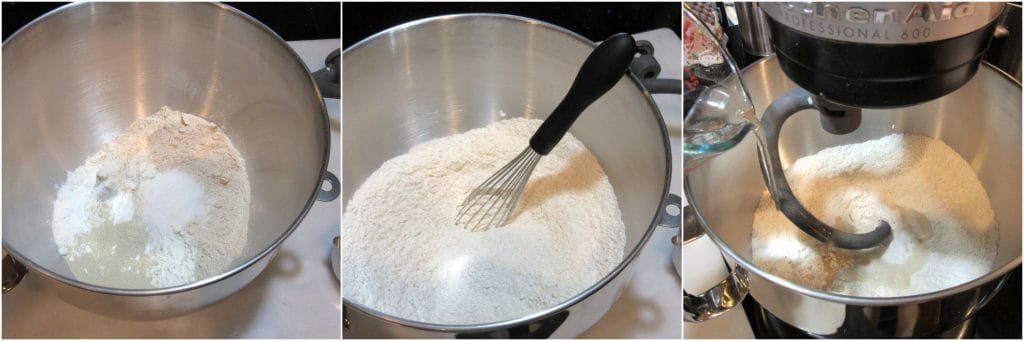
- Continue kneading with the dough hook for 4-5 minutes.
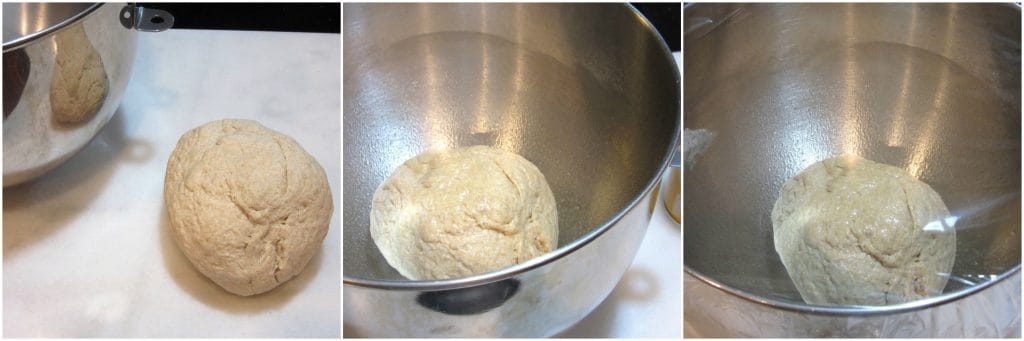
- Turn the dough ball out onto the counter and knead by hand an additional 2-3 minutes.
- Oil the inside of the bowl with olive oil and return the kneaded dough back to the bowl and coat the top with oil.
- Cover the bowl with plastic wrap and place the bowl in a warm, draft-free place for the dough to double in volume (approximately 2-3 hours).
- Once the dough has doubled in volume, turn the dough out onto a lightly floured surface.
- Divide the dough into two pieces. One-piece should be approximately ⅔'s and the other approximately ⅓.
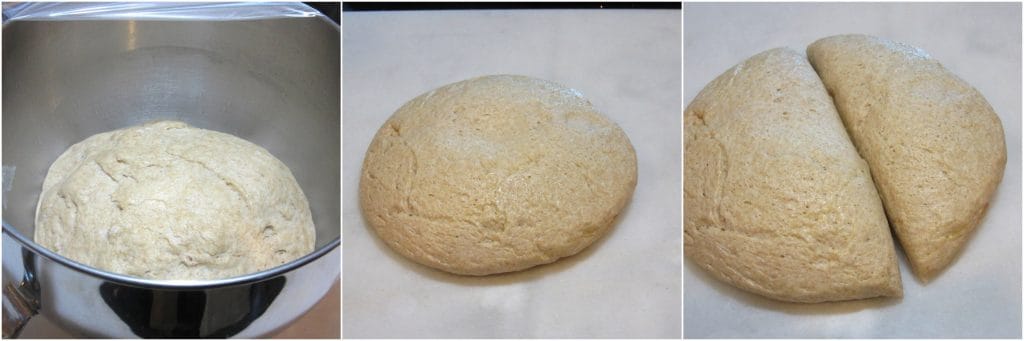
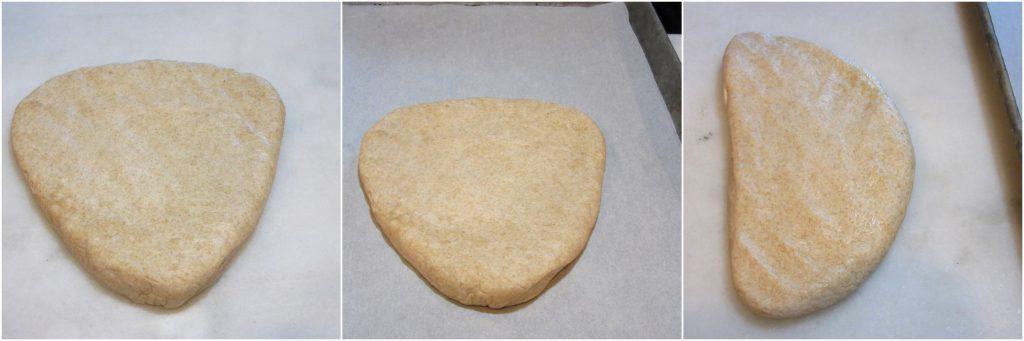
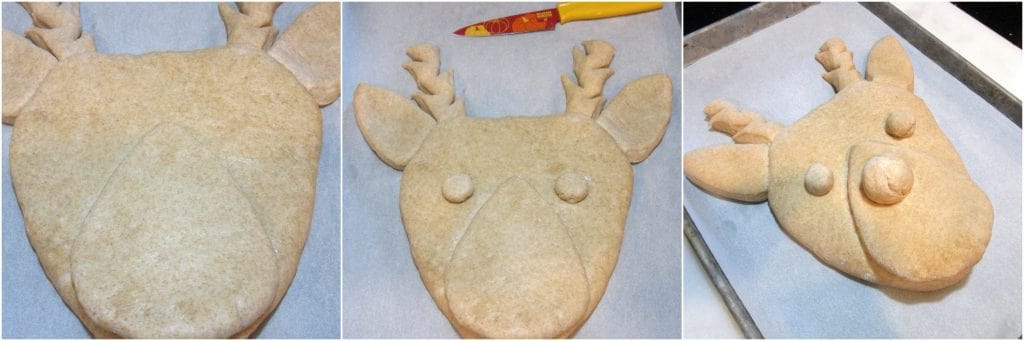
- Take the larger piece of dough and flatten it out into a triangle shape to form Rudolph's head. Don't be afraid to press and push the dough to get the desired shape.
- Place the triangle on a parchment-lined baking sheet.
- Press out the remaining ⅓ of the dough into a flatted semi-circle shape.
- Use a knife or a bench scraper to cut a log of dough off the long side of the semi-circle.
- Cut this log dough in half. These will be the antlers.
- Dip each log dough tip into a bit of water (the water helps to attach the pieces of dough) and place each antler piece under the head of the reindeer.
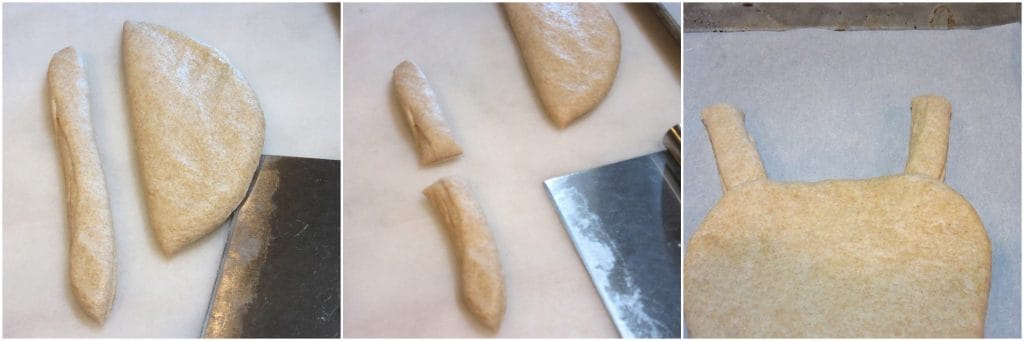
- Use a small paring knife to make cuts into the antlers.
- Return back to the remaining dough and cut a log from the long side, and divide in half for his ears.
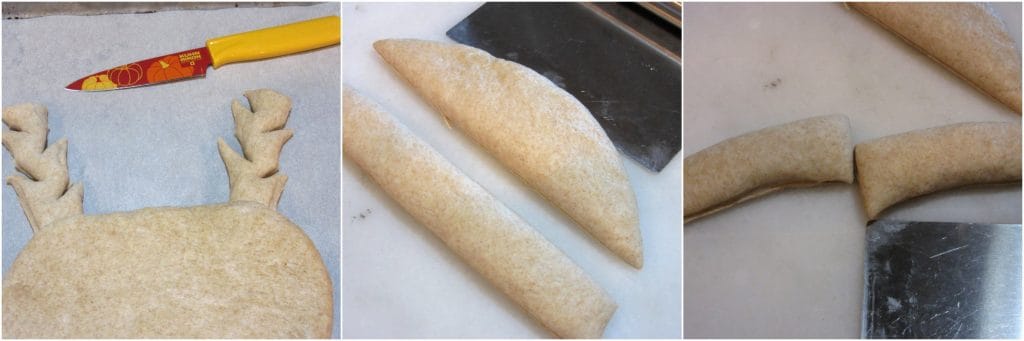
- From each half, cut a tiny equal piece for the eyes. Roll each piece for his eyes to form two small, round balls.
- *Note - a touch of extra water may be helpful to roll the balls without having too many creases, and make them smoother (if required).
- Form the ears into a pointy end, and flatten until you get your desired shape.
- Dip the end of the ears in the water...
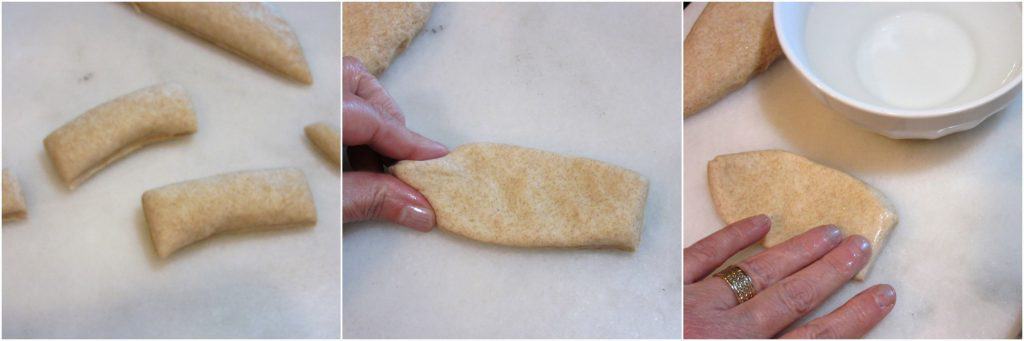
- Attach the ears to the head of the reindeer and press firmly to attach.
- Place water on the base of the head where you'll be attaching the muzzle.
- With the last piece of the remaining dough, break off a piece large enough for Rudolph's red nose and roll into a ball (using extra water to make the ball smoother, if needed).
- Press the final piece of dough into a teardrop shape.
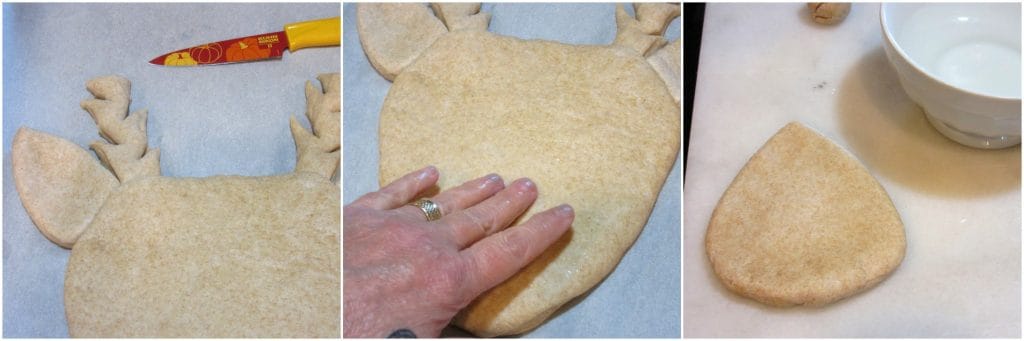
- Lay the muzzle onto the bottom portion of the head shape, pressing firmly (yet lightly, so no finger marks show) onto the head.
- Attach his eyes and nose using a small amount of water and press to attach.
- Allow the reindeer to rise in a warm draft-free place for at least 60 minutes.
- Brush Rudolph with an egg wash (1 egg mixed with 1 tablespoon water) and bake in a preheated 425-degree oven until he turns golden brown and sounds hollow when tapped (approximately 25-30 minutes).
- Remove from the oven and cool completely on a rack before adding color (optional).

When you make today's recipe (and I hope that you will), I'd appreciate it if you'd take the time to come back and give it a star rating along with a comment on why you rated as you did.
Search engines such as Google appreciate comments and ratings and, in turn, will show my recipes to more people. Please look for the pink star rating box within the printable recipe card. Thank you!!
Printable Recipe Card

Rudolph the Bread-Nosed Reindeer
Ingredients
- 2 cups bread flour
- 1 cup whole wheat flour
- 1½ teaspoons active dry yeast
- 1 teaspoon sugar
- 1 teaspoons salt
- 1 cup warm water 110 degrees plus 3-4 additional tablespoons depending on humidity.
- olive oil
Instructions
- To make the dough:
- Place the first 5 ingredients in the bowl of a stand mixer. Whisk to combine.
- Gradually add the warm water and use the dough hook to knead the dough into a ball.
- *Note - if the dough seems to dry, add additional warm water 1 tablespoon at a time, if needed.
- Continue kneading with the dough hook for 4-5 minutes.
- Turn the dough out onto a lightly floured surface and knead by hand for an additional 2-3 minutes.
- Return the dough back into the bowl which has been oiled with olive oil.
- Place a thin coat of oil on top of the bread ball.
- Cover the bowl with plastic wrap and allow the dough to rise in a warm, draft free place until doubled in volume (approximately 2-3 hours).
- Turn the risen dough out onto a lightly floured surface and follow with the photo tutorial instructions for forming, and coloring the Whole Wheat Rudolph Bread Nosed Reindeer found here: https://kudoskitchenbyrenee.com/whole-wheat-rudolph-bread-nosed-reindeer/
- Once formed, allow the bread to rest again for 40 minutes.
- bake the bread in a preheated 425-degree oven for 30 minutes or until the loaf sounds hollow when tapped, and is golden brown. Cool completely before serving and decorating with the gel food color (if desired).
Notes
Nutrition
I sincerely hope you've enjoyed today's Christmas yeast bread recipe as much as I've enjoyed bringing it to you!
Should you have any questions or comments regarding anything you've seen on my site, please don't hesitate to reach out to contact me. It is always my distinct pleasure to get back with you just as soon as I possibly can!
Thank you so much for visiting me today in my Kudos Kitchen. I hope you found something you'll love and that you will come back and visit me often. Please know that there is always room for you around my kitchen table!
Until we eat again, I hope you have a delicious day!


All of the recipes you'll find here on my website are in loving memory of my son, Greg, who left this earth far too soon and will be forever in our hearts.


Karen says
This is SO CUTE!!! I can't wait to bake it for my family!!!
Renée says
Thanks, Karen! I think your family will be thrilled!!
Enjoy, and Happy Holidays!
Renee
Suzy says
You are so talented with your food! I love all of the different holiday designs! the kids are going to go crazy for this!
Erica Schwarz says
This is sure adorable! I want to save this for my next kid's holiday party for sure!
Jenni says
Cutest Rudolph ever, Renee!
Renée says
Thank you, Jenni!!
Kam says
Oh my goodness this is so adorable! I can't eat this because of gluten sensitivities but I definitely will share this to my facebook page!
Renée says
I certainly appreciate the sharing. Thank you so much. Maybe next year I'll try and make him gluten-free and see how that works.
Happy Holidays, Kam!
Kimberly @ The Daring Gourmet says
Oh my gosh, how cute is this?! And I love that you've used real homemade dough instead of pre-packaged biscuit/pizza dough products!
gingeredwhisk says
What an awesome recipe! You are so very creative!
Renée says
Thank you so much. I appreciate that!
Cookin Canuck says
You are so darn creative, Renee! I'll bet this would get lots of "ooo"s and "aah"s at any holiday celebration.
Renée says
He's definitely an attention grabber, that's for sure. Thanks 🙂
thatskinnychickcanbake says
SO darn cute, Renee! You are an artist extraordinaire!!!
Renée says
Thank you so much, Liz. You are very kind indeed!
Sharon @What The Fork says
Oh my goodness, this is an amazing creation that is so adorable! Great job on this recipe!
Renée says
Ho! Ho! Ho! So glad you like it, Sharon. Thank you!
megunprocessed says
You are amazing! This is creative!
Renée says
Thank you so much! I'm glad you like him!
Melanie @ Gather for Bread says
So cute! Great job with all that shaping and cutting.
Renée says
Thanks so much. I appreciate it!
fearlessdining says
This bread is just precious. I love how creative you are 🙂
Renée says
Thank you so much. I enjoy playing with my food 🙂
grandbabycakes says
This is super fun! I love this idea.
Erren says
This is pure talent! Perfect for every family !
Renée says
Thank you so much, Erren. Glad you like him!
olivia @ livforcake says
This is adorable!! Super cute 🙂
Renée says
So glad you like it, Olivia. Thank you.
Krista says
This is awesome! Very creative! I am going to have to give this a try!
Renée says
I hope you do, Krista. I'd love to see your completed creation if you'd like to share him with me! Have fun!
Back for Seconds says
You are so talented! Another beautiful creation!
Renée says
Thank you so much!