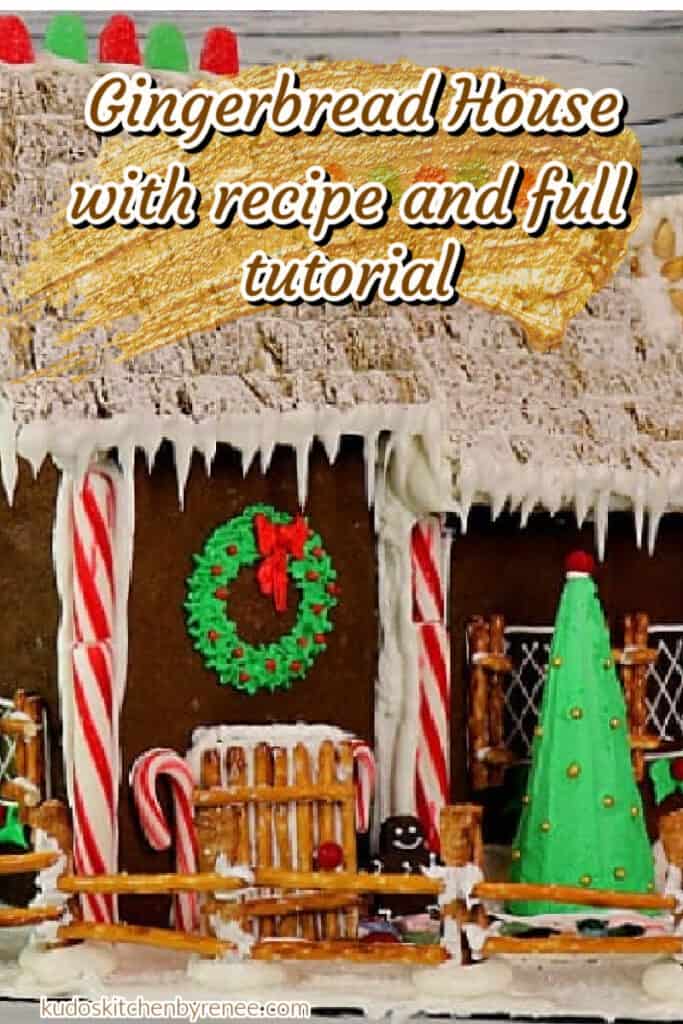
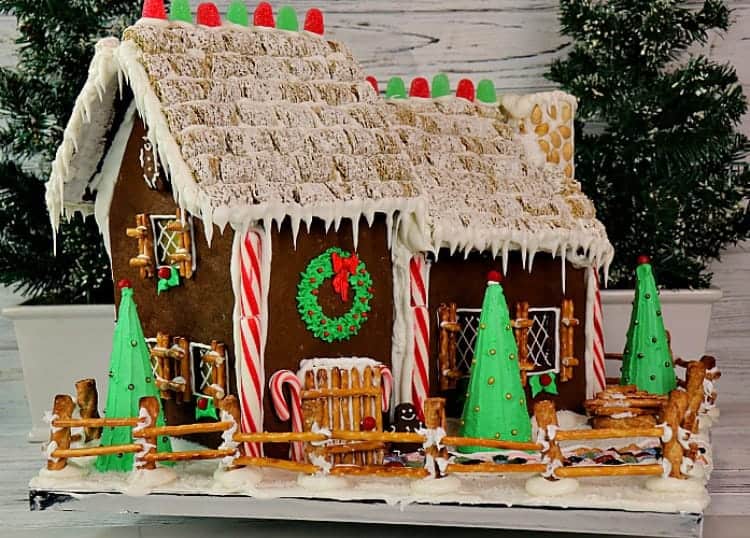
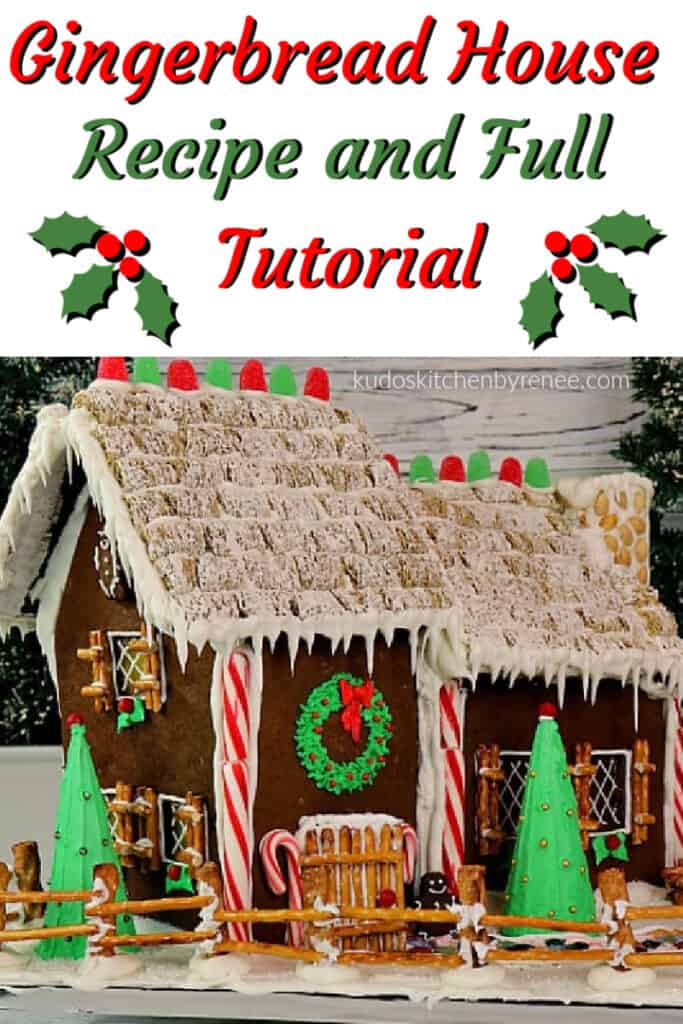
This Gingerbread House Recipe and Tutorial is a comprehensive instruction along with tips and tricks so you can learn from our successes, as well as our mistakes.

This recipe post and its contents may include affiliate links for your consideration. I may earn a commission from qualifying purchases, but your prices are never increased as a result. Thank you.
When I asked my mom and sister if they wanted to help me build a gingerbread house for Christmas, I don't think any of us knew exactly what we were letting ourselves in for.
With no plan in mind except for a few inspirational photos we found on the internet, we set off on our gingerbread house adventure.
**Please Note - The printable recipe card with detailed instructions, complete ingredient measurements, and nutritional information for making Gingerbread House Dough is available near the end of this post. OR click on the "jump to recipe" button (found above) to be taken directly to the gingerbread cookie recipe.

How long will it take to make this type of decorated gingerbread house?
- Please plan ahead!! While it may be too late to make this decorated gingerbread house this season, there is always next year! Bookmark this site to keep the directions handy.
- Our gingerbread house took us weeks and weeks to complete, not to mention a few scary moments before all was said and done and we could finally stand back and appreciate our efforts!
- Now, before you shy away from this project thinking it's too much to take on, let me just explain that as long as you don't rush the process you'll be just fine.
- Let me walk you through everything you'll need to know.
The first important DO'S and DON'TS:
- DO make sure to give yourself plenty of time (i.e. days) to properly let the gingerbread cure and dry after baking and before assembly.
- And, when the time comes to assemble the house, DO make sure the royal icing has had a chance to set and harden, no matter how anxious you are to add the roof in place.
- DO as I say, not as I DO!! 😉
- DON'T rush the process! This (from-scratch gingerbread house) is not something you can attempt to make in one or two days.
The ingredient list for making the gingerbread dough:
I made 5 batches for this particular house, but you may not need that much depending on the size of your house.
- granulated sugar
- molasses
- vanilla extract
- ground ginger
- allspice
- ground cloves
- ground cinnamon
- baking soda
- butter
- egg
- all-purpose flour
- coarse salt

The tools and equipment we used:
- hand mixer and stand mixer
- measuring cups and spoons
- baking sheets
- parchment paper
- plastic wrap
- rolling pin
- disposable piping bags
- large piping bag
- decorating tip assortments (large and small)
- offset spatula
- serrated knife
- pizza wheel (for cutting larger pieces of gingerbread)
- scissors
- mixing bowls
- gel food color
- spoons and spatulas
- small gingerbread man cookie cutter (optional)
- paring knife
- Exacto knife (optional but comes in handy for cutting the baked gingerbread)
- zip-top bags
- kitchen timer or Echo Dot (see below)
- cake board (larger than the size of the completed house)
- craft foam (for shoring up the house and roof as the icing dries)
DO's and DON'TS for making and storing gingerbread dough:
- DO plan ahead. Gingerbread dough may be made in advance.
- If wrapped well, gingerbread dough may be frozen for up to 2 months.
- If using right away, DO chill the dough for at least 2 hours before rolling.
- Don't roll the gingerbread when warm. You'll have a mess on your hands and it won't cut well.
How to make gingerbread dough for houses or gingerbread men:
- Add softened butter, sugar, vanilla, and molasses to a large bowl and beat until creamed.

- Add egg, salt, spices, baking soda, and flour and blend to form a dough.

- Wrap the dough well in plastic wrap and refrigerate or freeze for up to two months.

DO's and DON'TS for cutting, baking, and storing the baked gingerbread:
- DO liberally flour a rolling pin and roll each dough batch to ¼" thickness.
- DO liberally flour parchment paper and roll the dough directly onto the parchment.
- DO carefully transfer the parchment along with the cut gingerbread pieces to baking sheets.
- DO keep the dough as cool as possible during rolling. If the dough gets too warm, wrap it back up and refrigerate for at least 30 minutes.
- DO work with one batch of dough at a time, and keep the rest in the refrigerator.
- DO re-roll scraps of gingerbread. No dough should go to waste. You may need it later, so wrap it up and keep in the fridge or freezer.
- DO make sure to lightly flour the template pieces so they won't stick to the dough while cutting.
- DO use an Exacto knife for precision cutting of the windows.
- DO make sure the pieces are well baked before removing from the oven. They will harden a bit as they cool, but it is better to have them a little overbaked than a little underbaked.
- DO keep track of which pieces go with which side of the house by marking well for storage. After baking, the gingerbread pieces start to look pretty similar and it gets confusing if you have a lot of pieces for a larger house.
- DO cover the back of the candy windows with pieces of parchment to prevent the candy from sticking to the baking sheet surfaces after baking (as shown in some of the assembly photos).
- DO allow the baked gingerbread pieces to sit and completely dry and harden for AT LEAST 5 days.
- DON'T wrap the baked pieces OR freeze them. They need to air dry completely!
- DON'T rush the process! Allow the gingerbread enough time to dry and harden before moving on to decorating.
The directions for rolling and cutting gingerbread:
- Use a pizza cutter and paring knife to carefully cut out each of the template pieces for building the house.
- Crush the lemon drop candies in a zip-top bag using a rolling pin.
- Carefully cut the windows out with a paring knife.
- Carefully transfer the gingerbread pieces on the parchment to baking sheets.
- Once the gingerbread pieces are on the baking sheets, fill the cut windows with crushed lemon drop candy.
- Bake in a preheated 350-degree oven for approximately 20-25 minutes.

- Once baked, you may need to trim the walls and adjust the window openings if they've contorted a little during the baking. This is best done while the dough is still warm from the oven, using a butter knife for the windows (see below), and a serrated steak knife to trim the walls if needed.
- Remove the pieces to a cooling rack to cool completely.


- Make sure to correctly mark the pieces for storage and drying. If you're working with a lot of pieces this will prove to be extremely important!


The ingredient list for making royal icing:
I made 6 batches of royal icing. You may need more or less depending on the size of your house.
Find the recipe for royal icing HERE.

DO's for making and storing royal icing:
- DO Make it in small batches. Working with large batches at one time can cause overheating of the mixers or potential breakage of the stand mixer paddle. (yes, that happened).
- DO Keep the finished royal icing, well covered, so it doesn't dry out ahead of time.
- The batches of royal icing may be combined into one large bowl or container. DO Stir well to combine the batches.
- Meringue powder royal icing does not require refrigeration. DON'T refrigerate the royal icing. Cold icing is very difficult to work with.
The decorating DO's and DON'TS:
- DO decorate the sides of the house before assembling. The icing will be a whole lot easier to pipe onto the gingerbread house when laying flat on the table and not verticle!
- DO take your time!
- DO keep the royal icing covered well and (as needed) thin with warm water to make thinner consistencies.
- DO use gel colors to tint the icing to your desired colors.
- DO decorate sugar cones with green icing and allow to dry completely before placing them in the yard.
- DO assemble the chimney pieces using the royal icing BEFORE adding the peanut stones. Lay flat to dry.
- DO allow all the decorated pieces to dry for several days before progressing.
- DON'T decorate the roof pieces before you've assembled the house. Make sure your house is completely dry and structurally sound before adding cereal or candy to the roof. Decorating the roof first will add too much weight and cause a possible collapse of the house before it's completely dry (not that we know anything about that! HaHa)!
The directions for decorating a gingerbread house:
- Pipe intricate decorations onto the house BEFORE it's standing.
- Assemble the chimney pieces with royal icing, attach it to the side of the house where it belongs, and then allow to dry completely (on a flat surface) before assembling the house.
- Use an offset spatula and tinted royal icing to cover sugar cones for pine trees. Decorate with cinnamon candy and gold dragees, and allow the trees to dry thoroughly before proceeding.


- Use a piping bag with a thin tip to pipe window panes over the candy-coated windows.
- Use tinted green and red icing to pipe wreaths and decorations as desired.
- Add mini candy canes, and dragees, as desired.
- Do not decorate the roof before assembling the house. It will become too heavy and may cause structural damage if the house has not had a chance to dry thoroughly. Learn from our mistake here. 😉

Save this for later.
Email forwarding service for saving information.
- Allow all the decorated pieces to dry for several days before continuing.

- When the chimney is perfectly dry, thickly pipe royal icing onto the chimney front and sides and then press peanuts (flat side down) into the wet icing to simulate stones.
- Allow the chimney to dry completely before continuing.


The list of edible decorations we used:
Please feel free to use your own favorites!
- frosted mini-wheat cereal
- lemon drop hard candy (for the windows)
- pretzel sticks
- pretzel logs
- candy cane sticks
- mini candy canes
- gumdrops
- sugar cones ice cream cones
- gold dragees
- chocolate candy pebbles
- cinnamon red hots
- dry roasted peanuts
- white sanding sugar sparkles
The DO's and DON'TS of assembling a gingerbread house:
- DO make sure that all the pieces are completely dry before starting the assembly. Have I mentioned that before? LOL
- DO have your cake board ready, you will be attaching the house walls directly to the board, as well as each other.
- DO have a thick piping tip and a relatively thick icing consistency for assembling the pieces together.
- DO have a second pair of hands, OR some anchor items (i.e. tall cans) at the ready to keep the pieces stable.
- DO assemble the walls first, waiting a few days for the shell to dry BEFORE adding the roof!
- DO pipe icing into the joints on the inside AND outside of the house.
- Do press any sort of candy (we used candy cane sticks) into the corners of the structure while the icing is still wet.
- If you do happen to run into structural problems (as we did for because of some miss-measuring issues) DO be creative in your problem-solving abilities! You'll notice that we had to use gumdrops on the inside of the structure walls to keep the roof from caving into the house. LOL
- DON'T use too much pressure when assembling the walls. It is unnecessary and too much pressure may cause your house to unsightly tilt or even cause breakage of your gingerbread.
- DON'T ice the yard before making sure your house is structurally fine. If you need to add cans or items for stability on the outside of the house, this is impossible if the yard icing is still wet.

How to decorate the gingerbread landscape:
- Pipe a front walkway and just like the chimney, press the chocolate "stones" in place.
- Pipe additional icing to cover the cake board and use an offset spatula to drift and swirl the snow as desired.
- While the snow in the yard is still wet, sprinkle with the white sparkle sanding sugar.
- If desired, build a fence around the property using royal icing dollops to secure the fence posts pretzels and secure the pretzel stick rails in place with additional royal icing.
- Allow the landscape to dry completely before moving on to the roof installation.


DO's and DON'TS of adding the roof and completing the gingerbread house:
- DO decorate the roof AFTER it is in place on top of the house and dry.
- DON'T do it backward, as we did! 😉
- If needed (like we did) DO use a serrated knife to carefully trim the roof pieces to make them fit around the chunky chimney.
- DO use cut-to-size styrofoam pieces to hold the roof line in place while the icing completely dries.
- DO add the frosted cereal pieces or whatever candy you're using after the roof is secure.
- DO thin the royal icing with a drop or two of warm water so the icicles are easier to form.
- DON'T add the icicles until the roof is completely dry.
- DON'T jump the gun and remove the styrofoam pieces until you're 100% sure the roof is dry and secure.

How long will a gingerbread house last if not eaten in the first year?
- I have an aunt that used to bring her gingerbread house out every year, year after year, for holiday decoration.
- As long as it doesn't break in storage, you'll have your gingerbread house for many, many years to come!!
- Not only did we build a gingerbread house that could last a lifetime, but we also built some pretty great memories that will last a lifetime as well. Priceless!!
DO's and DON'TS for making your own gingerbread house template:
- DO measure correctly.
- DO look on the internet to find a house you like and one with a printable template.
- DO make sure you add enough walls for stability purposes to hold the roof in place.
- DO use something other than used copy paper. Something with a little more heft.
- DO tape the pieces together to make sure they fit properly.
- DO make the roof line a little longer than you think you may need.
- DO trace and transfer your template pieces to poster board or foam core.
- DO contact me if you'd like additional information regarding the gingerbread template we made. I'm not sharing the exact measurements here, but I can (and will) share that information if requested.
- DO use an Exacto knife for precision cutting.
- DON'T be surprised if you make a few mistakes.
- DON'T forget to label your pieces and keep them dry and flat.
- DON'T forget to have FUN!!!


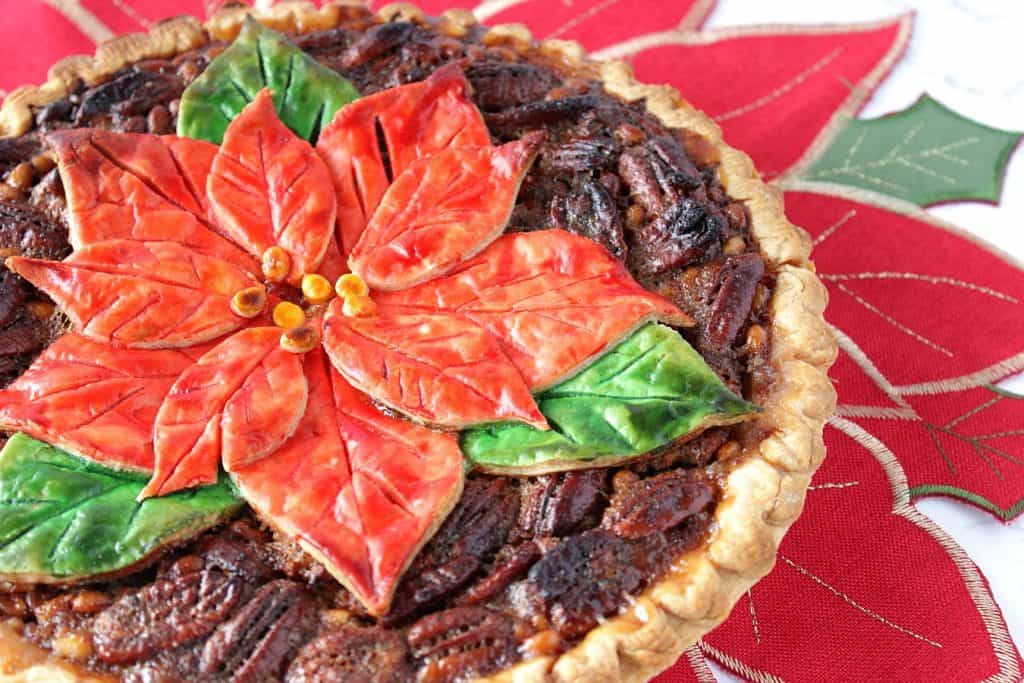
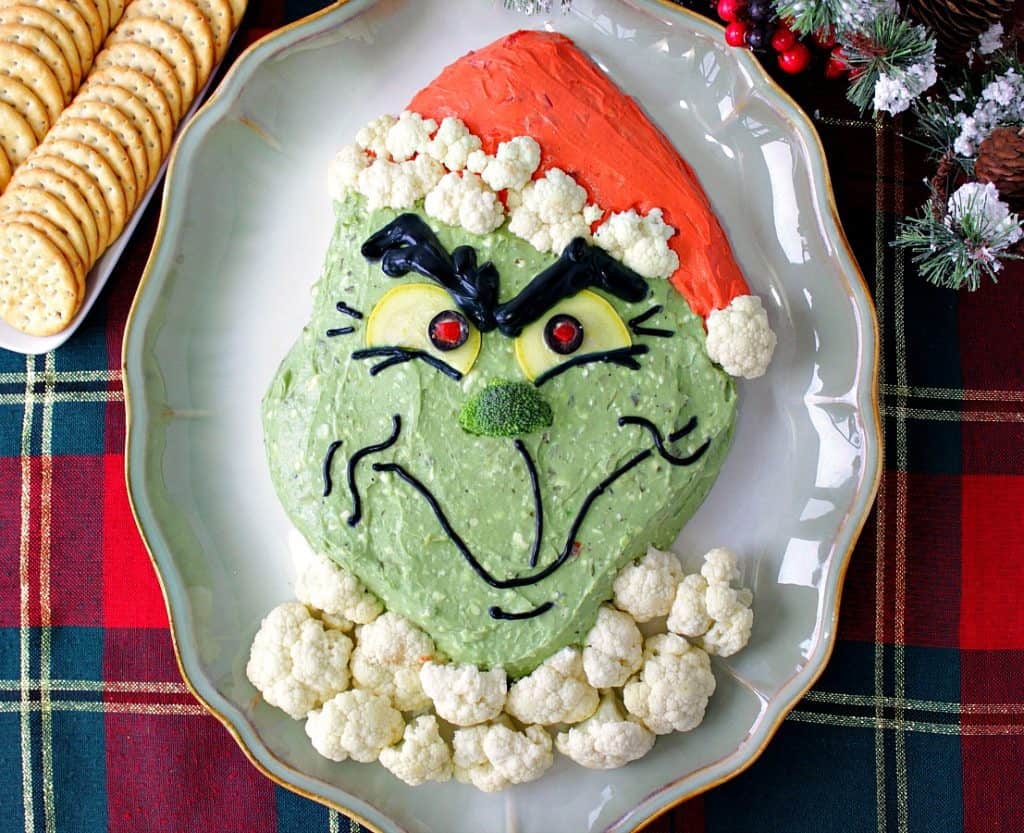
Additional Christmas recipes you're sure to love:
*Fried Rosette Snowflakes (shown below)
*Pecan Pie with Poinsettia Crust (shown below)
*Grinch Guacamole (shown below)
*Gingerbread House Recipe and Tutorial (shown below) THIS IS THE PLACE!!

Below is the printable recipe card along with the nutritional information for making Gingerbread Cookie Dough.
When you make today's recipe (and I hope that you will), I'd appreciate it if you'd take the time to come back and give it a star rating along with a comment on why you rated as you did.
Search engines such as Google appreciate comments and ratings and, in turn, will show my recipes to more people. Please look for the pink star rating box within the printable recipe card. Thank you!!
Printable Recipe Card

Gingerbread Cookie Dough
Ingredients
- ½ cup granulated sugar
- ½ cup molasses
- ½ cup butter softened
- 1 egg
- ½ teaspoon pure vanilla extract
- 2½ cups all-purpose flour
- 1½ teaspoon ground ginger
- 1 teaspoon allspice
- ½ teaspoon ground cloves
- 1 teaspoon ground cinnamon
- 1½ teaspoons baking soda
- pinch salt
Instructions
- In a large bowl using a stand mixer or hand mixer, cream together the butter, sugar, molasses, vanilla, and the egg.
- Slowly incorporate the ginger, allspice, cloves, cinnamon, salt, baking soda, and all-purpose flour until the mixtures comes together to form a soft dough.
- Divide the dough in half and wrap well in plastic wrap. Chill for at least 2 hours before rolling, OR freeze for up to 2 months.
- When cutting and baking, roll the dough to ¼" thickness and cut your desired shapes.
- Preheat oven to 350-degrees and bake the dough pieces on parchment lined baking sheets for approximately 20-25 minutes.
- Cool completely and air dry the dough for several days before decorating with royal icing.
- See https://kudoskitchenbyrenee.com/gingerbread-house-tutorial/ for full instructions for making and assembling the gingerbread house.
Video
Notes
Nutrition
I sincerely hope you've enjoyed today's recipe and complete tutorial for making a Gingerbread House as much as I've enjoyed bringing it to you!

Sean says
The recipe shows 1 egg but doesn't say where to add it. Is this done after the wet ingredients are blended but before adding the dry stuff? Should we not use the egg at all?
Thanks
Renée says
Hi, Sean.
So sorry for my error. Wish I had an editor for times like these. I've since gone in to fix the recipe card.
Add the egg in with the wet ingredients and blend.
Thanks for catching it and for kindly notifying me. I appreciate it.
Take good care,
Renee
Jocelyn says
Thanks for the quick response!! I've made gingerbread men a million times so I'm very familiar with the need to chill (to avoid a sticky mess!!!). I'm so excited to make the house using your tips. The yellow candy window idea is genius!!
Jocelyn says
Hi! How much flour? Maybe I'm missing something but I don't see it in the ingredients list!
Looking to make the walls and roof today so they dry out before next weekend 🙂
Karen says
How do I keep my assembly pieces from softening as this has happened to me. How store them for a week while prepping is going on. How do I keep the pieces structural and hardened?
Renée says
Hi, Karen!
I'd over-bake the pieces slightly, and then make sure to keep them in the open air for several days to dry out. Before we assembled, I think our walls and pieces air-dried for like 2 weeks. This was more due to scheduling than what we thought we needed (structurally), but looking back I'm sure the extra dry time was worth it, and the integrity of our house. In the end, PATIENCE is key when building a gingerbread house. This I know to be 100% true!
I hope this helps. Good luck.
Renee
Tayler says
Wow, this is a totally amazing gingerbread house! We are going to make one this weekend!
Renée says
Have fun!
Liz says
We used to make gingerbread houses with my mom each year....and then I made a few to give to friends! I need to try again and your tips are priceless! Such a perfect gingerbread house!!!
Renée says
I'm so glad you have those memories with your mom, Liz. I'll bet your houses were spectacular!