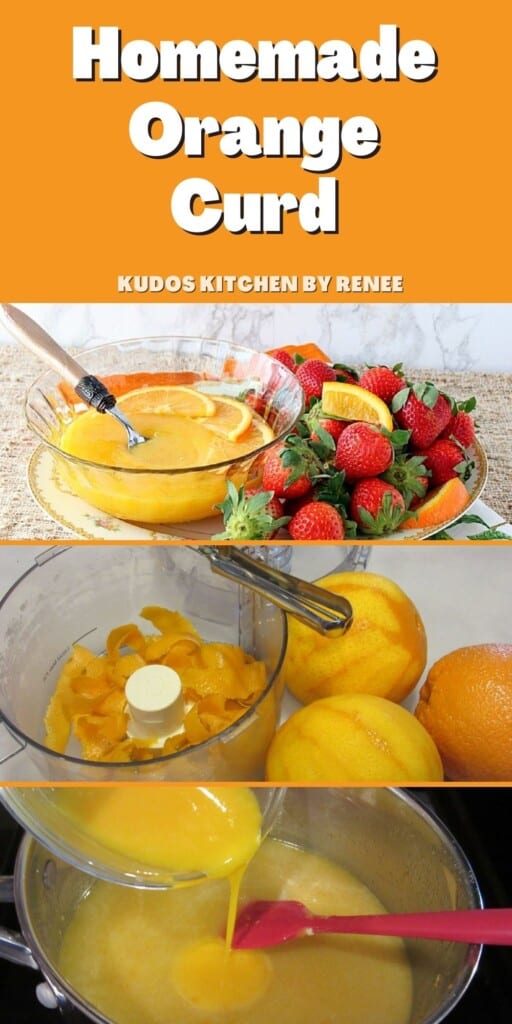
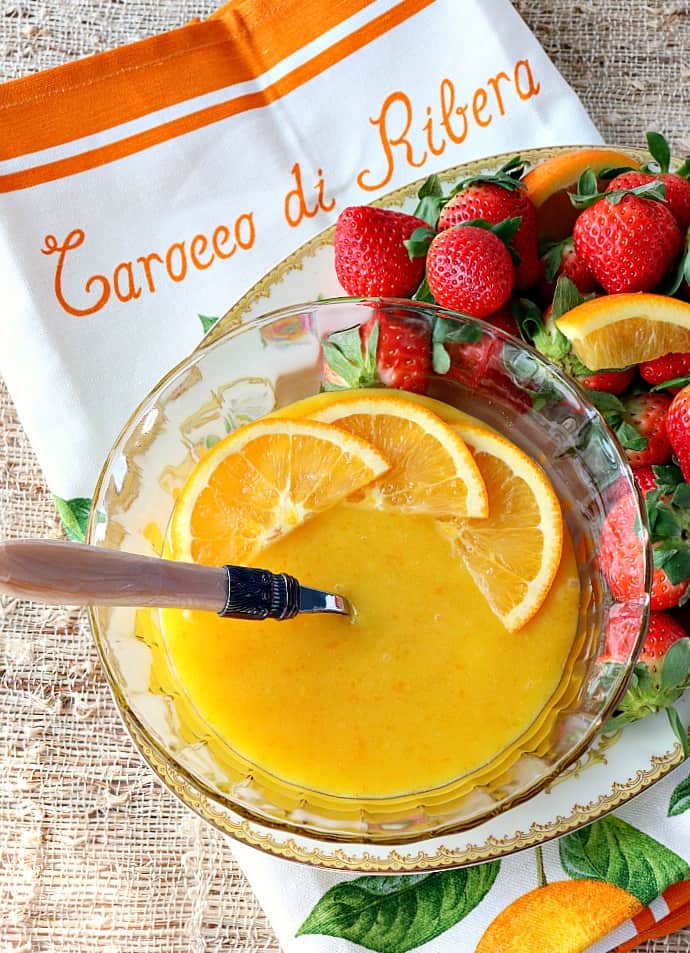
If you're looking for a taste of sunshine in the middle of winter, look no further than my easy Homemade Orange Curd recipe!
In a matter of minutes, you can have fresh homemade orange curd to use on your morning muffins, toast, fruit, or how about this amazing dish of Blueberry and Orange Sheet Pan Pancakes? NOW we're talking!!
This recipe post and its contents may include affiliate links for your consideration. I may earn a commission from qualifying purchases, but your prices are never increased as a result. Thank you.
Table of Contents Found Here
- The ingredient list:
- Why this recipe works:
- How long does it take to make homemade orange curd?
- Will orange curd thicken upon cooling?
- Tips and tricks for making the best homemade orange curd:
- What are the essential kitchen tools for making a sweet orange sauce at home?
- Help! I forgot to bring my eggs and butter to room temperature! How can I do this quickly?
- The step-by-step photo instructions for making homemade orange curd:
- Additional recipes using fresh oranges:
- Printable Recipe Card
- Please comment if you've made this recipe.

The ingredient list:
*Please note that the exact measurements along with a "shop the recipe" feature from Instacart and Walmart is available inside the printable recipe card.
- 4 large navel oranges
- 1½ cups granulated sugar
- ¼ pound butter softened
- 5 egg yolks
- ½ cup fresh orange juice
- pinch salt
- ½ teaspoon orange extract (optional)
Why this recipe works:
I've been craving oranges - a lot! I don't know if it's a need to replenish vitamin C in my body, or if it's because I'm craving warmer temperatures during this arctic blast we've been experiencing here in the Midwest.
Whatever the reason, this easy-to-make thick and tangy homemade orange curd cures my craving for oranges and satisfies my sweet tooth in an utterly delicious, and completely versatile, way!
How long does it take to make homemade orange curd?
From start to finish, it takes no more than 30 minutes. After that, the curd needs to cool before completely before refrigerating.
Save this for later.
Email forwarding service for saving information.
Will orange curd thicken upon cooling?
YES!! No need to worry if your curd seems on the thin and runny side while it is still warm.
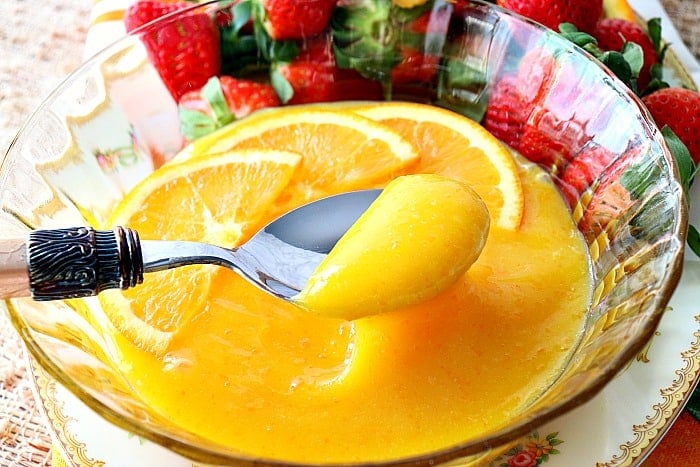
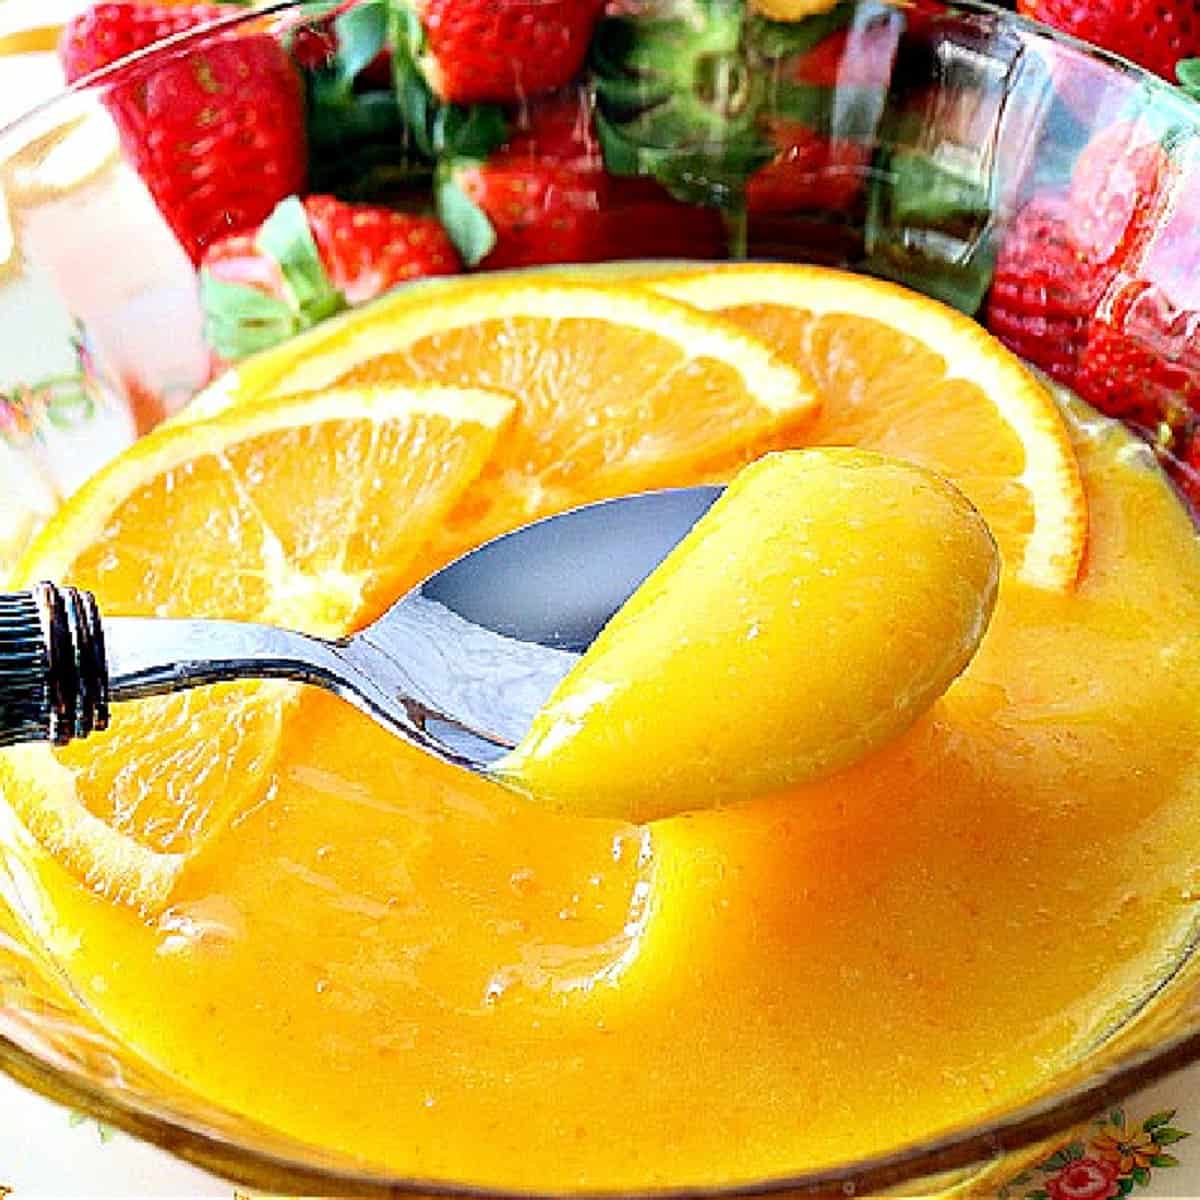
Once the curd has a chance to cool significantly you'll be surprised just how much it thickens, and once it has been refrigerated for a few hours the sweet orange sauce will be thick, rich, and velvety!
Tips and tricks for making the best homemade orange curd:
- Cooking the curd low and slow on the stovetop, and stirring it constantly, are the best tips I can give you.
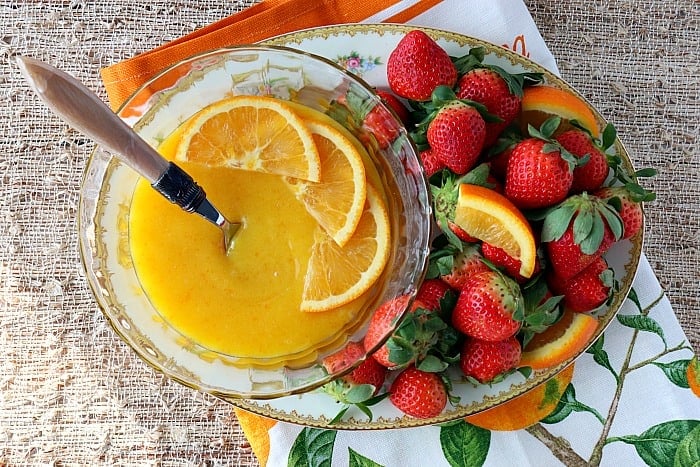
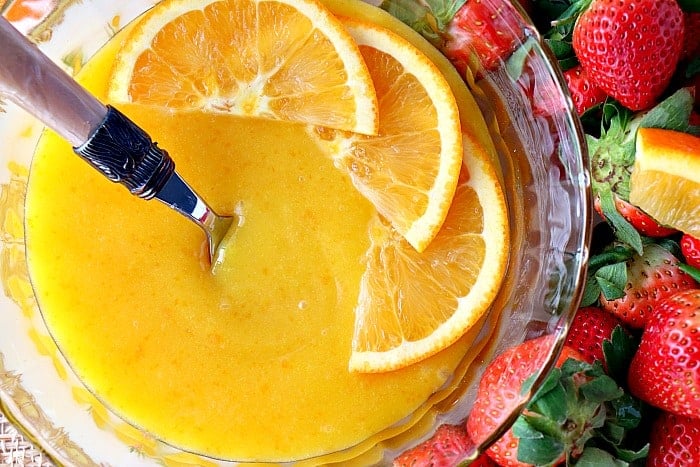
- The sweet orange sauce is ready to be cooled when it easily coats the back of a spoon (or spatula, in this case) and a clean trail is left behind after you've run your finger down the surface of the spoon (see the photo in the tutorial).
- Before cooling, strain the curd into a bowl to remove any hard bits of egg yolk that may have formed while cooking. If cooked at a low enough temperature, and stirred continuously, there won't be much in the way of hard bits. Use a spatula to press the curd completely through the sieve and discard whatever remains in the sieve.
- Once strained, cool the curd on the counter for at least one hour and then cover the curd with cling wrap and chill in the refrigerator for at least 4 hours.
- Your homemade sweet orange sauce is now ready for a multitude of uses.
What are the essential kitchen tools for making a sweet orange sauce at home?
For me, the key to making a lot of fresh orange zest (or any citrus zest for that matter) quickly, is to use a potato peeler and a food processor.
You'll also need a large wooden spoon or spatula, measuring cups and spoons, a heavy bottom saucepan, a few kitchen bowls (small and medium), a whisk, a strainer, and some cling wrap.
Help! I forgot to bring my eggs and butter to room temperature! How can I do this quickly?
Add the chilled eggs to a bowl of warm/hot water and allow to sit for 3-5 minutes. Viola. Room temperature eggs!
As far as the butter, microwave a bowlful of water until boiling. Carefully pour out the water and set the bowl over the stick of cold butter. Allow the butter to sit under the bowl for a few minutes and...voila! softened butter!
The step-by-step photo instructions for making homemade orange curd:
- Add the orange peels (making sure not to get the bitter white pith) into the food processor.
- Process until small and crumbly bits are formed.

- Scrape down the sides of the food processor.
- Add the granulated sugar and process again until the sugar and orange peel are completely combined.
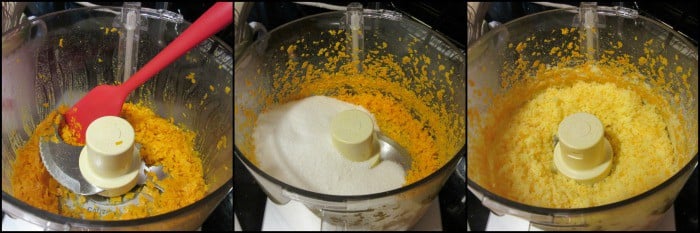
- Scrape down the sides of the food processor again.
- Add the orange and sugar mixture to a medium bowl along with a pinch of salt.
- Make sure to have the butter and eggs at room temperature.
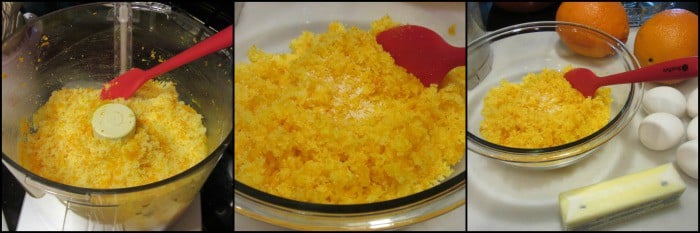
- Using a spoon or spatula, work the softened butter into the orange and sugar mixture until blended.
- Add the fresh orange juice.
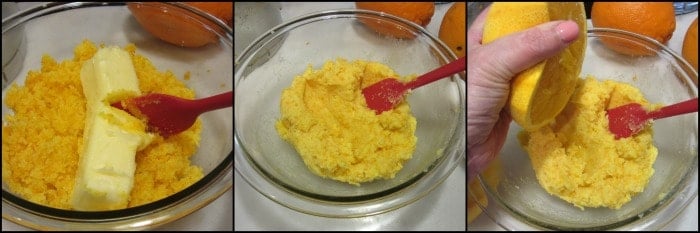
- Add the orange extract (optional).
- Stir well. The mixture will look curdled, but don't worry about that.
- Add the sugar, orange, and butter mixture into a heavy bottom saucepan over very low heat.
- Stirring frequently.
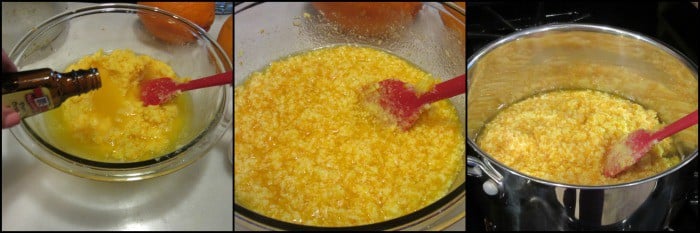
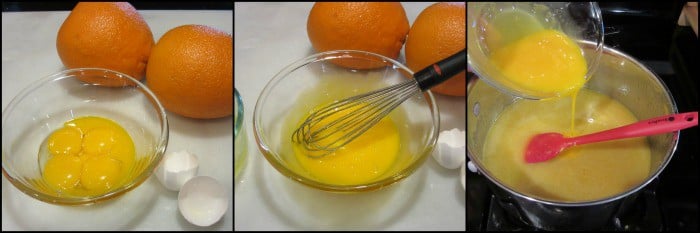
- Meanwhile, separate 5 egg yolks (reserving the whites for another use) and whisk to combine.
- While the orange and butter mixture is cooking over low heat, add the beaten egg yolks (a little at a time) to the heating orange mixture, stirring constantly.
- Continue to add the egg yolks gradually to the saucepan, stirring constantly, until all the egg yolks are incorporated.
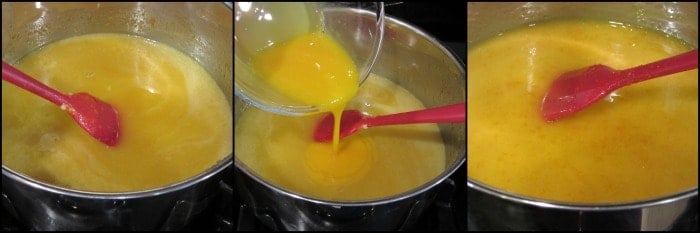
- Continue cooking and stirring the orange curd over LOW heat until the mixture thickens and can easily coat the back of a spoon or spatula and a trail can be left behind after running a finger down the length of the spoon.
- *Note - this will take approximately 20 minutes of cooking on low heat. DO NOT be tempted to increase the heat to medium or you will cook the egg yolks, the eggs will scramble, and you will ruin the curd.
- Once the curd has thickened, pour it into a sieve placed over a bowl, and use a spatula to press the curd into the bowl.
- Discard the bits that are left behind in the sieve.
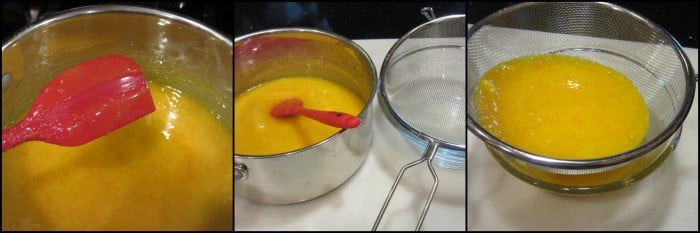
- Allow the hot curd to sit at room temperature until almost completely cooled.
- The curd will thicken upon cooling.
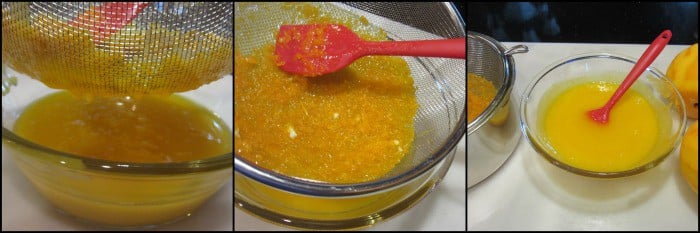
- Once almost completely cooled, cover the bowl with cling wrap and chill in the refrigerator for at least 4 hours.
- The curd will thicken even more during chilling.
- You are now ready to use the homemade orange curd for a multitude of uses.
- Enjoy!!

When you make today's recipe (and I hope that you will), I'd appreciate it if you'd take the time to come back and give it a star rating along with a comment on why you rated as you did.
Search engines such as Google appreciate comments and ratings and, in turn, will show my recipes to more people. Please look for the pink star rating box within the printable recipe card. Thank you!!
Printable Recipe Card

Homemade Orange Curd
Equipment
Ingredients
- 4 medium navel oranges peeled (approximately 4-5 tablespoons of zest)
- 1½ cups granulated sugar
- ¼ pound butter softened
- 5 large egg yolks
- ½ cup fresh orange juice
- ½ teaspoon orange extract optional
- pinch salt
Instructions
- Add the orange peels (making sure not to get the bitter white pith) into a food processor. Process until small and crumbly bits are formed.
- Scrape down the sides of the food processor.
- Add the granulated sugar and process again until the sugar and orange peel are completely combined.
- Scrape down the sides of the food processor again.
- Add the orange and sugar mixture to a medium bowl along with a pinch of salt.
- Using a spoon or spatula, work the softened butter into the orange and sugar mixture until blended.
- Add the fresh orange juice and orange extract (optional). Stir well. The mixture will look curdled, but don't worry about that.
- Add the sugar, orange and butter mixture into a heavy bottom saucepan over very low heat. Stir frequently.
- Meanwhile, separate 4 egg yolks (reserving the whites for another use) and whisk to combine.
- While the orange and butter mixture is cooking over low heat, add the beaten egg yolks (a little at a time) to the heating orange mixture, stirring constantly.
- Continue to add the egg yolks gradually to the saucepan, stirring constantly, until all the egg yolks are incorporated.
- Continue cooking and stirring the orange curd over LOW heat until the mixture thickens and can easily coat the back of a spoon or spatula and a trail can be left behind after running a finger down the length of the spoon.*Note - this will take approximately 20 minutes of cooking on low heat. DO NOT be tempted to increase the heat to medium or you will cook the egg yolks, the eggs will scramble, and you will ruin the curd.
- Once the curd has thickened, pour it into a sieve placed over a bowl, and use a spatula to press the curd into the bowl.Discard the bits that are left behind in the sieve.
- Allow the hot curd to sit at room temperature until almost completely cooled.Curd will thicken upon cooling.
- Once almost completely cooled, cover the bowl with cling wrap and chill in the refrigerator at least 4 hours.The curd will thicken even more during chilling.
- Spoon the chilled orange curd over pancakes, cake, toast, scones...you name it.
Video
Notes
Nutrition
I sincerely hope you've enjoyed today's sweet homemade orange sauce recipe as much as I've enjoyed bringing it to you!

Should you have any questions or comments regarding anything you've seen on my site, please don't hesitate to reach out to contact me. It is always my distinct pleasure to get back with you just as soon as I possibly can!
Thank you so much for visiting me today in my Kudos Kitchen. I hope you found something you'll love and that you will come back and visit me often. Please know that there is always room for you around my kitchen table!
Until we eat again, I hope you have a delicious day!


All of the recipes you'll find here on my website are in loving memory of my son, Greg, who left this earth far too soon and will be forever in our hearts.

Julie says
Oooh I see cream puffs filled with orange curd maybe mixed with some pastry cream, topped with chocolate ganache in my future!
Renée says
Hi, Julie. I'm glad you like this recipe. As a matter of fact, I have an orange cream éclair recipe already on my site.
Please check it out if you're interested. https://www.kudoskitchenbyrenee.com/profiteroles-orange-curd-whipped-cream/
Have a wonderful day and thanks for visiting.
Renee
Susan says
Question: Why not use a microplaner or kitchen rasp to obtain the zest from the oranges? Is it necessary to cook the peel for the pectin, to help with gelling or setting the curd?
Renée says
Hi, Susan!
That's a valid question and one that's easy for me to answer. Since this recipe calls for so much zest, I find it easier (and much faster) to use a vegetable peeler and take full, shallow strips off the citrus instead of rasping each individual orange. Of course, using a microplane will work as well (and without as much clean-up), so feel free to choose your kitchen tool of choice for this particular task. Both will work, but I really like the food processor method for larger amounts of zest.
I hope this helps.
Take good care,
Renee
Tammie says
Does this actually taste like orange without adding the extract? I've made an orange curd before, that one called for the use of an orange liquor, optional of course but I didn't use it. It also called for the use of two different kinds of oranges and basically what your recipe is calling for, including the lemon for acidity but that curd didn't taste anything like orange. It was more of a light flavored lemon curd. When I see the word optional, I take it at face value but again, with that other recipe, it was apparent the optional orange liquor was needed. So again I ask, does this actually taste like orange without the optional ingredient? I would hate to not only waste my time but money should it actually be needed. Thanks for your answer in advance...
Renée says
Hi, Tammie!
Thanks for your question.
I'm going to be completely honest with you. Since I did add the ½ teaspoon orange extract (I happened to already have it in my pantry), I don't honestly know how strong of an orange flavor it will have without that ingredient. That said, as you can see from the recipe, there is A TON of orange zest called for, and also a good amount of fresh orange juice so those two factors alone lead me to believe that the orange extract would be a totally optional ingredient and only used to punch up an already strongly flavored orange curd. I don't know if this actually answers your question, but it's the best I can do. I'd love to hear back from you should you decide to make this recipe, with or without the extract. Thanks so much.
Renee
Mike says
Is there a typo in the recipe? In the list of ingredients it calls for 5 egg yolks. In the directions it says to use 4.
Renée says
Yes, the instructions had a typo. So sorry. This is the reason I take photos of the process so I can double check myself in case of errors.
All the photos have 5 egg yolks so that's what I used. Sorry for any confusion this may have caused and I'm sorry I wasn't able to get back with you sooner, Mike.
Toni says
I would love to try this! I am sure my kids will love it!
Renée says
Then you should! Make your kids happy 🙂
Liren | Kitchen Confidante says
What a luscious curd! Your tips are so thorough!
Renée says
Thank you, Liren. I'm glad you find them helpful!
Sara says
What a well thought out and organized tutorial! Perfect step by step demonstration! Such a delicious sauce to serve with scones or in a bar recipe!
Renée says
I appreciate that, Sara. Thank you so much!!
Marsha says
What a gorgeous looking curd - can't wait to try it!
Shadi Hasanzadenemati says
Love this beautiful curd, it's perfect for baked goods.