What's not to love about Mom's Best Apple Hand Pies? They're easy to make, and with just a little bit of effort, you can show your loved ones they're the apple of your pies!


You can make these apple hand pies for any day of the year simply by using a different cookie cutter and, I promise, you'll love them no matter what the occasion. Maybe even just because it's Monday. 🙂
This pie crust has got to be the easiest and best-tasting pie crust I've ever made. In the past, I'd never been that good at making the crust, but now I think I can safely say that I've got it down.
Light and flaky, this is the perfect crust, and it is sure to make you a pie-making hero to your family and friends! No more store-bought pie crusts for us…not when making it at home, from scratch, is SO easy and delicious!


Let's start with the crust, shall we?
This is my recipe that I like to call Mom's Homemade Pie Crust.
Save this for later.
Email forwarding service for saving information.
MOM'S BEST APPLE HAND PIES
Makes: 10-12 4" pies Prep Time: 90 minutes including chill time Bake Time: 35-40 minutes
1 recipe for perfect pie crust (above), chilled
For the filling:
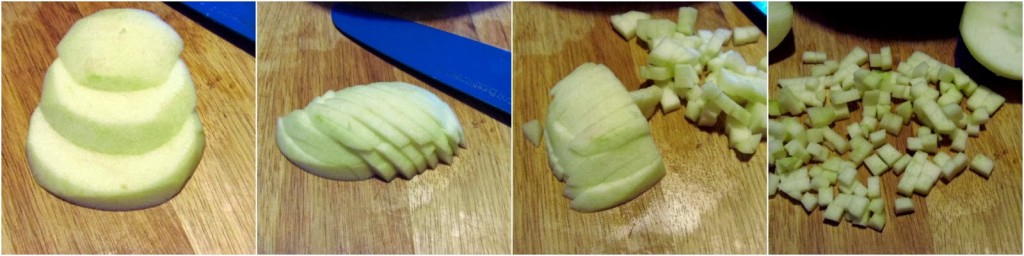
2 granny Smith apples, peeled and diced into ¼" cubes (see photo below for how-to steps)
4 tablespoons sugar
1 tablespoon lemon juice
1 teaspoon pure vanilla extract
¼ teaspoon salt
2 tablespoons all-purpose flour
For the icing:
1 cup powdered sugar
1 teaspoon pure vanilla extract
1 -2 tablespoons milk (depending on your preferred consistency)
sanding sugar if desired
-Preheat the oven to 350 degrees.
-In a medium-size bowl, combine all of the filling ingredients and mix well.
-Unwrap one dough disc at a time. On a lightly floured surface, roll the dough to ⅛" thickness.
-Using large cookie cutters of your choice, cut out two of each shape for each hand pie.
-Place one of the cut crusts onto a parchment-lined baking sheet.
-Place approximately 1 - 1 ½ tablespoons of apple filling into the center of each crust.
-Top the apple filling with the corresponding 2nd cut crust and crimp the edges shut with the tines of a fork.
-Continue the same process with the remaining dough. *Note - the scraps can be re-rolled and used again to make additional pies.
-Using a sharp paring knife, cut a small vent hole into the top of each pie.
-Bake in preheated oven for approximately 35-40 minutes or until the pies are a nice golden brown.
-Cool completely on a baking rack and then ice or dust with powdered sugar.
-To make the icing, mix together the powdered sugar, vanilla, and 1 tablespoon of the milk. If the consistency is too thick, add a splash more milk until you come up with a thick yet drizzling consistency.
-Place the icing into a zip lock bag and snip the corner with scissors. Or you can use a parchment triangle or piping bag. Drizzle (or pipe) the icing over the tops of the baked pies.
-Sprinkle the wet icing with sanding sugar, if desired, and serve!

So there you have it, folks. A simply delicious, flaky apple hand pie that you can pick up and eat on the go or sit down and savor, slowly, with the ones you love!

Should you have any questions or comments regarding anything you've seen on my site, please don't hesitate to reach out to contact me. It is always my distinct pleasure to get back with you just as soon as I possibly can!
Thank you so much for visiting me today in my Kudos Kitchen. I hope you found something you'll love and that you will come back and visit me often. Please know that there is always room for you around my kitchen table!
Until we eat again, I hope you have a delicious day!


Paula says
Delicious and very *apple of my eye* appealing. Love this idea for a Valentine's treat.
Renee Goerger says
Thanks Paula! These little pies would be good with other filling too. My son Adam loves apple so that's the route I went. Next time...cherry 🙂