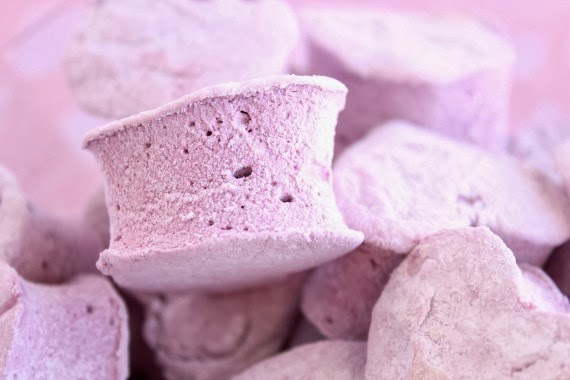
If you've ever wanted to make your own Homemade Heart Marshmallows, maybe now is the time. Let me show you just how easy they are to make!

*Disclaimer - This recipe was originally published in 2014. I'm working hard to update all my older recipes with recipe cards, new photos, and additional recipe information. But, getting to all of them will take time. Please bear with me. In the meantime let me assure you that this recipe is still a winner and one I'm sure you'll be well pleased with when you make it at home.
For a long time now, it's always impressed me whenever I see somebody who's taken the time to make their own marshmallows.
Homemade marshmallows have been on my list of things I've wanted to make in my own kitchen for a long time. Well, I finally made some, and you know what? They're really easy to make, and they taste far better than the ones you buy in the grocery store.
I found this recipe on the Food Network website and they listed this as an intermediate level of difficulty. I'm here to tell you, on a scale of 1 - 10, 1 being really easy and 10 being really difficult, this rates about a 3.
As long as you have a stand mixer for whipping and a candy thermometer for making sure your sugar is at exactly the right temperature, it's a no-brainer.
Save this for later.
Email forwarding service for saving information.
The only thing I did differently to the Food Network's recipe was that I added some pink gel food coloring in order to make pink hearts for Valentine's Day.
Looking back, I wish I would have kept them white because I wasn't all that thrilled with the pink color I'd arrived at. For you, I would recommend you keep your marshmallows white. Unless of course you're like me and can't leave well enough alone. LOL
Trust me, I get it!

*Note - If you're using a specialty cutter (like I did with the hearts) you'll not get the same yield as you would if you cut your marshmallows into traditional square shapes. For the largest yield of presentable marshmallows, I suggest cutting them into squares (which is how the recipe is written).
HOMEMADE MARSHMALLOWS {PRINT THIS RECIPE}
Yield: Approximately 3 dozen large square shape or 9 dozen mini square shape marshmallows
Prep Time: 35 minutes (plus 4 hours to allow the marshmallows to set)
3 packages of unflavored gelatin
1 cup ice water, divided
1 ½ cups granulated sugar
1 cup light corn syrup
¼ teaspoon salt
1 teaspoon vanilla extract
¼ cup powdered sugar
¼ cup cornstarch
baking spray
-In the bowl of a stand mixer, add the gelatin to ½ cup of ice water. Stir and set aside.
-In a medium saucepan over medium heat, combine the remaining ½ cup water, granulated sugar, corn syrup, and salt. Cook, stirring occasionally until the sugar is melted.
-Increase the heat just slightly and allow the mixture to come to a boil, stirring occasionally. After about 7-8 minutes, use a candy thermometer to check the temperature. Once it reaches 240 degrees, immediately turn off the heat.
-Carefully pour the hot sugar mixture into an easily pourable glass measuring cup.
-Place the bowl of the softened gelatin onto the stand mixer base and attach the whisk. Turn the mixer on low speed and while it's running, slowly pour the hot sugar syrup down the side of the bowl and into the gelatin mixture. Once you have added all of the hot syrup, increase the speed of the mixer to high. Continue to whip the mixture at high speed until it becomes very thick and has increased in volume (approximately 12-15 minutes).
-Add in the vanilla extract and food coloring (optional) and continue to whip for an additional 1-2 minutes.
-While the mixture is whipping, prepare a 9x13 baking pan by spraying it with baking spray.
-In a medium bowl, stir together the powdered sugar and cornstarch. Add about ¼ cup of this mixture into the prepared pan and move it around to completely coat the bottom and sides of the pan.
-Scrape the marshmallow mixture into the prepared pan, and use a spatula that has been sprayed with baking spray to evenly spread the mixture into the pan.
-Sprinkle the top with additional powdered sugar/corn starch mixture and set aside the remaining sugar mixture for later.
-Allow the marshmallows to set for at least 4 hours.
-Turn the marshmallows out onto a cutting board and cut them into the desired size and shape (using a cookie cutter or pizza wheel) you're looking to make.
-Toss the cut marshmallows into a bowl with the remaining powdered sugar/corn starch mixture and toss to coat.
-These marshmallows will keep for up to a week in a sealed, airtight container.
Well then, I think it's about time that I go make a few steamy mugs of Vermont Hot Chocolate so I can float a few of these babies in it.
Should you have any questions or comments regarding anything you've seen on my site, please don't hesitate to reach out to contact me. It is always my distinct pleasure to get back with you just as soon as I possibly can!
Thank you so much for visiting me today in my Kudos Kitchen. I hope you found something you'll love and that you will come back and visit me often. Please know that there is always room for you around my kitchen table!
Until we eat again, I hope you have a delicious day!


All of the recipes you'll find here on my website are in loving memory of my son, Greg, who left this earth far too soon and will be forever in our hearts.

Paula says
Something I have yet to try and make. Though the pink shade didn't quite come out the way your liked, I think these look great.
Renee Goerger says
Thanks Paula. Next time I make them, I'll be sticking with plain white. I still have so much food coloring left over from my cookies days that I just couldn't help myself this time 😉
C.S. Weaver says
Homemade marshmallows are the bomb! Much easier than one would imagine. Made some with mint flavoring for Christmas, great with hot cocoa. Your heart-shaped ones are cute and would also look great floating in a mug of dark chocolate cocoa. Or what about lemon flavored in a cup of tea?
Renee Goerger says
Oooh, mint marshmallows sound like a fabulous idea! I like the idea of lemon too 🙂
Renee - Kudos Kitchen
Faye Wilkerson says
Haven't made marshmallows since college Food 101. The mugs are very creative.
Renee Goerger says
Thanks Faye. Glad you like the mugs 🙂
Renee - Kudos Kitchen