
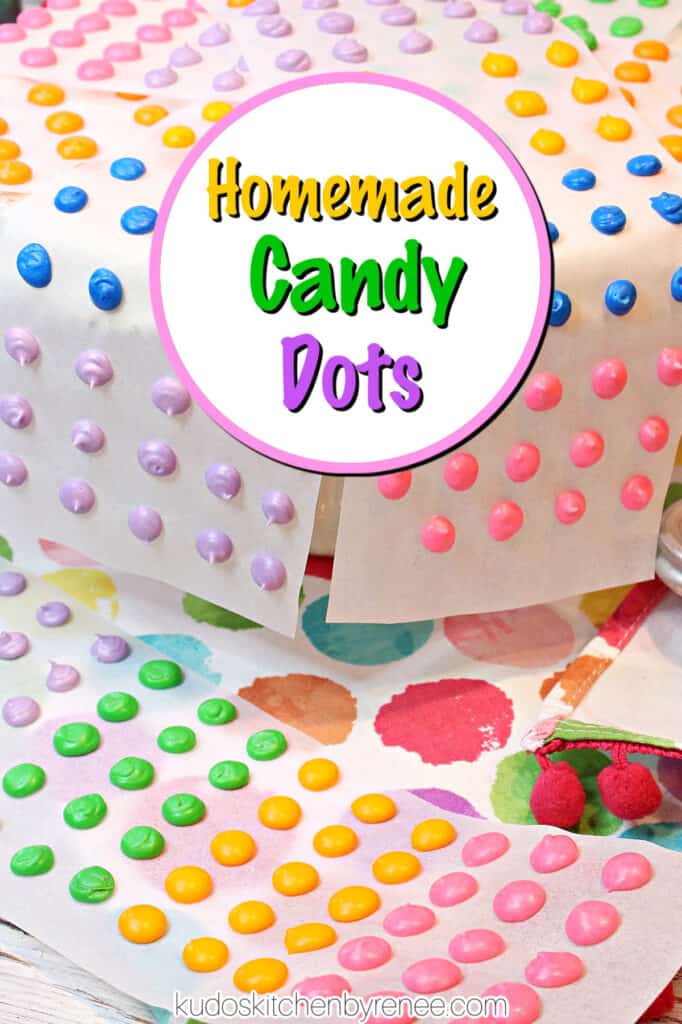

Homemade Candy Dots conjure up childhood memories of simpler times. These tasty little treats are easy to make, and they're fun to eat...Just like you remember!
Whether you call them candy dots or candy buttons, the mere sight of these little colorful candies brings a smile to just about everyone's face!!
Table of Contents Found Here
- The ingredient list:
- Kitchen tools and equipment needed:
- How this recipe came to be
- How long to make Homemade candy buttons
- What is the royal icing consistency needed to make candy buttons
- An important tip for royal icing consistency
- How to store royal icing
- How long do candy buttons take to dry
- True confessions
- How to make a piping bag out of a parchment triangle
- Can regular parchment paper or another type of paper be used for strips
- Other uses for colorful candy dots
- Additional recipes featuring royal icing:
- Printable Recipe Card
- Please comment if you've made this recipe.

The ingredient list:
- confectioners sugar
- meringue powder
- light corn syrup
- warm water
- orange extract or your favorite flavor
- gel food color
Kitchen tools and equipment needed:
- hand mixer or stand mixer
- measuring cups and spoons
- spoons
- medium mixing bowls
- parchment paper strips
- parchment triangles or disposable piping bags
- baking sheets (optional)
How this recipe came to be
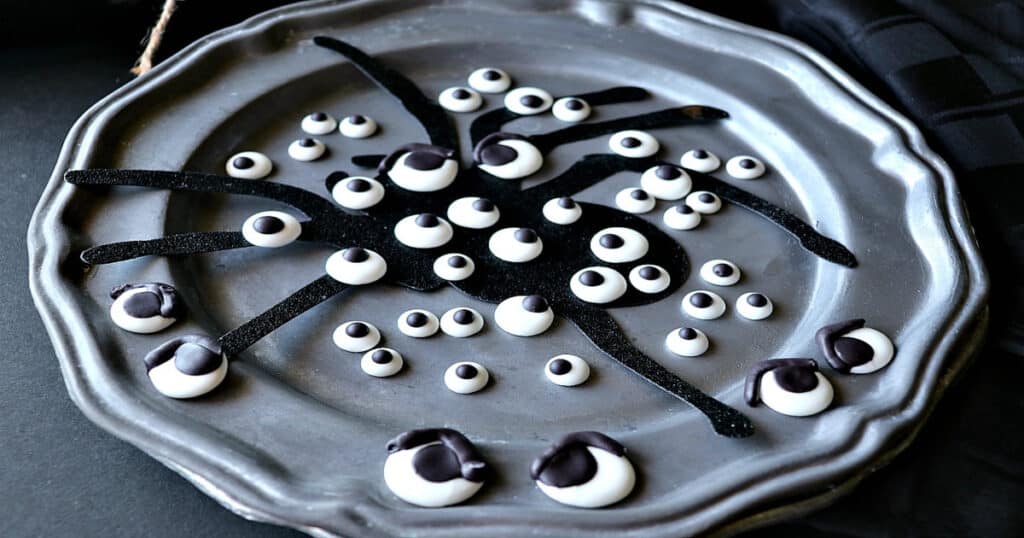
In all honesty, I had the idea for this recipe while I was making these homemade royal icing candy eyeballs (shown below).
I think you'll see the similarity and how the inspiration popped into my head.
I sat on the idea for many, many months, and then, when the time was right, I decided to make (and publish) this recipe, including video instruction, just for you!
How long to make Homemade candy buttons
That depends on how many colorful dot strips you plan to make and how many colors you choose to use.
Naturally, the more you make, the more time it will take.
That said, the making of the white royal icing itself will take about 5 minutes to prepare, and then the mixing of the specific colors will take a few minutes per color.
What is the royal icing consistency needed to make candy buttons
Not too thick, and not too runny!
The best example I can give is a consistency similar to pancake batter.
It's always best to make a few test dots first and see if you need to make adjustments to the consistency.
An important tip for royal icing consistency
It's essential to start with a too thick consistency, to begin with, rather than one that is too thin.
Remember, it's always easier to add drops of warm water to thin the icing than to add additional confectioners sugar to thicken it.
How to store royal icing
Since this recipe uses meringue powder, this royal icing can be stored in an air-tight container at room temperature.
Feel free to mix each color ahead of time and then store each color in its own air-tight container. This step can be a real-time-saver if needed.
How long do candy buttons take to dry
I like to give them a full 24 hours, so plan accordingly so you'll have room to keep them out and in a single layer before moving.
Working on baking sheets can be helpful for moving the strips after they've been piped should you need to stack, or move them.
Save this for later.
Email forwarding service for saving information.
True confessions
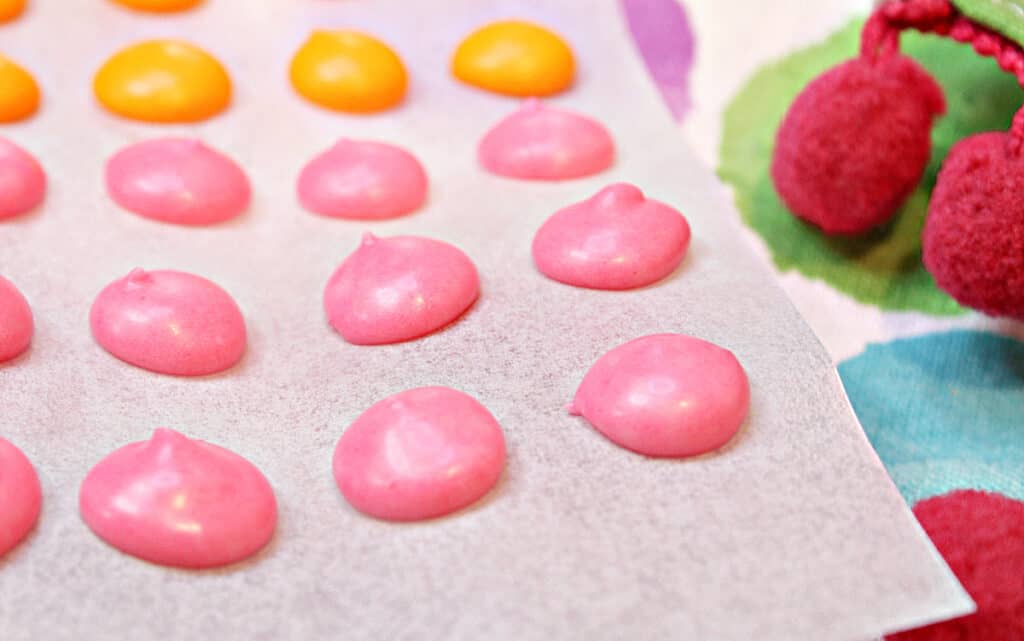
Honestly, I was a little heavy-handed with the gel food color when it comes to the colors you see here in my photos.
Next time I make these candy dots, I'll use the color a bit more sparingly to make the dots more pastel in color (as I remember) and not so deeply hued.
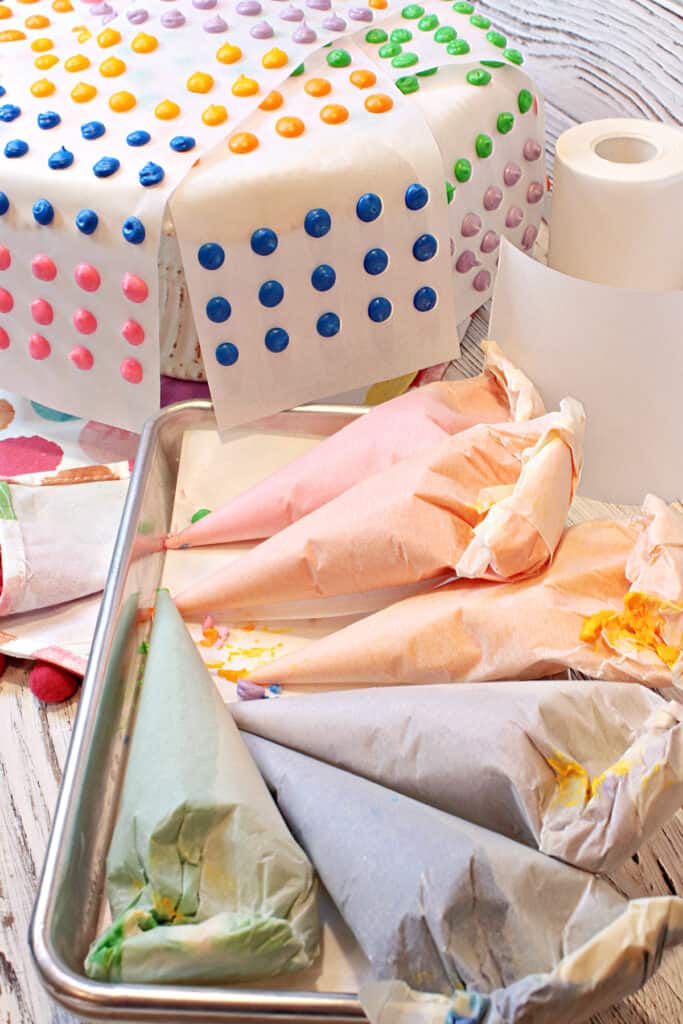
How to make a piping bag out of a parchment triangle
Can regular parchment paper or another type of paper be used for strips
Good question, but part two to that question is sadly one don't have an answer for.
While I'm confident that regular (white) parchment paper can be cut into strips (be very careful to keep the cuts as straight as possible), using standard white copy paper (for example) may be tricky.
There's a possibility that the white copy paper may be too thick, and that the candy will stick badly to the paper and be very hard to remove after the dots are fully dry.
That said, I kind of remember the original dots sticking to the paper pretty firmly, and that eating a thin layer of paper along with the candy was also something that happened pretty regularly. Ah, the memories. LOL!
If you decide to give it a go, write me and let me know how it worked for you. I'd love to hear!!
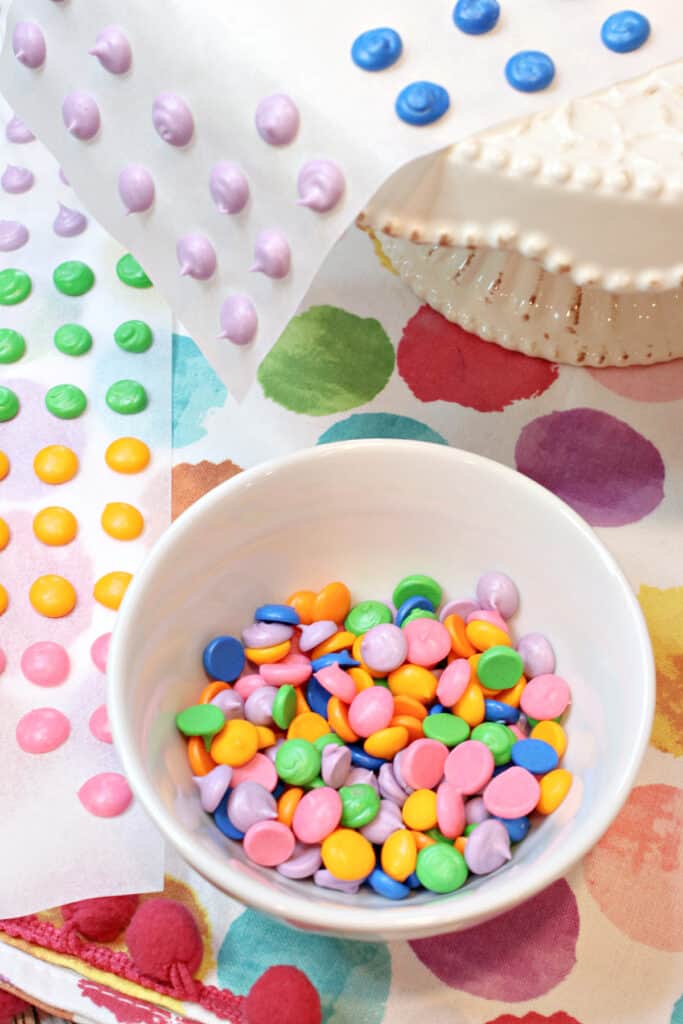
Other uses for colorful candy dots
Skip the jimmies entirely.
Use them to pack a punch of color on decorated cakes, cupcakes, and whatever else you can think of!
Additional recipes featuring royal icing:
*American Flag Heart Cookies (shown below)
While these adorable red, white, and blue sugar cookies do take a little extra time to prepare, American Flag Heart Decorated Sugar Cookies are definitely worth the effort! They’re sure to be a hit at your next patriotic party or event.

*Homemade Candy Eyeballs (shown at the top of the article)
EYE think you’ll agree that making and using these homemade candy eyeballs for your Halloween sweets and snacks, that your freaky tricks and treats will never LOOK the same again!
*Polka Dot Heart Decorated Sugar Cookies (shown below)
When your heart desires adorable cookies, look no further than this easy yet delicious Polka Dot Heart Sugar Cookies recipe! They’re perfect for Valentine’s day…and beyond!

*Gingerbread Trees and Snowflake Cookies (not shown)
The simple white royal icing design for these Gingerbread Trees and Snowflake cookies really stands out against the brown of the gingerbread. They’re stunning AND delicious!!
*Homemade Candy Dots (shown below) THIS IS THE PLACE!!

When you make today's recipe (and I hope that you will), I'd appreciate it if you'd take the time to come back and give it a star rating along with a comment on why you rated as you did.
Search engines such as Google appreciate comments and ratings and, in turn, will show my recipes to more people. Please look for the pink star rating box within the printable recipe card. Thank you!!
Printable Recipe Card


HOMEMADE CANDY DOTS
Equipment
- piping bags or parchment triangles
- small mixing bowls
- stand mixer or hand mixer
- mixing spoons
- parchment paper strip rolls
- meringue powder
Ingredients
- 3 cups confectioners sugar
- ½ teaspoon orange extract or favorite flavor
- 1½ tablespoons meringue powder
- 2 tablespoons light corn syrup
- ¼-½ warm water, depending on consistency needed
Instructions
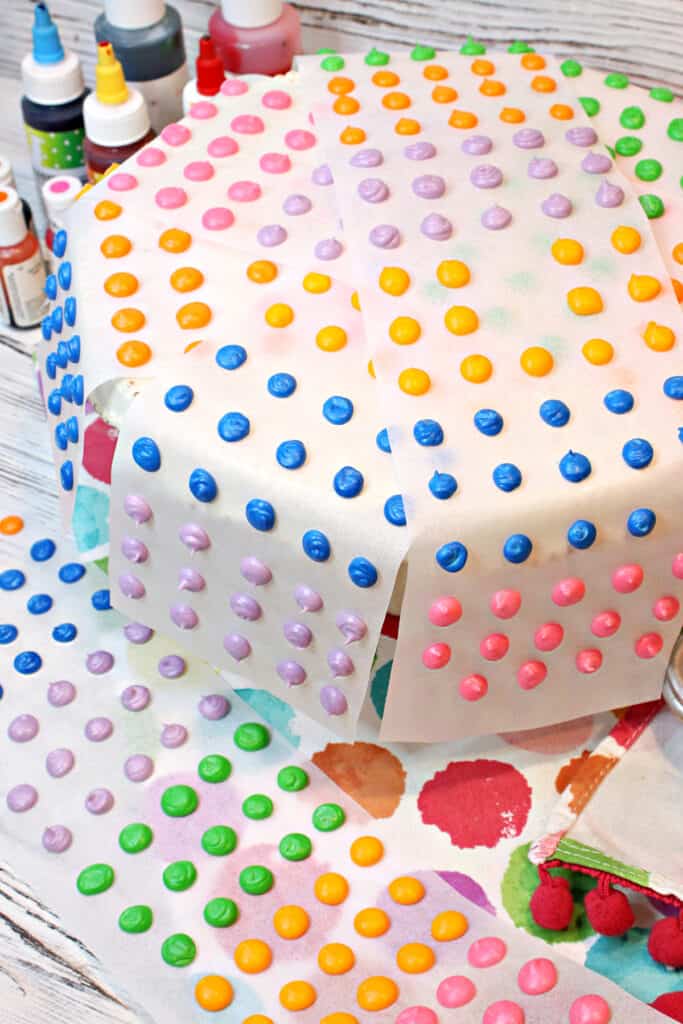
- Blend all the ingredients (starting with ¼ cup warm water), except for the gel color, on low speed.
- Evenly divide the prepared royal icing into small bowls, depending on how many colors you've chosen to use.
- Add a small amount of gel food color to each bowl, and stir well to combine. If a darker hue is preferred, add a touch more gel color, and stir.
- If a thinner consistency is needed, add a touch more warm water, a tiny bit at a time, until you reach the consistency of pancake batter.
- Add the colored icings to individual piping bags and snip off a small corner for piping.
- Pipe small dollops of colored icing onto the parchment paper strips, in straight lines, changing colors as desired.
- *Note- A fingertip wet with water is a good way to tap down any undesirable sharp points after piping.
- Allow the dots to dry completely (24 hours) at room temperature before eating or serving.
Video
Should you have any questions or comments regarding anything you've seen on my site, please don't hesitate to reach out to contact me. It is always my distinct pleasure to get back with you just as soon as I possibly can!
Thank you so much for visiting me today in my Kudos Kitchen. I hope you found something you'll love and that you will come back and visit me often. Please know that there is always room for you around my kitchen table!
Until we eat again, I hope you have a delicious day!


All of the recipes you'll find here on my website are in loving memory of my son, Greg, who left this earth far too soon and will be forever in our hearts.

I sincerely hope you've enjoyed today's fun and colorful homemade candy recipe as much as I've enjoyed making, eating, and bringing it to you!!
Should you have any questions or comments regarding anything you've seen on my site, please don't hesitate to reach out to contact me. It is always my distinct pleasure to get back with you just as soon as I possibly can!
Thank you so much for visiting me today in my Kudos Kitchen. I hope you found something you'll love and that you will come back and visit me often. Please know that there is always room for you around my kitchen table!
Until we eat again, I hope you have a delicious day!
All of the recipes you'll find here on my website are in loving memory of my son, Greg, who left this earth far too soon and will be forever in our hearts.

Comments
No Comments