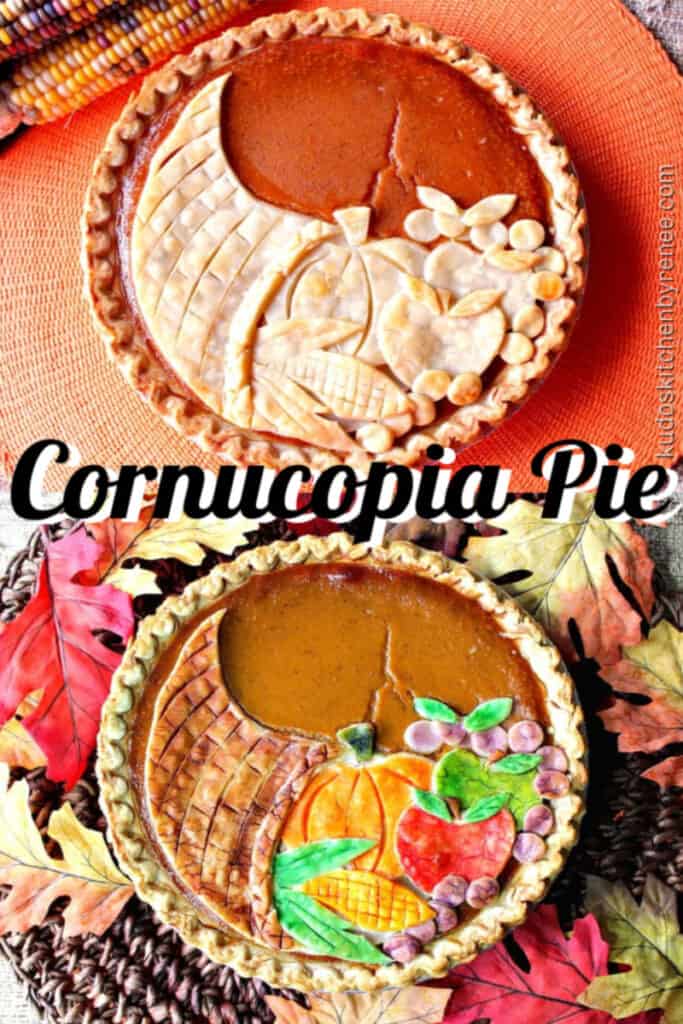
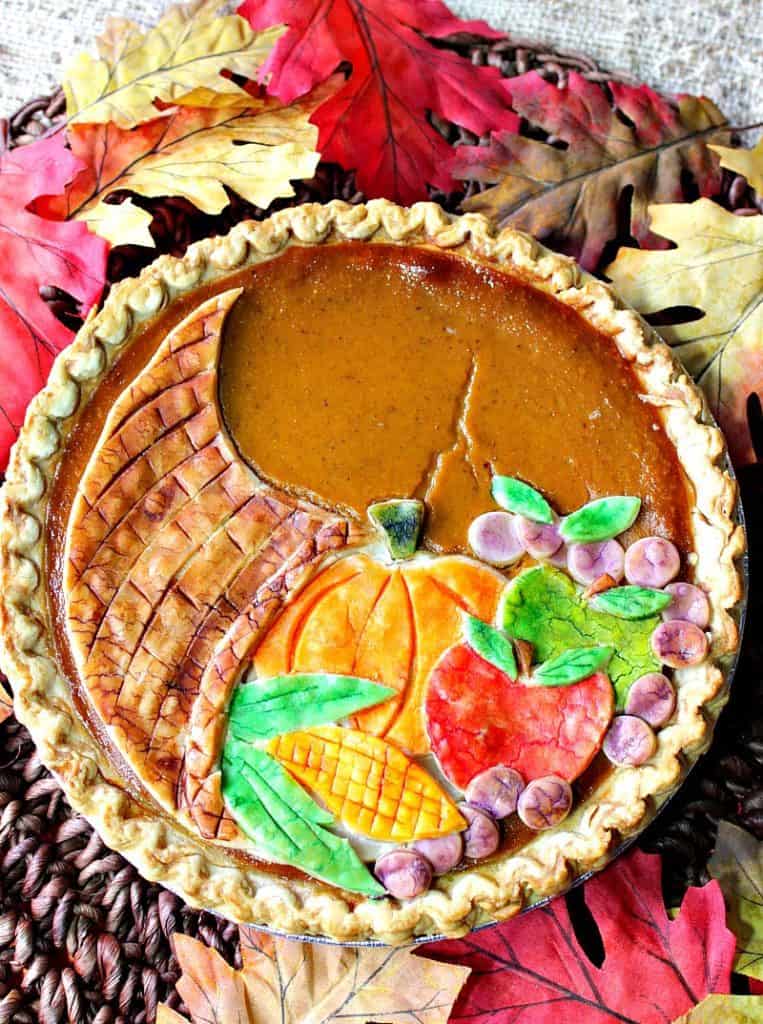
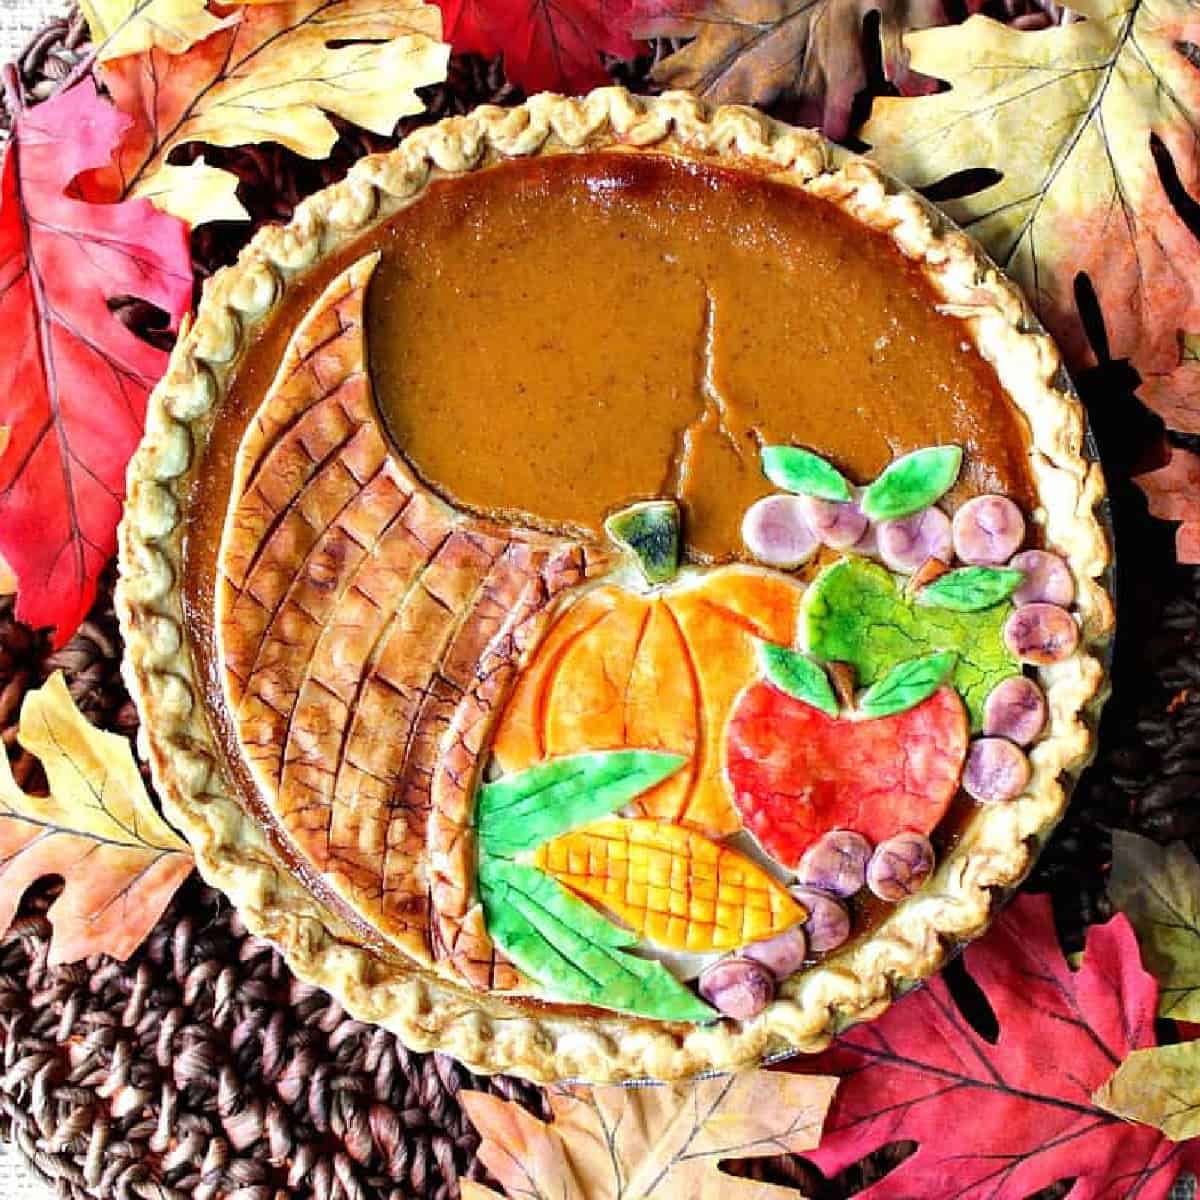
Kick up your pumpkin pie game this Thanksgiving by making this Festive Cornucopia Pumpkin Pie. It's easier to make than you may think. Let me show you how.
This recipe post and its contents may include affiliate links for your consideration. I may earn a commission from qualifying purchases, but your prices are never increased as a result. Thank you.
By now you know I love to embellish and add a flourish to my food, especially around the holidays.
For me, it's exciting and fun to bring something to the table that's traditional, and yet unexpected and new.
Enter stage left, Cornucopia Pumpkin Pie, and take your rightful place in the spotlight.
Table of Contents Found Here
- To paint a pie crust or not? That is the question!
- Kitchen tools and equipment for making a decorative pie:
- The making of a cornucopia pumpkin pie:
- Pie crust recipe:
- Renee's tips and tricks for making this decorative pie:
- The easy instructions:
- A turkey of a pie made quite an impact!
- Additional recipes for Thanksgiving:
- Printable Recipe Card
- Please comment if you've made this recipe.
To paint a pie crust or not? That is the question!
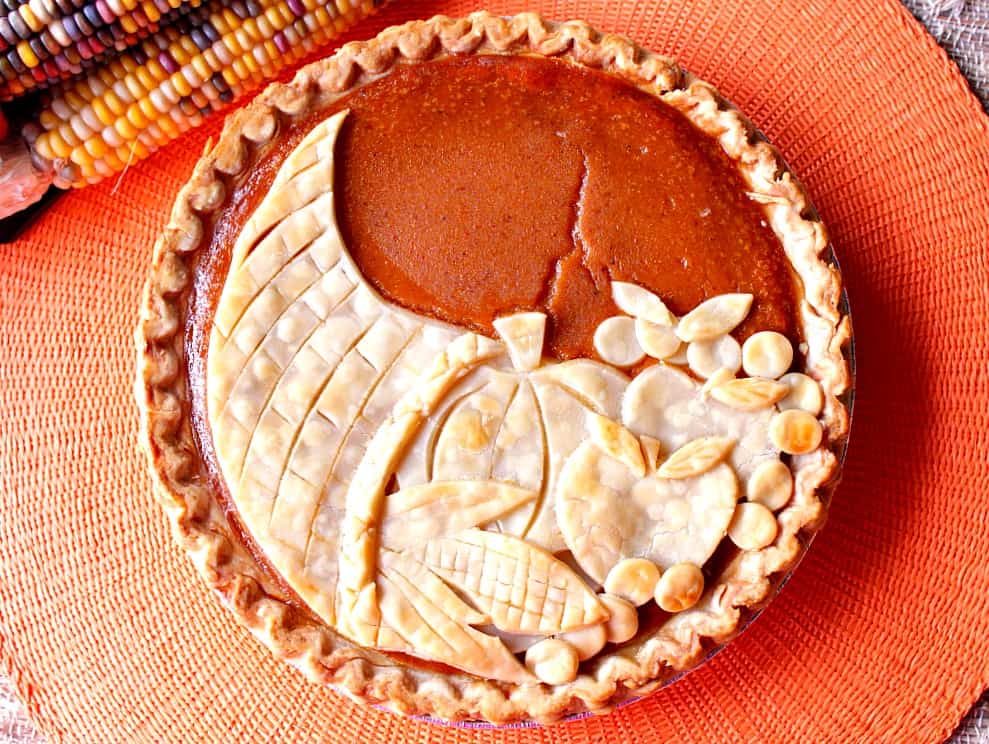
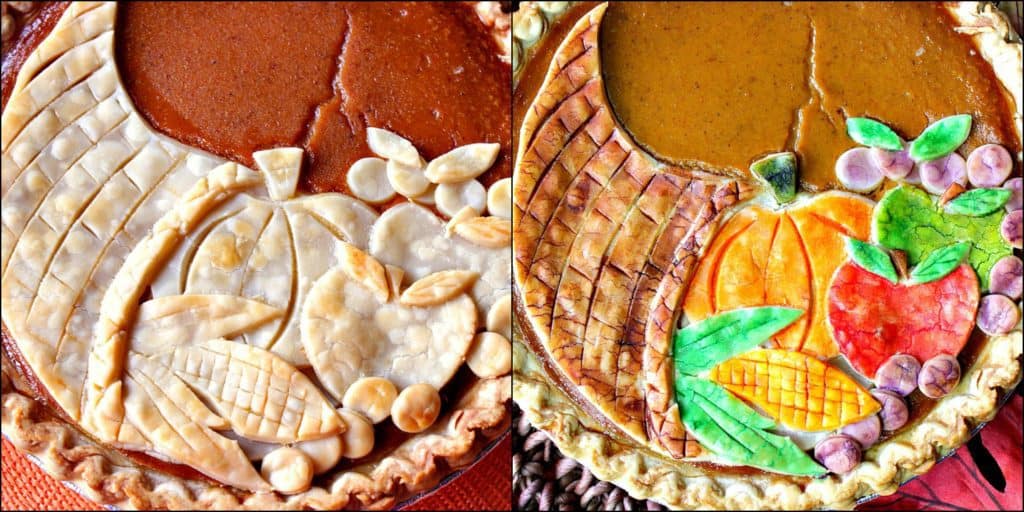
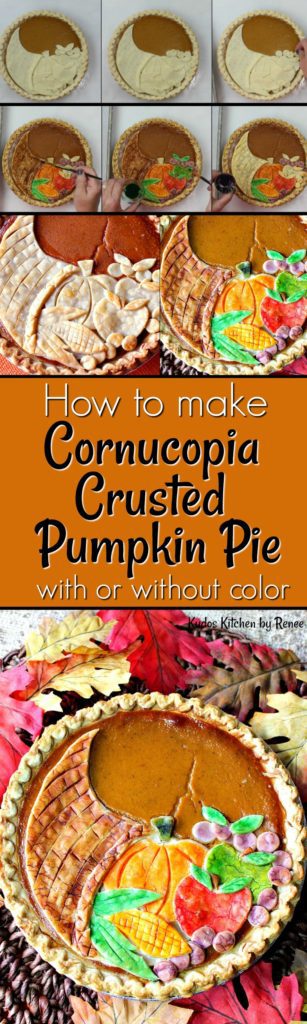
I've decided to show you two ways in which you can make and serve this pie Cornucopia Crusted Pumpkin Pie. With, and without the color.
I actually can't decide which way I like better as I feel they're both charming in their own ways. Plus, not everyone has an array of gel food color in their kitchen pantry to choose from, so I'm keeping it real for you.
What do you think? Both pretty cute, right?

Kitchen tools and equipment for making a decorative pie:
- rolling pin
- paring knives
- offset spatulas
- small prep dishes
- baking sheets
- parchment paper
- pie pan
- food-safe paintbrushes
- gel food color
- ruler
The making of a cornucopia pumpkin pie:
Before I go any further with this post, I have to add a disclaimer to this post as is it not so much a "recipe" as it is a "method" for embellishing your homemade, or store-bought, pumpkin pie.
For the purpose of this post, and to keep it less intimidating than it may already be, I used a store-bought pumpkin pie, and a package of store-bought rolled pie crust which can be found in the refrigerated section of any grocery store.
That said, however, the recipe for my pumpkin pie is listed in the recipe card below. I'd adapted this recipe slightly from my Turkey Crust Pumpkin Pie to make it fit the cornucopia design.
Pie crust recipe:
My wonderful pie friend, Kate McDermott, author of the book "Art Of Pie" shares her recipe HERE for basic pie dough. And also check out Kate's fabulous cookbook "The Art of Pie."
Renee's tips and tricks for making this decorative pie:
- First, is that the pie needs to be partially baked before you add any of the pie crust embellishments on top.
- If the pie is not partially baked, the add-on crust pieces will brown and most likely burn before the whole of the pie is set and cooked through.
- The second tip I have for you is to keep the pie dough for the embellishments chilled until you're ready to roll and cut.
- Then, roll it out the dough to ¼" thickness on a lightly floured surface, and use a very sharp paring knife to cut out all the pieces.
*Note - Feel free to use whatever type of fruits and vegetables you like as the "bounty" of your cornucopia.
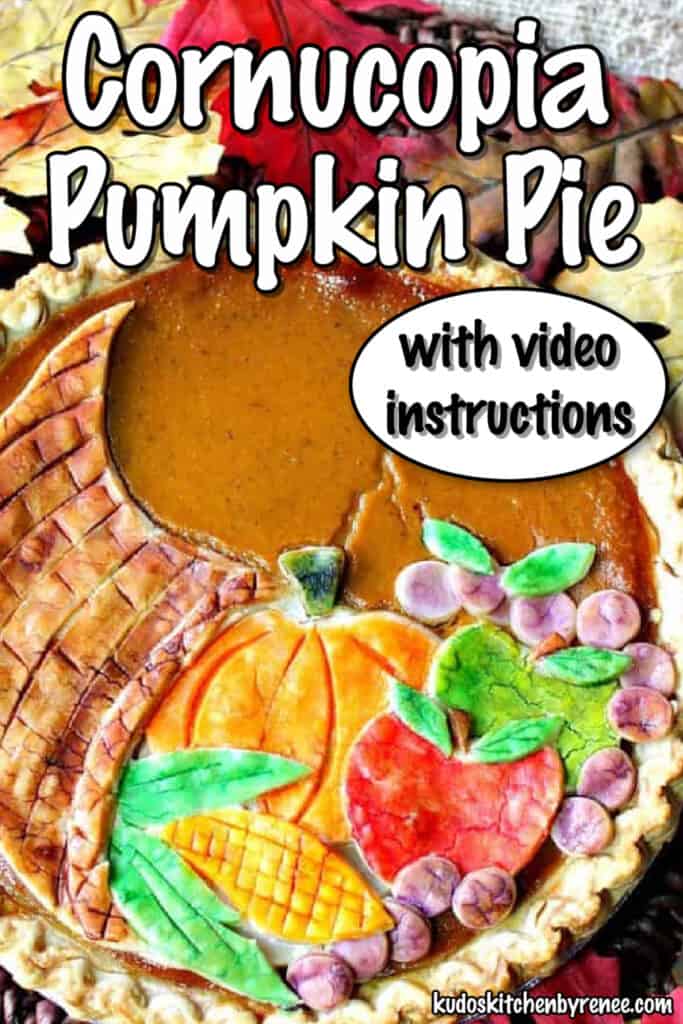
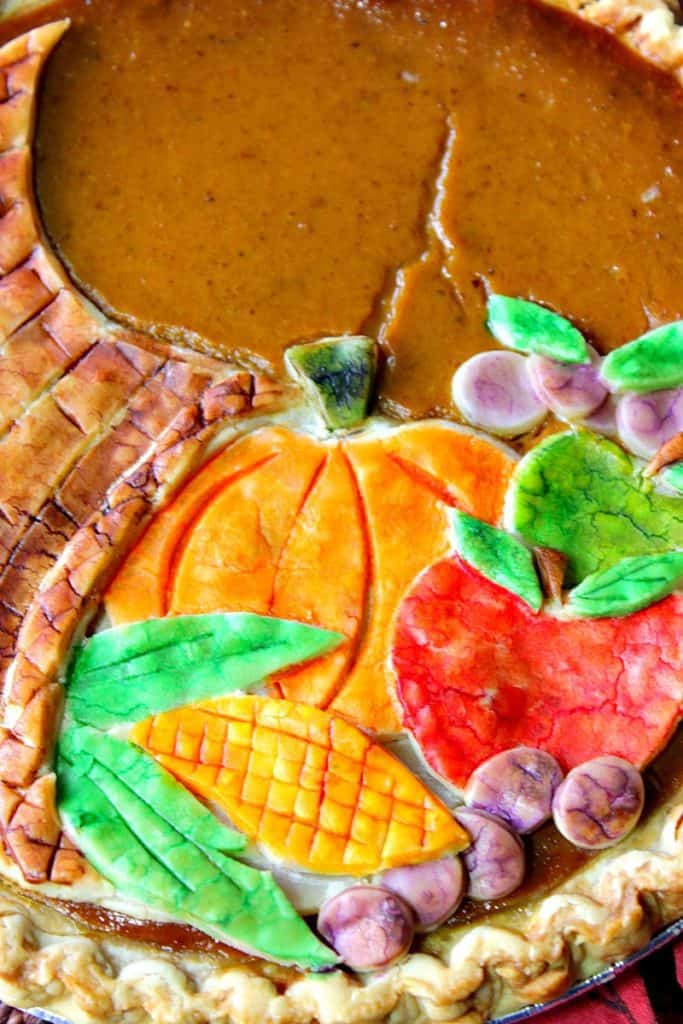
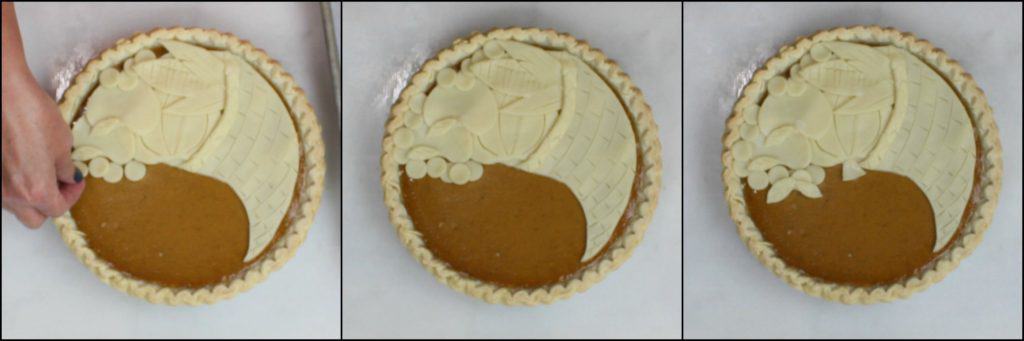
I happen to love pumpkins and corn and thought they'd give the cornucopia crusted pumpkin pie a nice traditional feel, and the apples and grapes were added for the pop of color I knew they'd bring.
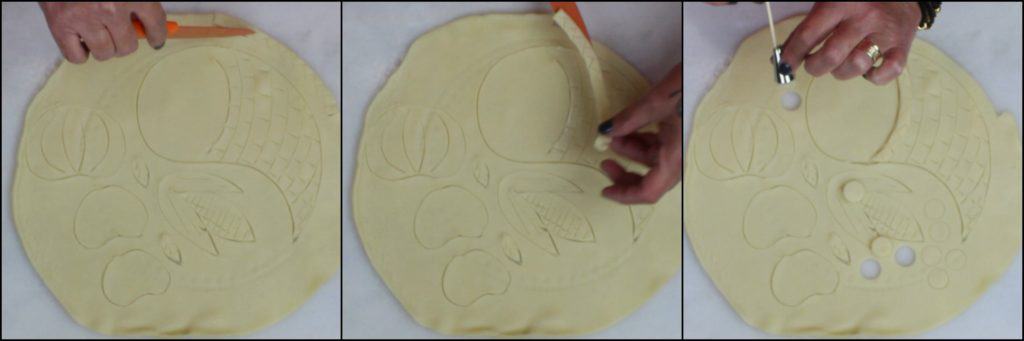
- My third tip for you is to use an actual "tip" (as in piping tip) to cut out the grapes (should you decide to use grapes in your design).
- As you'll see in the photos and video, I used the large end of a piping bag tip (the side that fits onto a piping bag) as my cutter, and then I used a skewer to pop the pie dough out of the tip after each cut, as needed.
- The fourth and final tip I have for you is for when you're scoring the dough, like for the cornucopia basket itself, the corn kernels, and leaves, don't slice all the way through the pie dough.
There were a few instances where you'll see I didn't take my own advice, and it was harder to move those pieces into place. Use a light hand and take your time.
I hope all these tips and tricks will help, not hinder, your desire to make this cornucopia crusted pumpkin pie.
They're not meant to intimidate you, they're meant to inspire and bring out the food artist within YOU!
Save this for later.
Email forwarding service for saving information.
You can do this!!
The easy instructions:
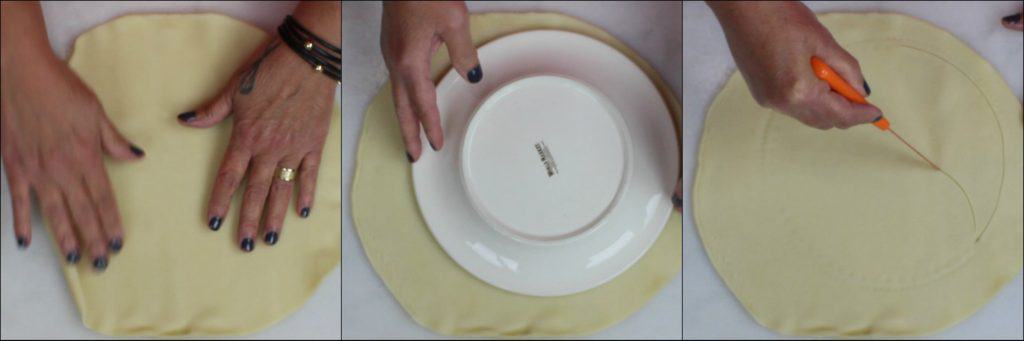
- Roll out your pie dough to ¼" thickness.
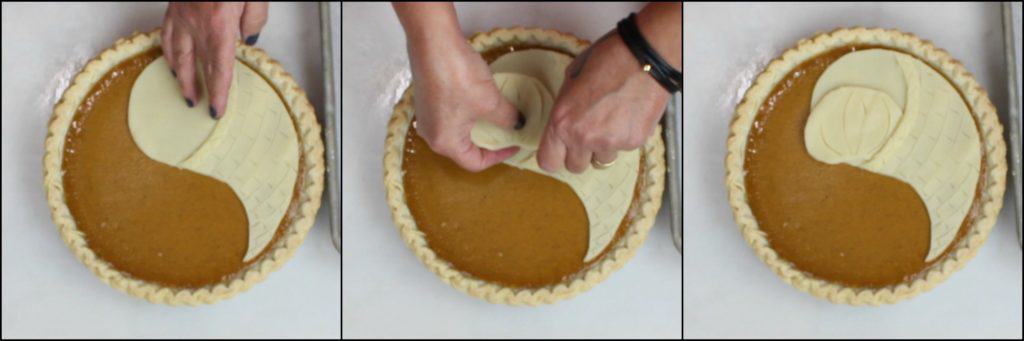
- Use a plate that is roughly the same size circumference as your pie plate (gently press it into the dough so it makes a slight imprint) and use that as your guide as to how big your cornucopia basket should be.
- Use a sharp paring knife to cut out a cornucopia making it crescent in shape with a wide end, and a pointy end.
- Carefully cut out all the fruit and vegetable elements to fill your cornucopia.
- If needed you can find fruit and vegetable templates on the web.
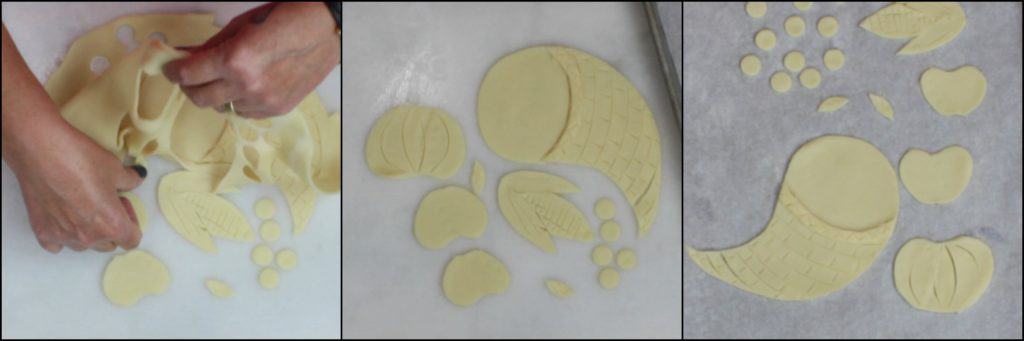
- Once all your pieces are cut, detailed, and scored, remove the unused dough (you can bake that up in separate pieces with cinnamon and sugar so you don't waste it), and place your fruit and vegetable pieces on a parchment-lined baking sheet.
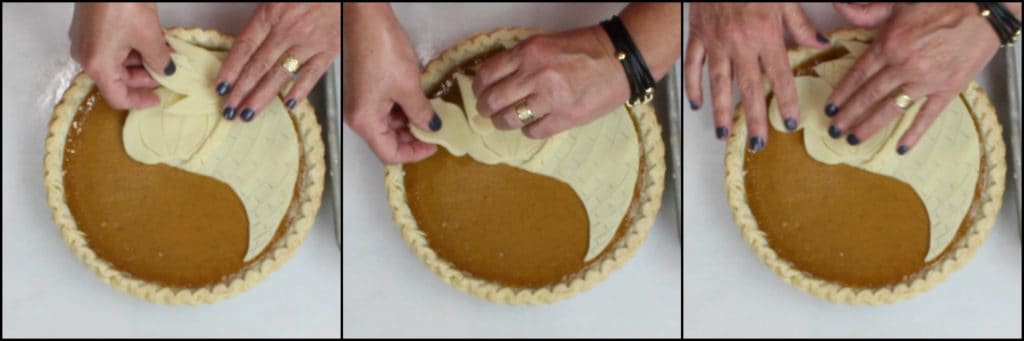
- Start arranging your cornucopia and its contents onto a partially baked pumpkin pie, making sure to cut a slit in the cornucopia and then nestle the contents under the slice so it appears the contents are spilling out of the basket.
- Continue arranging the remaining fruit and vegetable pieces as you see fit, using a light touch of water to stick the pie dough pieces to one another.
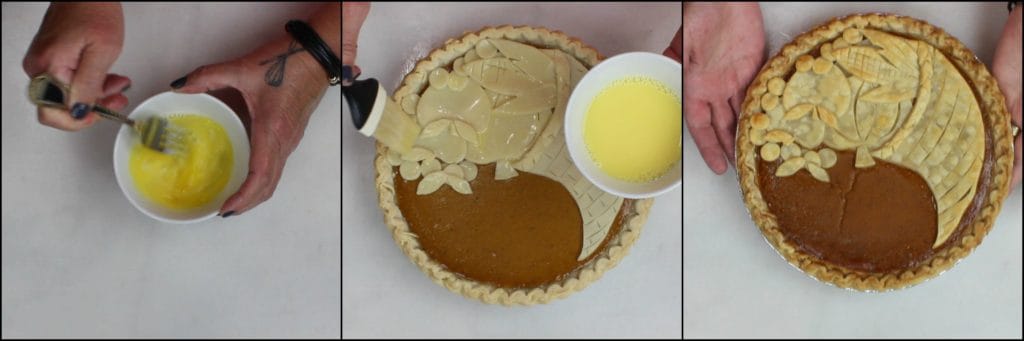
- Mix together an egg and a tablespoon of water and gently brush the egg wash over the completed design.
- Bake the pie to completion (so it's set in the center) at 350-degrees and the cornucopia design is lightly golden brown.
- Cool completely, and serve, or take a few extra steps to add color to your pie.
- If you are painting your pie dough, divide the remaining egg wash between 6 small cups (paper cups work well for this) and add a few drops of gel food color to each cup. I used orange, green, purple, red, green, and yellow.
- Using a clean paintbrush, gently paint the colored egg wash onto the pie crust pieces, adding a second coat if you'd like more vivid colors.
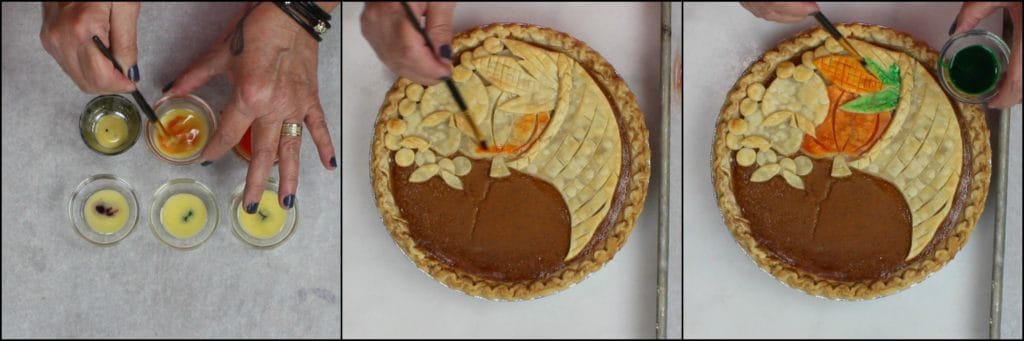
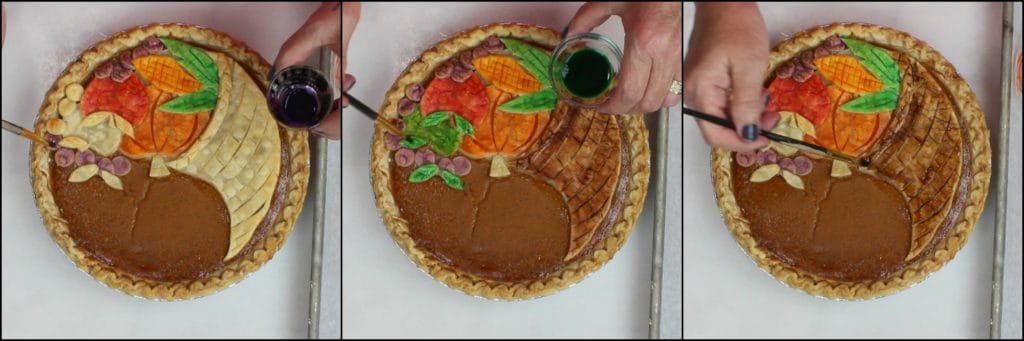
- Continue painting until your design is complete and return the pie back into a preheated 350-degree oven for an additional 20 minutes to set the color. Cool completely and serve.
A turkey of a pie made quite an impact!
If you're familiar with my blog and recipes, then you probably recognize my Turkey Crusted Pumpkin Pie.
This particular pie has been pinned on Pinterest a remarkable 237K times (and counting) and has been shared all over the internet.
I'm completely in awe at how well this little turkey crusted pie design has done (and continues to do) and am SO thankful for how it has resonated with people and how many people contacted me saying how successful they were when making their own Turkey Pumpkin Pies at home (video below).
Now you may think that I'm trying to capture lightning in a bottle and have the same successes a second time around with this new Cornucopia Crusted Pumpkin Pie design...but, can you blame me?!! HaHa.
In all actuality, the success I've had with that pie has only spurred on my creativity and made it more and more exciting for me to push some artistic culinary boundaries.
You can also do this! I promise. I'll bet your pie will be one that wins you rave reviews! Give it a go!
Additional recipes for Thanksgiving:
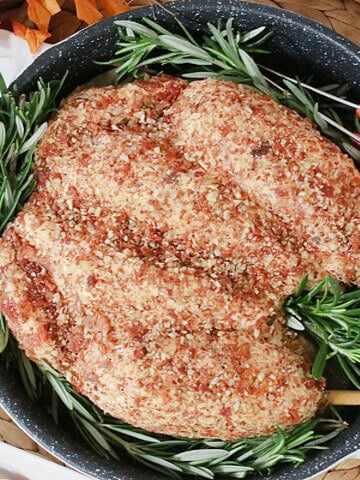
You'll be amazed at how delicious Brown Bag Roast Turkey is! The skin is crispy, and the meat juicy! It’s utter perfection!! This method for roasting a Thanksgiving turkey has it IN THE BAG so don't miss out your chance to serve the best roast turkey you've ever had!
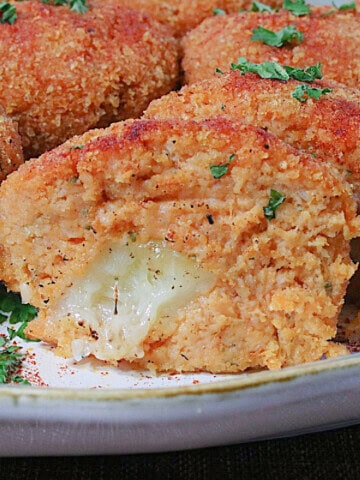
Please don't think this amazing Pretzel Roll Stuffing should only be made for Thanksgiving. After your first bite, you'll be looking for reasons to make it all year long!
This Fall Chopped Salad has all the colors and flavors you love about the season! With roasted vegetables and fresh fall fruit, it will easily grace any table, for any occasion.
When you make today's recipe (and I hope that you will), I'd appreciate it if you'd take the time to come back and give it a star rating along with a comment on why you rated as you did.
Search engines such as Google appreciate comments and ratings and, in turn, will show my recipes to more people. Please look for the pink star rating box within the printable recipe card. Thank you!!
Printable Recipe Card

Pumpkin Pie with Painted Cornucopia Crust
Equipment
- kitchen scale optional
- pinch pot bowls optional for food color
- paper cups optional for food color
Ingredients
- 2 9" round pie crust
- ¾ cup granulated sugar
- 1 teaspoon ground cinnamon
- ½ teaspoon kosher salt
- ½ teaspoon ground ginger
- ¼ teaspoon ground cloves
- pinch freshly grated nutmeg
- 2 large eggs
- 1 can (15 ounces) pumpkin pie purée
- 1 can (12 ounces) evaporated milk
- ½ teaspoon pure vanilla extract
Instructions
- Preheat oven to 375-degrees Fahrenheit (190 degrees Celsius)
- Roll out one of the pie crusts to fit slightly larger than a 9" deep dish pie plate.
- Loosely roll the pie crust upon the rolling pin and transfer it to a waiting 9" pie plate.
- Gently unroll the crust and evenly press the crust into the corners and up the sides of the plate.
- Crimp the edge of the crust with your favorite method of decoration.
- In a medium bowl, whisk together the sugar, cinnamon, salt, ginger, cloves, and nutmeg.
- In a large bowl, whisk together the eggs, pumpkin puree, evaporated milk, and vanilla.
- Add the dry ingredients to the wet ingredients and whisk to thoroughly combine the pie filling so that it's creamy, with no lumps.
- Carefully pour the pie filling into the waiting pie crust in the pie plate.
- Partially bake in a preheated oven for 30-35 minutes.
- While the pie partially bakes, roll out the second pie crust.
- Use your imagination to cut out fruit and vegetable shapes using a paring knife.
- Use water to "glue" the pie pieces together to form your design.
- Remove the partially baked pie from the oven and gently place the pieces of your design into place.
- If coloring the cornucopia now is the time to mix your colors with about 1 tablespoon of egg wash (per color) before the second bake time. *Note - make sure to wash the brush with water between colors.
- Return the pie back to the oven and continue baking until the center of the pie is set, and the crust is completely baked (approximately 30-40 minutes).
- Cool the pie completely on a wire rack before serving.
Video
Notes
Nutrition
I sincerely hope you've enjoyed this post on how to make a Festive Cornucopia Crusted Pumpkin Pie as much as I've enjoyed bringing it to you.
Should you have any questions or comments regarding anything you've seen on my site, please don't hesitate to reach out to contact me. It is always my distinct pleasure to get back with you just as soon as I possibly can!
Thank you so much for visiting me today in my Kudos Kitchen. I hope you found something you'll love and that you will come back and visit me often. Please know that there is always room for you around my kitchen table!
Until we eat again, I hope you have a delicious day!


All of the recipes you'll find here on my website are in loving memory of my son, Greg, who left this earth far too soon and will be forever in our hearts.

Stephanie Pass says
Wow, this looks amazing! My kids love pumpkin pie, and they would totally love to eat this. But, I don't know if I could make myself cut into such a work of art!
Claudia Lamascolo says
The most amazing baker every, I am in awe every time I visit here ... so amazing and creative. I made this recipe last year and back again. Happy Thanksgiving and thanks for sharing your amazing fabulous talents with the world XO blessings to all of you and your
DomesticSuperhero says
Wow this looks SOOOOO good! I can't wait to try it!
Renée says
I really hope you do. I'd also love to see your pie when it's finished if you'd like to share it with me. You can email me a photo at; info@kudoskitchenbyrenee.com
Have fun!!! 🙂
Ashlyn@ Belle of the Kitchen says
Renee this pie is absolutely stunning! You are such an artist! This would bring such a huge wow factor to any Thanksgiving spread!
Renée says
Thank you so much, Ashlyn! I'm hoping that others will try this technique. Anyone can be a pie artist 🙂
Amy @ Little Dairy on the Prairie says
This is so pretty! I love all your pictures to show your progress!
Renée says
Thank you, Amy. I'm glad you like all the photos too.
Michelle says
What a stunning pie! I'm in awe!
Renée says
Thank you, Michelle!
Megan says
This is a gorgeous dessert!
Renée says
Thanks 🙂
TheChunkyChef says
You are such a true artist... love it!
Renée says
You are very kind. I'm hoping to inspire others to try it, too!
delaneyyutzy says
This makes me so excited for Thanksgiving!
Renée says
That is wonderful to hear! Thanks 🙂
Dorothy Reinhold says
This gorgeous! It's like a piece of art! Your steps are so clear I am going to give it a shot!
Renée says
I'm so happy to hear that, Dorothy. I know you'll be successful. Make it your own!