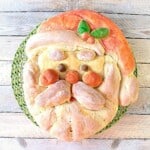
Buttermilk Shaped Santa Bread
Ho! Ho! Ho! This tasty Charming Buttermilk Shaped Santa Bread is as whimsical as he is delicious. With my easy to follow step-by-step instructions, he'll be on your holiday table in no time.
Servings: 16 servings
Calories: 231kcal
Ingredients
- 1 package active dry yeast 3½ teaspoons
- 1 teaspoon granulated sugar
- ¾ cup warm water 110-115 degrees
- 1½ cup buttermilk
- 3 tablespoons butter melted
- 3 tablespoons honey
- 1 tablespoon salt
- 6½ cups all-purpose flour plus additional if needed
Instructions
- In a small bowl, dissolve the yeast in the warm water. Add the sugar and allow the mixture to sit and get foamy (about 5 minutes).
- In the bowl of a stand mixer with the dough hook, combine 3 cups of flour, the foamy yeast mixture, buttermilk, butter, honey, and salt. Mix in an additional 3 cups of flour and mix until the dough forms a softball. Turn the dough out onto a lightly floured surface and knead by hand until the dough is smooth and elastic. *Note - You may need to work in the remaining ½ cup flour if the dough is extremely sticky.
- Spray the inside of the bowl lightly with olive oil spray. Return the dough to the bowl and spray the top lightly with olive oil. Cover the bowl with plastic wrap and place the bowl in a warm, draft-free place until the dough has doubled in bulk (approximately 1 hour).
- Turn the risen dough out onto a lightly floured surface and divide the dough in half. Working on a baking sheet that has been lined with parchment paper, press half of the dough out to form a slightly oblong oval (approximately 1" thick) in the center of the baking sheet. This is the base for Santa's face.
- Cut off approximately ⅓ of the remaining dough ball and form a modified "U" shape which will form Santa's beard. Make sure to leave more dough at the bottom of the shape and taper it on each side. Use water to adhere the beard to Santa's face, pulling and patting until you get your desired shape.
- Cut off another piece of dough from the remaining ball and form it into a slight boomerang shape. This will be Santa's hat. Adhere the hat onto the top of Santa's face using water and pressing and pulling it into your desired shape. *Note - I pulled and pushed the dough for Santa's hat down on the right side at a jaunty angle.
- Cut another piece of dough from the remaining piece and form a long, modified triangle shape. This will be the trim on Santa's hat. Adhere the trim to the hat using water and pressing it into place. With the remaining dough, pinch or cut off pieces that will form 2 sides of Santa's mustache, 1 nose, 2 cheeks, two eyes, holly leaves and berries (if desired), and the ball at the end of Santa's hat. Attach all the elements with water.
- Use a very sharp paring knife to cut slits in Santa's beard, and also to add details to the holly berries. *Note - It's easier to make several shallow cuts than one deep one. The deeper cut shallow cuts, the more the details will show after the second rise and bake.
- Place the completed Santa in a warm, draft-free place to rise a second time (approximately 45 minutes). Once risen, preheat oven to 375 degrees and bake Santa in a preheated oven for 35-40 minutes, or until he's golden brown and sounds hollow when tapped.
- Cool Santa completely. If adding color, mix a small drop of each of the colors with about 1 tablespoon of water. Use a clean paintbrush to lightly brush color onto Santa's hat, beard, eyes, cheeks and nose, and holly berries. If you'd like a deeper color, add two or more coats, drying in-between each coat.
- Serve and enjoy!!!
Notes
Tools and equipment;
Stand mixer or large bowl with a wooden spoon, baking sheet, parchment, paper, water for joining dough pieces, olive oil spray, plastic wrap, red gel food color,
green gel food color, black gel food color, white gel food color (found online or at craft stores)
green gel food color, black gel food color, white gel food color (found online or at craft stores)
Nutrition
Serving: 1serving | Calories: 231kcal | Carbohydrates: 43g | Protein: 6g | Fat: 3g | Saturated Fat: 1g | Cholesterol: 8mg | Sodium: 480mg | Potassium: 88mg | Fiber: 1g | Sugar: 4g | Vitamin A: 105IU | Calcium: 34mg | Iron: 2.4mg
